| .. | ||
| image | ||
| include | ||
| jerry_app | ||
| source | ||
| README.md | ||
| setup.py | ||
About Curie BSP port
Intel® Curie BSP is the SDK that will help you developing software on Curie based boards, for example with the Arduino 101 board (AKA Genuino 101).
This folder contains necessary files to integrate JerryScript with Intel® Curie BSP, so that JavaScript can run on Arduino 101 board (AKA Genuino 101).
How to build
1. Preface
Curie BSP only support Ubuntu GNU/Linux as host OS envirenment.
Necessary hardwares
2. Prepare Curie BSP
You can refer to a detailed document Curie BSP. But, we summary the main steps below:
1. Get repo:
mkdir ~/bin
wget http://commondatastorage.googleapis.com/git-repo-downloads/repo -O ~/bin/repo
chmod a+x ~/bin/repo
2. In ~/.bashrc add:
PATH=$PATH:~/bin
3. Create your directory for CurieBSP (eg. Curie_BSP):
mkdir Curie_BSP && cd $_
4. Initialize your repo:
repo init -u https://github.com/CurieBSP/manifest
5. Download the sources files:
repo sync -j 5 -d
6. Get toolchain (compilation/debug):
Download issm-toolchain-linux-2016-05-12.tar.gz, and uncompress it.
TOOLCHAIN_DIR environment variable needs to match the toolchain destination folder
You can use the command:export TOOLCHAIN_DIR='path to files of the toolchain'
Or you can just uncompress the toolchain tarball and copy the contents (licensing readme.txt tools version.txt) into wearable_device_sw/external/toolchain.
7. Get BLE firmware:
Download curie-ble-v3.1.1.tar.gz and uncompress the retrieved package into wearable_device_sw/packages folder
You will first register in the web page. Then you will receive an email where is a download link. Click the link in the mail, choose the curie-ble-v3.1.1.tar.gz (118 KB) and download.
8. Get tools to flash the device:
https://01.org/android-ia/downloads/intel-platform-flash-tool-lite
3. Build JerryScript and Curie BSP
1. Generate makefiles
Run the Python script setup.py in jerryscript/targets/curie_bsp/ with the full path or relative path of the Curie_BSP:
python setup.py <path of Curie_BSP>
2. One time setup. It will check/download/install the necessary tools, and must be run only once.
In the directory Curie_BSP
make -C wearable_device_sw/projects/curie_bsp_jerry/ one_time_setup
3. In the directory Curie_BSP
mkdir out && cd $_
make -f ../wearable_device_sw/projects/curie_bsp_jerry/Makefile setup
make image
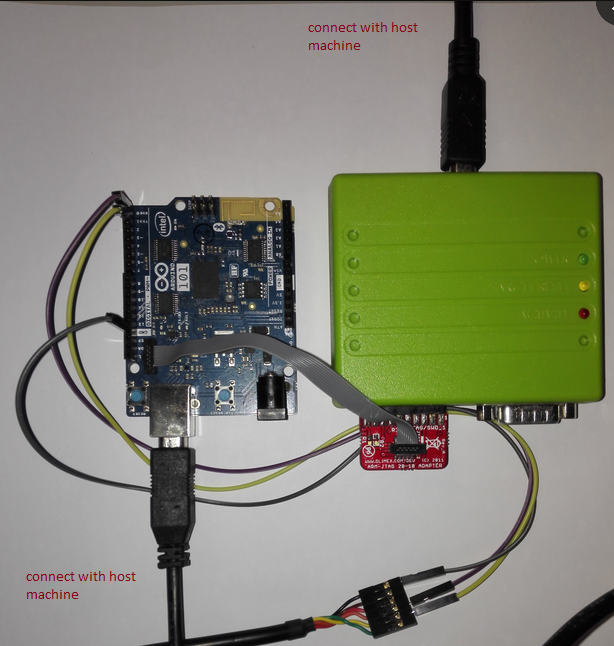
4. Connect JTAG Debugger and TTL Serial Cable to Arduino 101 as below:
5. Flash the firmware
make flash FLASH_CONFIG=jtag_full
4. Serial terminal
Assume the serial port is ttyUSB0 in /dev directory, we can type command screen ttyUSB0 115200 to open a serial terminal.
After the board boot successfully, you should see something like this:
Quark SE ID 16 Rev 0 A0
ARC Core state: 0000400
BOOT TARGET: 0
  6135|QRK| CFW| INFO| GPIO service init in progress..
  6307|ARC|MAIN| INFO| BSP init done
  6315|ARC| CFW| INFO| ADC service init in progress..
  6315|ARC| CFW| INFO| GPIO service init in progress...
  6315|ARC| CFW| INFO| GPIO service init in progress...
  6315|ARC|MAIN| INFO| CFW init done
To test the JavaScript command, you should add characters js e to the beginning of the JavaScript command, like this:
js e print ('Hello World!');
It is the uart command format of Curie BSP. js is cmd group, e is cmd name, which is short for eval, and print ('Hello World!'); is the cmd parameters, which is the JavaScript code we want to run.
You can see the result through the screen:
js e print ('Hello World!');js e 1 ACK
Hello World!
undefined
js e 1 OK
js e 1 ACK and js e 1 OK are debug info of Curie BSP uart commands, which mean it receive and execute the command sucessfully. Hello World! is the printed content. undefined is the return value of the statement print ('Hello World!').