61 KiB
#http #web #hacking source
Today, the majority of the applications we use constantly interact with the internet, both web and mobile applications. Most internet communications are made with web requests through the HTTP protocol. HTTP is an application-level protocol used to access the World Wide Web resources. The term hypertext stands for text containing links to other resources and text that the readers can easily interpret.
HTTP communication consists of a client and a server, where the client requests the server for a resource. The server processes the requests and returns the requested resource. The default port for HTTP communication is port 80, though this can be changed to any other port, depending on the web server configuration. The same requests are utilized when we use the internet to visit different websites. We enter a Fully Qualified Domain Name (FQDN) as a Uniform Resource Locator (URL) to reach the desired website, like www.hackthebox.com.
URL
Resources over HTTP are accessed via a URL, which offers many more specifications than simply specifying a website we want to visit. Let's look at the structure of a URL: 
Here is what each component stands for:
| Component | Example | Description |
|---|---|---|
Scheme |
http:// https:// |
This is used to identify the protocol being accessed by the client, and ends with a colon and a double slash (://) |
User Info |
admin:password@ |
This is an optional component that contains the credentials (separated by a colon :) used to authenticate to the host, and is separated from the host with an at sign (@) |
Host |
inlanefreight.com |
The host signifies the resource location. This can be a hostname or an IP address |
Port |
:80 |
The Port is separated from the Host by a colon (:). If no port is specified, http schemes default to port 80 and https default to port 443 |
Path |
/dashboard.php |
This points to the resource being accessed, which can be a file or a folder. If there is no path specified, the server returns the default index (e.g. index.html). |
Query String |
?login=true |
The query string starts with a question mark (?), and consists of a parameter (e.g. login) and a value (e.g. true). Multiple parameters can be separated by an ampersand (&). |
Fragments |
#status |
Fragments are processed by the browsers on the client-side to locate sections within the primary resource (e.g. a header or section on the page). |
Not all components are required to access a resource. The main mandatory fields are the scheme and the host, without which the request would have no resource to request.
HTTP Flow

The diagram above presents the anatomy of an HTTP request at a very high level. The first time a user enters the URL (inlanefreight.com) into the browser, it sends a request to a DNS (Domain Name Resolution) server to resolve the domain and get its IP. The DNS server looks up the IP address for inlanefreight.com and returns it. All domain names need to be resolved this way, as a server can't communicate without an IP address.
Note: Our browsers usually first look up records in the local '/etc/hosts' file, and if the requested domain does not exist within it, then they would contact other DNS servers. We can use the '/etc/hosts' to manually add records to for DNS resolution, by adding the IP followed by the domain name.
Once the browser gets the IP address linked to the requested domain, it sends a GET request to the default HTTP port (e.g. 80), asking for the root / path. Then, the web server receives the request and processes it. By default, servers are configured to return an index file when a request for / is received.
In this case, the contents of index.html are read and returned by the web server as an HTTP response. The response also contains the status code (e.g. 200 OK), which indicates that the request was successfully processed. The web browser then renders the index.html contents and presents it to the user.
Note: This module is mainly focused on HTTP web requests. For more on HTML and web applications, you may refer to the Introduction to Web Applications module.
#cURL
In this module, we will be sending web requests through two of the most important tools for any web penetration tester, a Web Browser, like Chrome or Firefox, and the cURL command line tool.
cURL (client URL) is a command-line tool and library that primarily supports HTTP along with many other protocols. This makes it a good candidate for scripts as well as automation, making it essential for sending various types of web requests from the command line, which is necessary for many types of web penetration tests.
We can send a basic HTTP request to any URL by using it as an argument for cURL, as follows:
tr01ax@htb[/htb]$ curl inlanefreight.com

<!DOCTYPE HTML PUBLIC "-//IETF//DTD HTML 2.0//EN">
<html><head>
...SNIP...
We see that cURL does not render the HTML/JavaScript/CSS code, unlike a web browser, but prints it in its raw format. However, as penetration testers, we are mainly interested in the request and response context, which usually becomes much faster and more convenient than a web browser.
We may also use cURL to download a page or a file and output the content into a file using the -O flag. If we want to specify the output file name, we can use the -o flag and specify the name. Otherwise, we can use -O and cURL will use the remote file name, as follows:
tr01ax@htb[/htb]$ curl -O inlanefreight.com/index.html
tr01ax@htb[/htb]$ ls
index.html
As we can see, the output was not printed this time but rather saved into index.html. We noticed that cURL still printed some status while processing the request. We can silent the status with the -s flag, as follows:
tr01ax@htb[/htb]$ curl -s -O inlanefreight.com/index.html
This time, cURL did not print anything, as the output was saved into the index.html file. Finally, we may use the -h flag to see what other options we may use with cURL:
tr01ax@htb[/htb]$ curl -h
Usage: curl [options...] <url>
 -d, --data <data>   HTTP POST data
 -h, --help <category> Get help for commands
 -i, --include       Include protocol response headers in the output
 -o, --output <file> Write to file instead of stdout
 -O, --remote-name   Write output to a file named as the remote file
 -s, --silent        Silent mode
 -u, --user <user:password> Server user and password
 -A, --user-agent <name> Send User-Agent <name> to server
 -v, --verbose       Make the operation more talkative

This is not the full help, this menu is stripped into categories.
Use "--help category" to get an overview of all categories.
Use the user manual `man curl` or the "--help all" flag for all options.
As the above message mentions, we may use --help all to print a more detailed help menu, or --help category (e.g. -h http) to print the detailed help of a specific flag. If we ever need to read more detailed documentation, we can use man curl to view the full cURL manual page.
In the upcoming sections, we will cover most of the above flags and see where we should use each of them.#https #web #hacking source
In the previous section, we discussed how HTTP requests are sent and processed. However, one of the significant drawbacks of HTTP is that all data is transferred in clear-text. This means that anyone between the source and destination can perform a Man-in-the-middle (MiTM) attack to view the transferred data.
To counter this issue, the HTTPS (HTTP Secure) protocol was created, in which all communications are transferred in an encrypted format, so even if a third party does intercept the request, they would not be able to extract the data out of it. For this reason, HTTPS has become the mainstream scheme for websites on the internet, and HTTP is being phased out, and soon most web browsers will not allow visiting HTTP websites.
HTTPS Overview
If we examine an HTTP request, we can see the effect of not enforcing secure communications between a web browser and a web application. For example, the following is the content of an HTTP login request: 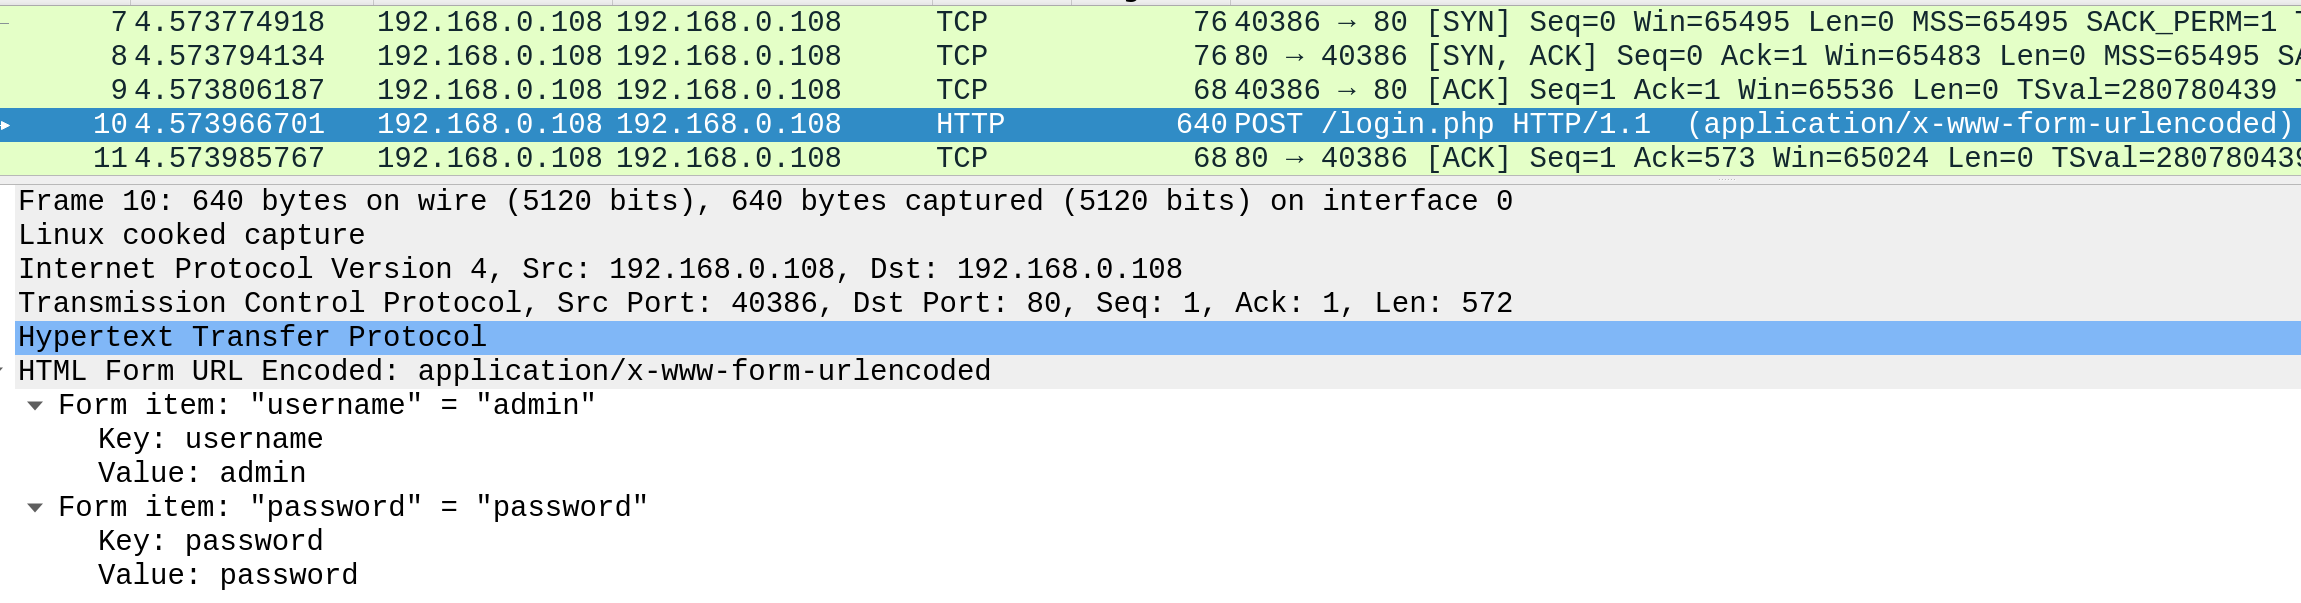
We can see that the login credentials can be viewed in clear-text. This would make it easy for someone on the same network (such as a public wireless network) to capture the request and reuse the credentials for malicious purposes.
In contrast, when someone intercepts and analyzes traffic from an HTTPS request, they would see something like the following: 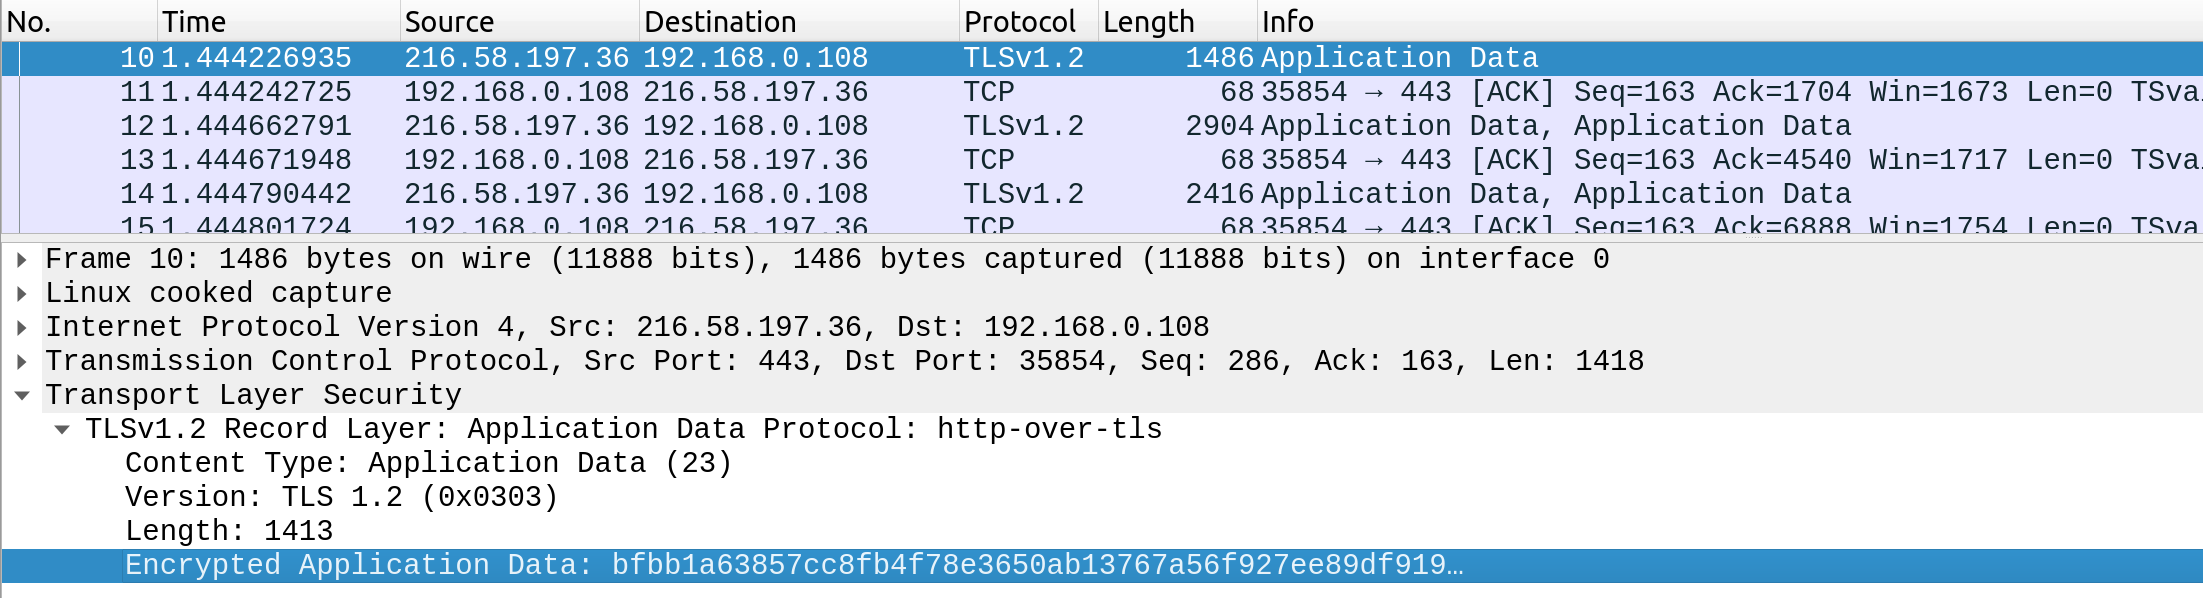
As we can see, the data is transferred as a single encrypted stream, which makes it very difficult for anyone to capture information such as credentials or any other sensitive data.
Websites that enforce HTTPS can be identified through https:// in their URL (e.g. https://www.google.com), as well as the lock icon in the address bar of the web browser, to the left of the URL: 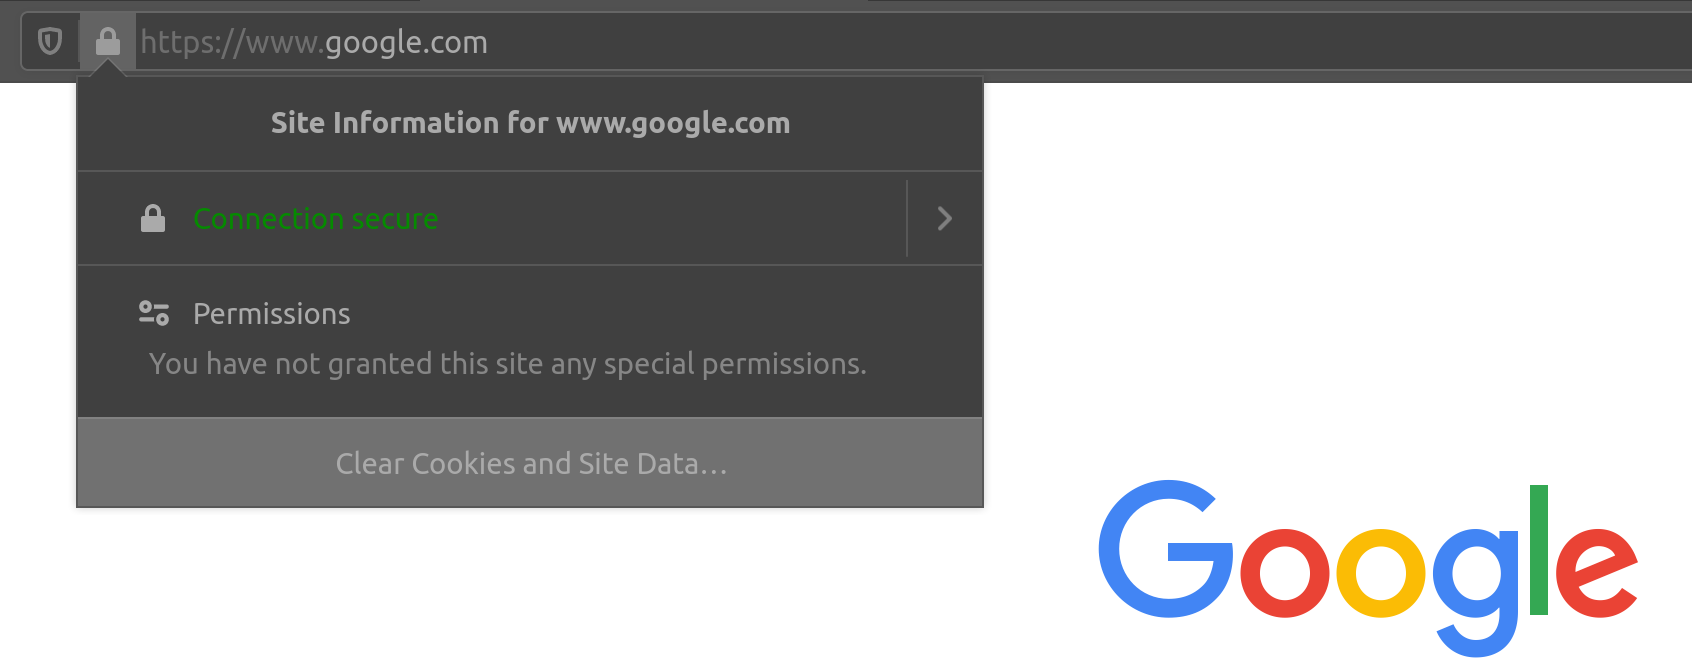
So, if we visit a website that utilizes HTTPS, like Google, all traffic would be encrypted.
Note: Although the data transferred through the HTTPS protocol may be encrypted, the request may still reveal the visited URL if it contacted a clear-text DNS server. For this reason, it is recommended to utilize encrypted DNS servers (e.g. 8.8.8.8 or 1.1.1.1), or utilize a VPN service to ensure all traffic is properly encrypted.
HTTPS Flow
Let's look at how HTTPS operates at a high level: 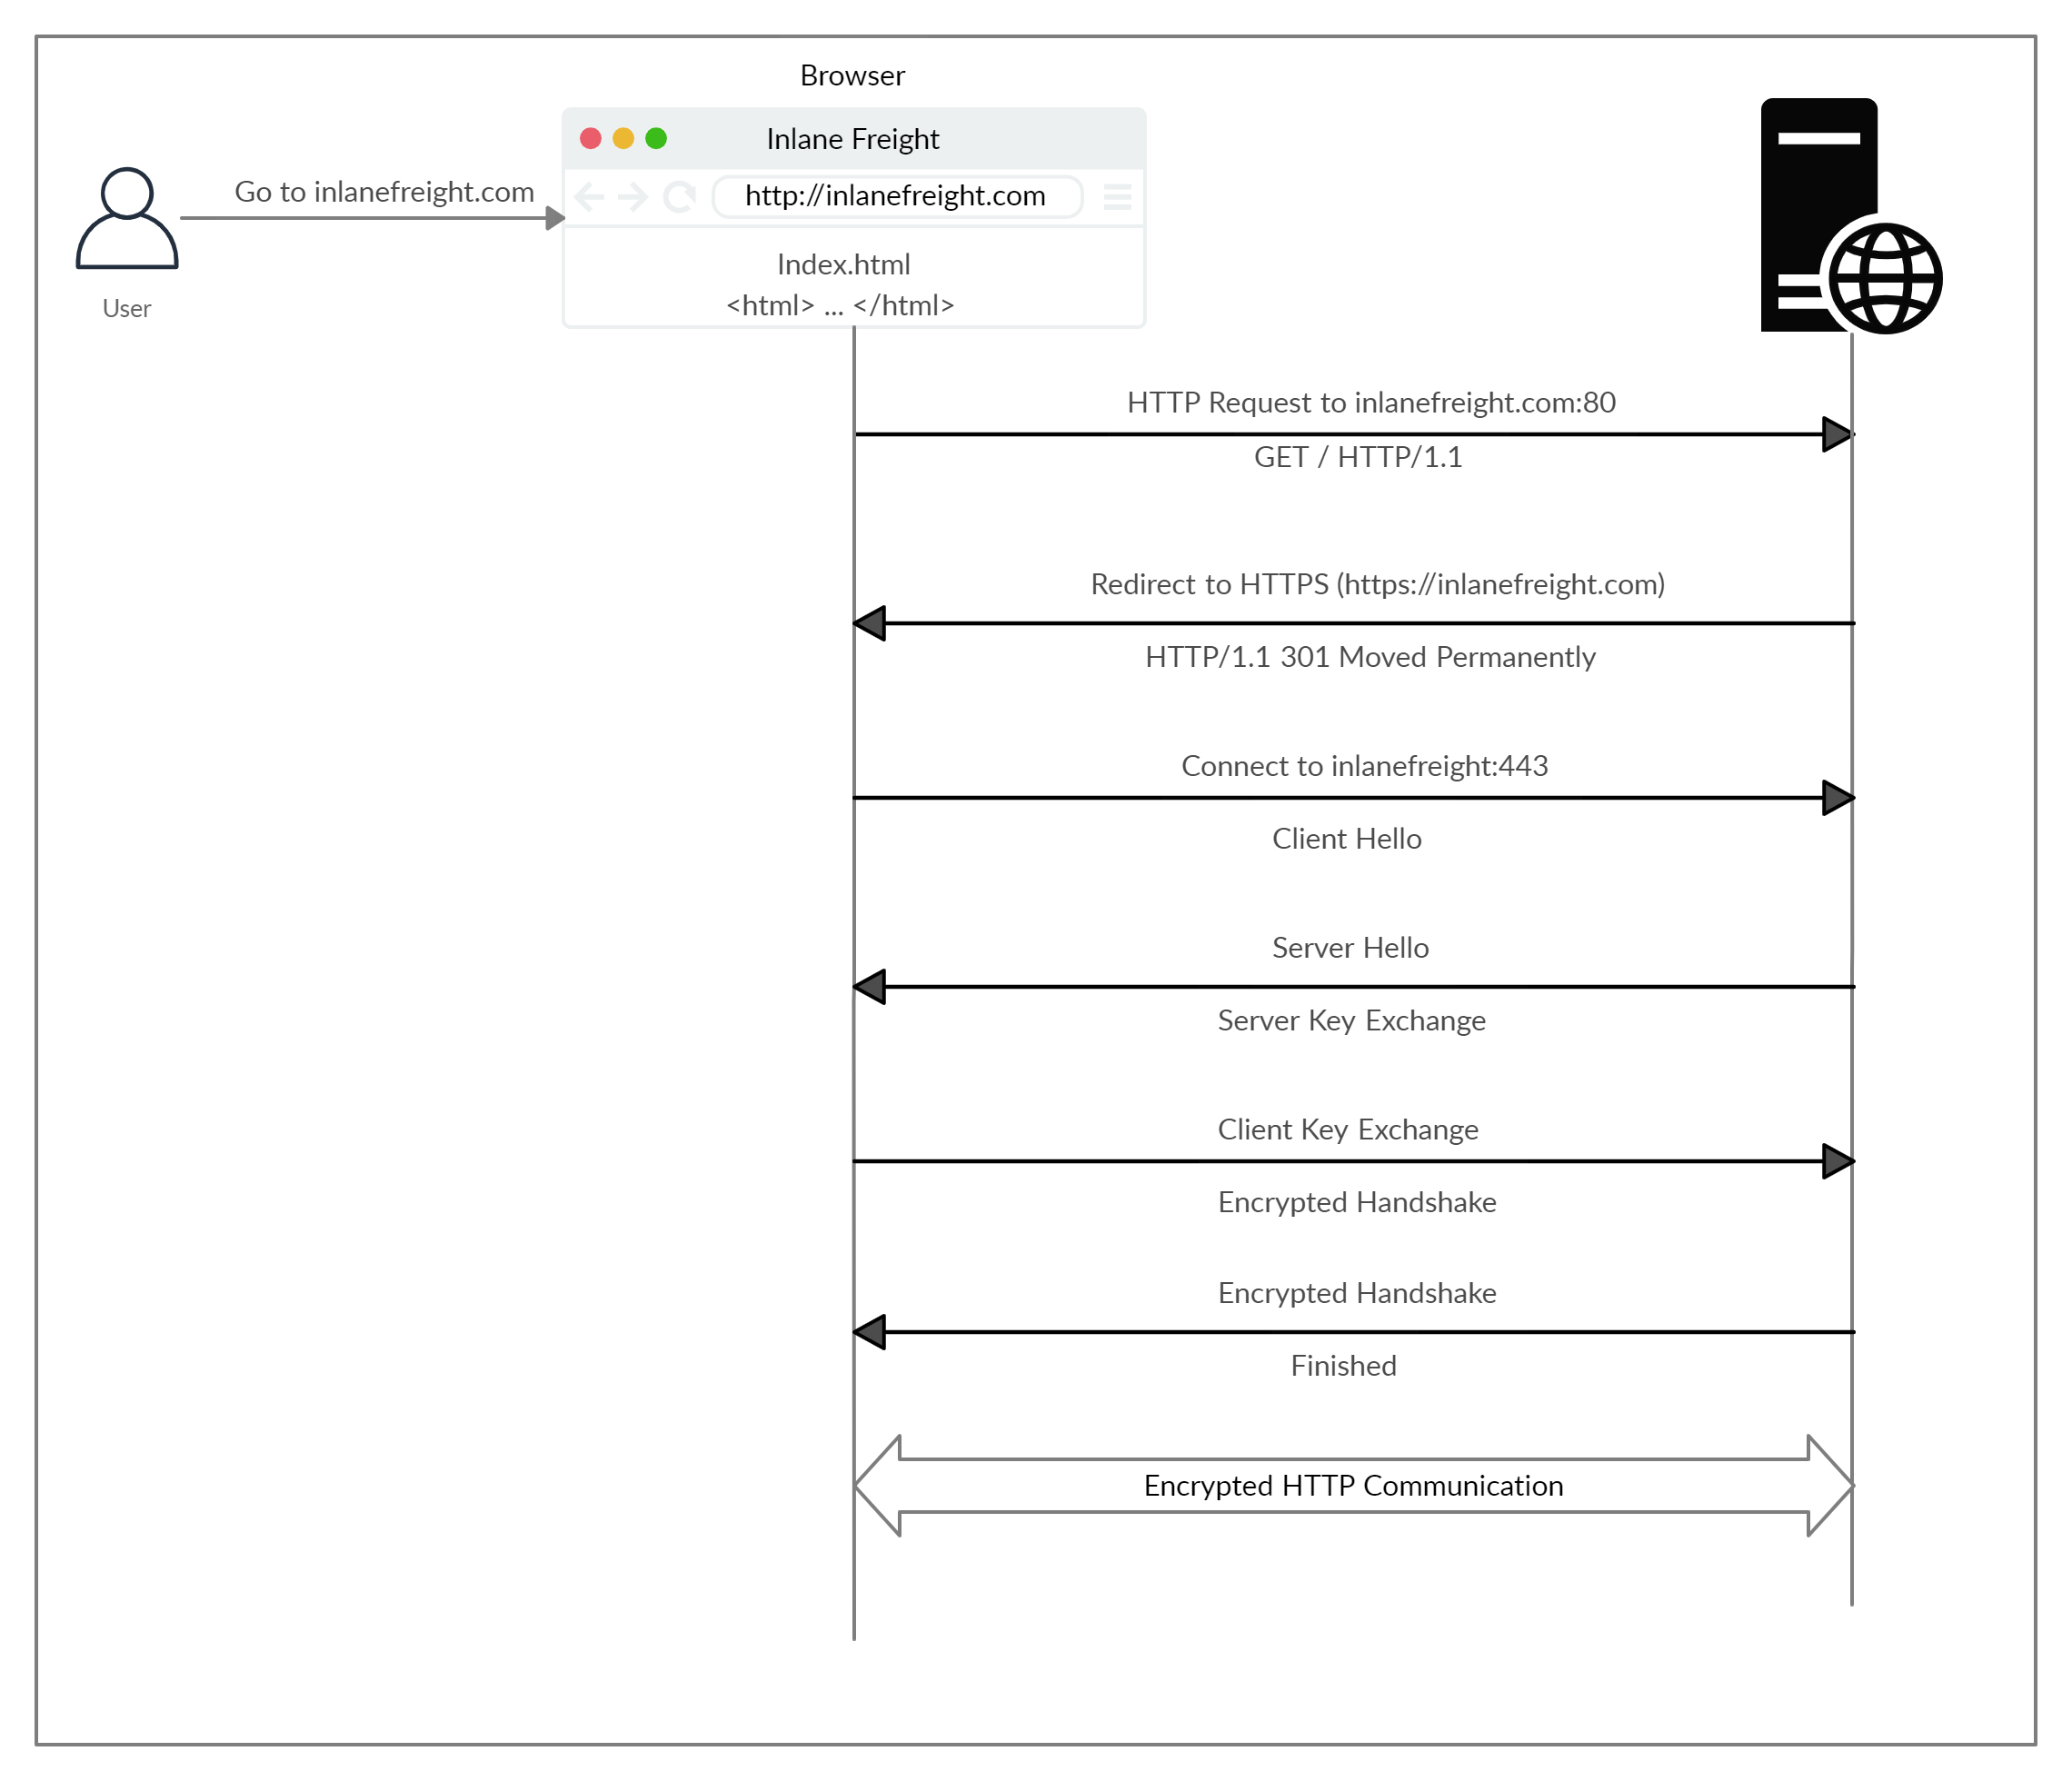
If we type http:// instead of https:// to visit a website that enforces HTTPS, the browser attempts to resolve the domain and redirects the user to the webserver hosting the target website. A request is sent to port 80 first, which is the unencrypted HTTP protocol. The server detects this and redirects the client to secure HTTPS port 443 instead. This is done via the 301 Moved Permanently response code, which we will discuss in an upcoming section.
Next, the client (web browser) sends a "client hello" packet, giving information about itself. After this, the server replies with "server hello", followed by a key exchange to exchange SSL certificates. The client verifies the key/certificate and sends one of its own. After this, an encrypted handshake is initiated to confirm whether the encryption and transfer are working correctly.
Once the handshake completes successfully, normal HTTP communication is continued, which is encrypted after that. This is a very high-level overview of the key exchange, which is beyond this module's scope.
Note: Depending on the circumstances, an attacker may be able to perform an HTTP downgrade attack, which downgrades HTTPS communication to HTTP, making the data transferred in clear-text. This is done by setting up a Man-In-The-Middle (MITM) proxy to transfer all traffic through the attacker's host without the user's knowledge. However, most modern browsers, servers, and web applications protect against this attack.
cURL for HTTPS
cURL should automatically handle all HTTPS communication standards and perform a secure handshake and then encrypt and decrypt data automatically. However, if we ever contact a website with an invalid SSL certificate or an outdated one, then cURL by default would not proceed with the communication to protect against the earlier mentioned MITM attacks:
tr01ax@htb[/htb]$ curl https://inlanefreight.com

curl: (60) SSL certificate problem: Invalid certificate chain
More details here: https://curl.haxx.se/docs/sslcerts.html
...SNIP...
Modern web browsers would do the same, warning the user against visiting a website with an invalid SSL certificate.
We may face such an issue when testing a local web application or with a web application hosted for practice purposes, as such web applications may not yet have implemented a valid SSL certificate. To skip the certificate check with cURL, we can use the -k flag:
tr01ax@htb[/htb]$ curl -k https://inlanefreight.com

<!DOCTYPE HTML PUBLIC "-//IETF//DTD HTML 2.0//EN">
<html><head>
...SNIP...
As we can see, the request went through this time, and we received the response data.#http #web #hacking source
HTTP communications mainly consist of an HTTP request and an HTTP response. An HTTP request is made by the client (e.g. cURL/browser), and is processed by the server (e.g. web server). The requests contain all of the details we require from the server, including the resource (e.g. URL, path, parameters), any request data, headers or options we specify, and many other options we will discuss throughout this module.
Once the server receives the HTTP request, it processes it and responds by sending the HTTP response, which contains the response code, as discussed in a later section, and may contain the resource data if the requester has access to it.
HTTP Request
Let's start by examining the following example HTTP request:
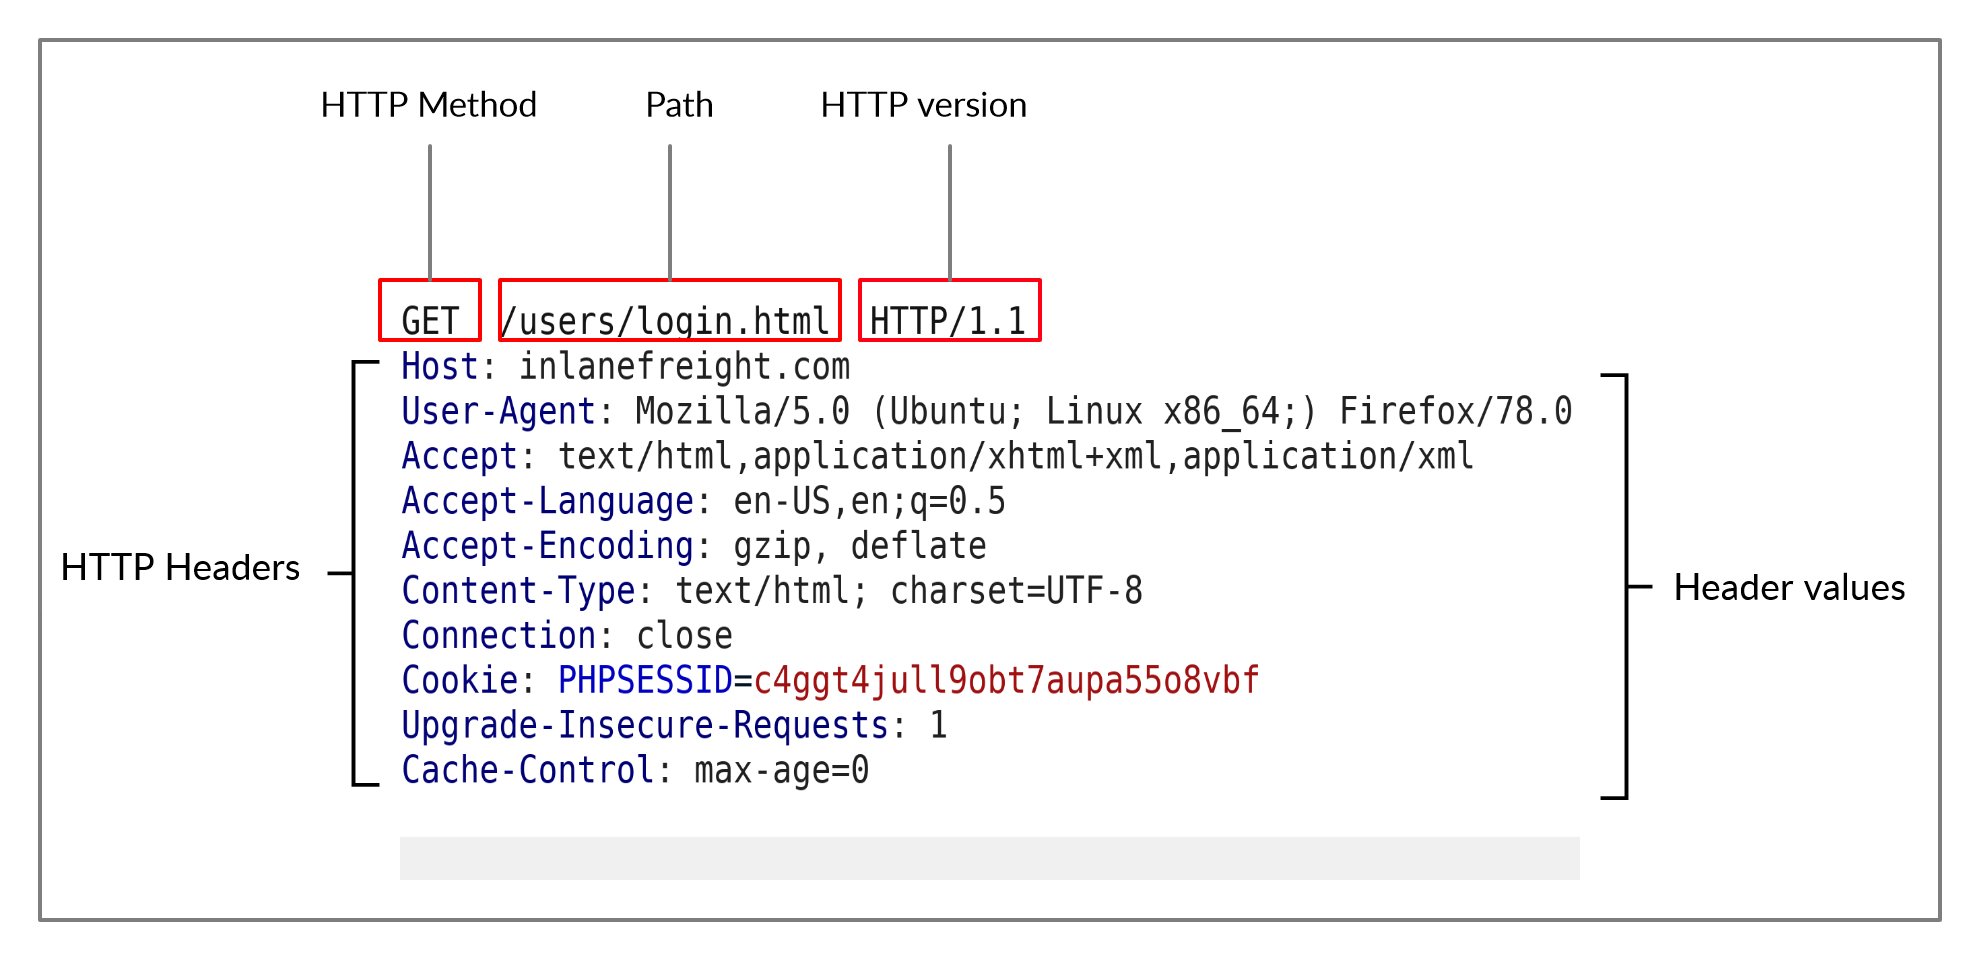
The image above shows an HTTP GET request to the URL:
http://inlanefreight.com/users/login.html
The first line of any HTTP request contains three main fields 'separated by spaces':
| Field | Example | Description |
|---|---|---|
Method |
GET |
The HTTP method or verb, which specifies the type of action to perform. |
Path |
/users/login.html |
The path to the resource being accessed. This field can also be suffixed with a query string (e.g. ?username=user). |
Version |
HTTP/1.1 |
The third and final field is used to denote the HTTP version. |
The next set of lines contain HTTP header value pairs, like Host, User-Agent, Cookie, and many other possible headers. These headers are used to specify various attributes of a request. The headers are terminated with a new line, which is necessary for the server to validate the request. Finally, a request may end with the request body and data.
Note: HTTP version 1.X sends requests as clear-text, and uses a new-line character to separate different fields and different requests. HTTP version 2.X, on the other hand, sends requests as binary data in a dictionary form.
HTTP Response
Once the server processes our request, it sends its response. The following is an example HTTP response:
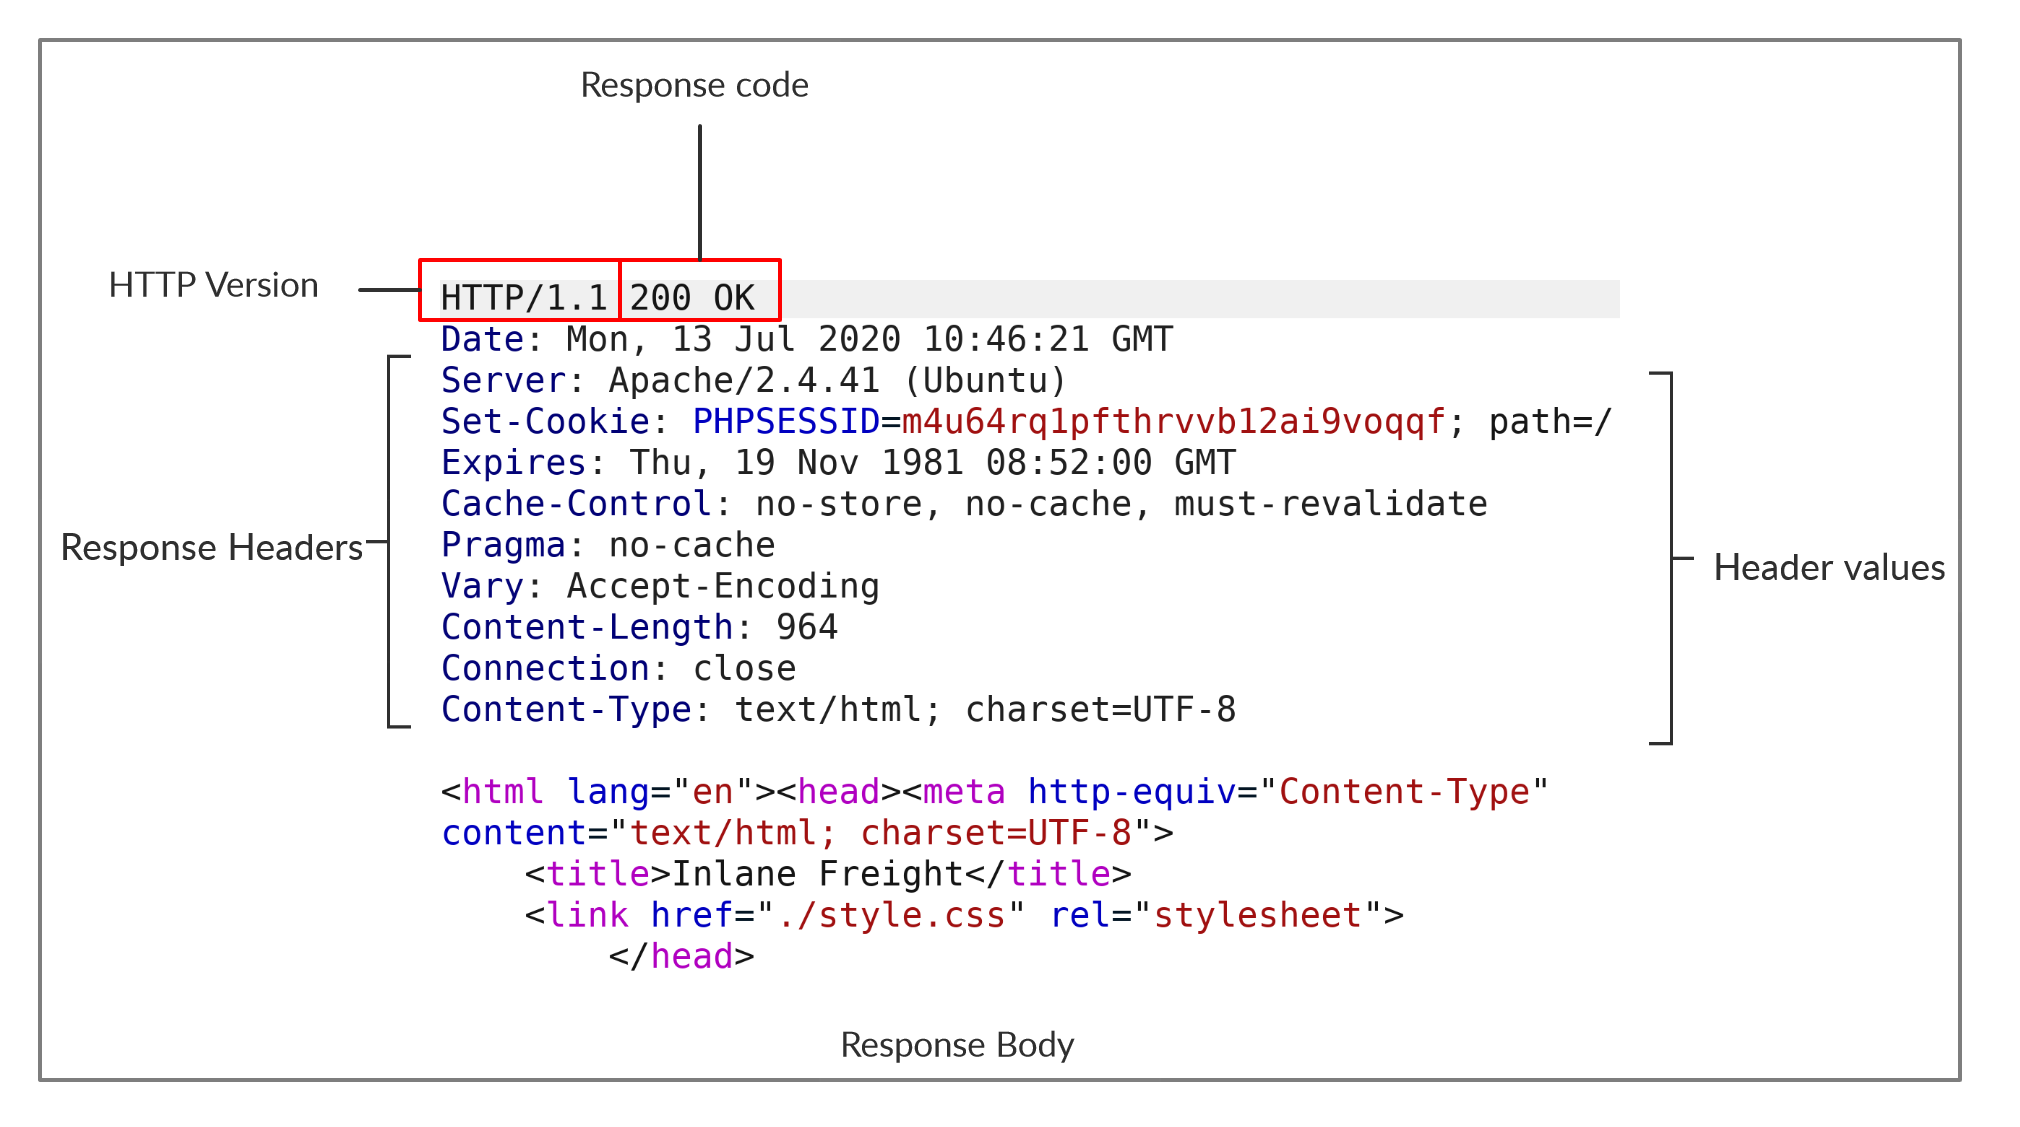
The first line of an HTTP response contains two fields separated by spaces. The first being the HTTP version (e.g. HTTP/1.1), and the second denotes the HTTP response code (e.g. 200 OK).
Response codes are used to determine the request's status, as will be discussed in a later section. After the first line, the response lists its headers, similar to an HTTP request. Both request and response headers are discussed in the next section.
Finally, the response may end with a response body, which is separated by a new line after the headers. The response body is usually defined as HTML code. However, it can also respond with other code types such as JSON, website resources such as images, style sheets or scripts, or even a document such as a PDF document hosted on the webserver.
cURL
In our earlier examples with cURL, we only specified the URL and got the response body in return. However, cURL also allows us to preview the full HTTP request and the full HTTP response, which can become very handy when performing web penetration tests or writing exploits. To view the full HTTP request and response, we can simply add the -v verbose flag to our earlier commands, and it should print both the request and response:
tr01ax@htb[/htb]$ curl inlanefreight.com -v

*   Trying SERVER_IP:80...
* TCP_NODELAY set
* Connected to inlanefreight.com (SERVER_IP) port 80 (#0)
> GET / HTTP/1.1
> Host: inlanefreight.com
> User-Agent: curl/7.65.3
> Accept: */*
> Connection: close
>
* Mark bundle as not supporting multiuse
< HTTP/1.1 401 Unauthorized
< Date: Tue, 21 Jul 2020 05:20:15 GMT
< Server: Apache/X.Y.ZZ (Ubuntu)
< WWW-Authenticate: Basic realm="Restricted Content"
< Content-Length: 464
< Content-Type: text/html; charset=iso-8859-1
<
<!DOCTYPE HTML PUBLIC "-//IETF//DTD HTML 2.0//EN">
<html><head>

...SNIP...
As we can see, this time, we get the full HTTP request and response. The request simply sent GET / HTTP/1.1 along with the Host, User-Agent and Accept headers. In return, the HTTP response contained the HTTP/1.1 401 Unauthorized, which indicates that we do not have access over the requested resource, as we will see in an upcoming section. Similar to the request, the response also contained several headers sent by the server, including Date, Content-Length, and Content-Type. Finally, the response contained the response body in HTML, which is the same one we received earlier when using cURL without the -v flag.
Exercise: The -vvv flag shows an even more verbose output. Try to use this flag to see what extra request and response details get displayed with it.
Browser DevTools
Most modern web browsers come with built-in developer tools (DevTools), which are mainly intended for developers to test their web applications. However, as web penetration testers, these tools can be a vital asset in any web assessment we perform, as a browser (and its DevTools) are among the assets we are most likely to have in every web assessment exercise. In this module, we will also discuss how to utilize some of the basic browser devtools to assess and monitor different types of web requests.
Whenever we visit any website or access any web application, our browser sends multiple web requests and handles multiple HTTP responses to render the final view we see in the browser window. To open the browser devtools in either Chrome or Firefox, we can click [CTRL+SHIFT+I] or simply click [F12]. The devtools contain multiple tabs, each of which has its own use. We will mostly be focusing on the Network tab in this module, as it is responsible for web requests.
If we click on the Network tab and refresh the page, we should be able to see the list of requests sent by the page: 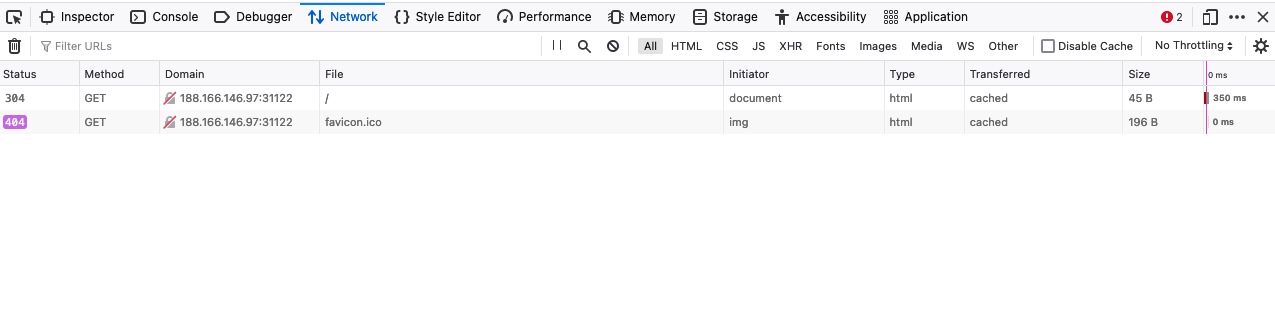
As we can see, the devtools show us at a glance the response status (i.e. response code), the request method used (GET), the requested resource (i.e. URL/domain), along with the requested path. Furthermore, we can use Filter URLs to search for a specific request, in case the website loads too many to go through.
Exercise: Try clicking on any of the requests to view their details. You can then click on the Response tab to view the response body, and then click on the Raw button to view the raw (unrendered) source code of the response body.#http #headers #hacking #web
source
We have seen examples of HTTP requests and response headers in the previous section. Such HTTP headers pass information between the client and the server. Some headers are only used with either requests or responses, while some other general headers are common to both.
Headers can have one or multiple values, appended after the header name and separated by a colon. We can divide headers into the following categories:
General HeadersEntity HeadersRequest HeadersResponse HeadersSecurity Headers
Let's discuss each of these categories.
General Headers
General headers are used in both HTTP requests and responses. They are contextual and are used to describe the message rather than its contents.
| Header | Example | Description |
|---|---|---|
Date |
Date: Wed, 16 Feb 2022 10:38:44 GMT |
Holds the date and time at which the message originated. It's preferred to convert the time to the standard UTC time zone. |
Connection |
Connection: close |
Dictates if the current network connection should stay alive after the request finishes. Two commonly used values for this header are close and keep-alive. The close value from either the client or server means that they would like to terminate the connection, while the keep-alive header indicates that the connection should remain open to receive more data and input. |
Entity Headers
Similar to general headers, Entity Headers can be common to both the request and response. These headers are used to describe the content (entity) transferred by a message. They are usually found in responses and POST or PUT requests.
| Header | Example | Description |
|---|---|---|
Content-Type |
Content-Type: text/html |
Used to describe the type of resource being transferred. The value is automatically added by the browsers on the client-side and returned in the server response. The charset field denotes the encoding standard, such as UTF-8. |
Media-Type |
Media-Type: application/pdf |
The media-type is similar to Content-Type, and describes the data being transferred. This header can play a crucial role in making the server interpret our input. The charset field may also be used with this header. |
Boundary |
boundary="b4e4fbd93540" |
Acts as a marker to separate content when there is more than one in the same message. For example, within a form data, this boundary gets used as --b4e4fbd93540 to separate different parts of the form. |
Content-Length |
Content-Length: 385 |
Holds the size of the entity being passed. This header is necessary as the server uses it to read data from the message body, and is automatically generated by the browser and tools like cURL. |
Content-Encoding |
Content-Encoding: gzip |
Data can undergo multiple transformations before being passed. For example, large amounts of data can be compressed to reduce the message size. The type of encoding being used should be specified using the Content-Encoding header. |
Request Headers
The client sends Request Headers in an HTTP transaction. These headers are used in an HTTP request and do not relate to the content of the message. The following headers are commonly seen in HTTP requests.
| Header | Example | Description |
|---|---|---|
Host |
Host: www.inlanefreight.com |
Used to specify the host being queried for the resource. This can be a domain name or an IP address. HTTP servers can be configured to host different websites, which are revealed based on the hostname. This makes the host header an important enumeration target, as it can indicate the existence of other hosts on the target server. |
User-Agent |
User-Agent: curl/7.77.0 |
The User-Agent header is used to describe the client requesting resources. This header can reveal a lot about the client, such as the browser, its version, and the operating system. |
Referer |
Referer: http://www.inlanefreight.com/ |
Denotes where the current request is coming from. For example, clicking a link from Google search results would make https://google.com the referer. Trusting this header can be dangerous as it can be easily manipulated, leading to unintended consequences. |
Accept |
Accept: */* |
The Accept header describes which media types the client can understand. It can contain multiple media types separated by commas. The */* value signifies that all media types are accepted. |
Cookie |
Cookie: PHPSESSID=b4e4fbd93540 |
Contains cookie-value pairs in the format name=value. A cookie is a piece of data stored on the client-side and on the server, which acts as an identifier. These are passed to the server per request, thus maintaining the client's access. Cookies can also serve other purposes, such as saving user preferences or session tracking. There can be multiple cookies in a single header separated by a semi-colon. |
Authorization |
Authorization: BASIC cGFzc3dvcmQK |
Another method for the server to identify clients. After successful authentication, the server returns a token unique to the client. Unlike cookies, tokens are stored only on the client-side and retrieved by the server per request. There are multiple types of authentication types based on the webserver and application type used. |
A complete list of request headers and their usage can be found here.
Response Headers
Response Headers can be used in an HTTP response and do not relate to the content. Certain response headers such as Age, Location, and Server are used to provide more context about the response. The following headers are commonly seen in HTTP responses.
| Header | Example | Description |
|---|---|---|
Server |
Server: Apache/2.2.14 (Win32) |
Contains information about the HTTP server, which processed the request. It can be used to gain information about the server, such as its version, and enumerate it further. |
Set-Cookie |
Set-Cookie: PHPSESSID=b4e4fbd93540 |
Contains the cookies needed for client identification. Browsers parse the cookies and store them for future requests. This header follows the same format as the Cookie request header. |
WWW-Authenticate |
WWW-Authenticate: BASIC realm="localhost" |
Notifies the client about the type of authentication required to access the requested resource. |
Security Headers
Finally, we have Security Headers. With the increase in the variety of browsers and web-based attacks, defining certain headers that enhanced security was necessary. HTTP Security headers are a class of response headers used to specify certain rules and policies to be followed by the browser while accessing the website.
| Header | Example | Description |
|---|---|---|
Content-Security-Policy |
Content-Security-Policy: script-src 'self' |
Dictates the website's policy towards externally injected resources. This could be JavaScript code as well as script resources. This header instructs the browser to accept resources only from certain trusted domains, hence preventing attacks such as Cross-site scripting (XSS). |
Strict-Transport-Security |
Strict-Transport-Security: max-age=31536000 |
Prevents the browser from accessing the website over the plaintext HTTP protocol, and forces all communication to be carried over the secure HTTPS protocol. This prevents attackers from sniffing web traffic and accessing protected information such as passwords or other sensitive data. |
Referrer-Policy |
Referrer-Policy: origin |
Dictates whether the browser should include the value specified via the Referer header or not. It can help in avoiding disclosing sensitive URLs and information while browsing the website. |
Note: This section only mentions a small subset of commonly seen HTTP headers. There are many other contextual headers that can be used in HTTP communications. It's also possible for applications to define custom headers based on their requirements. A complete list of standard HTTP headers can be found here.
cURL
In the previous section, we saw how using the -v flag with cURL shows us the full details of the HTTP request and response. If we were only interested in seeing the response headers, then we can use the -I flag to send a HEAD request and only display the response headers. Furthermore, we can use the -i flag to display both the headers and the response body (e.g. HTML code). The difference between the two is that -I sends a HEAD request (as will see in the next section), while -i sends any request we specify and prints the headers as well.
The following command shows an example output of using the -I flag:
tr01ax@htb[/htb]$ curl -I https://www.inlanefreight.com

Host: www.inlanefreight.com
User-Agent: Mozilla/5.0 (Macintosh; Intel Mac OS X 10_14_5) AppleWebKit/605.1.15 (KHTML, like Gecko)
Cookie: cookie1=298zf09hf012fh2; cookie2=u32t4o3tb3gg4
Accept: text/plain
Referer: https://www.inlanefreight.com/
Authorization: BASIC cGFzc3dvcmQK

Date: Sun, 06 Aug 2020 08:49:37 GMT
Connection: keep-alive
Content-Length: 26012
Content-Type: text/html; charset=ISO-8859-4
Content-Encoding: gzip
Server: Apache/2.2.14 (Win32)
Set-Cookie: name1=value1,name2=value2; Expires=Wed, 09 Jun 2021 10:18:14 GMT
WWW-Authenticate: BASIC realm="localhost"
Content-Security-Policy: script-src 'self'
Strict-Transport-Security: max-age=31536000
Referrer-Policy: origin
Exercise: Try to go through all of the above headers, and see whether you can recall the usage for each of them.
In addition to viewing headers, cURL also allows us to set request headers with the -H flag, as we will see in a later section. Some headers, like the User-Agent or Cookie headers, have their own flags. For example, we can use the -A to set our User-Agent, as follows:
tr01ax@htb[/htb]$ curl https://www.inlanefreight.com -A 'Mozilla/5.0'

<!DOCTYPE HTML PUBLIC "-//IETF//DTD HTML 2.0//EN">
<html><head>
...SNIP...
Exercise: Try to use the -I or the -v flags with the above example, to ensure that we did change our User-Agent with the -A flag.
Browser DevTools
Finally, let's see how we can preview the HTTP headers using the browser devtools. Just as we did in the previous section, we can go to the Network tab to view the different requests made by the page. We can click on any of the requests to view its details: 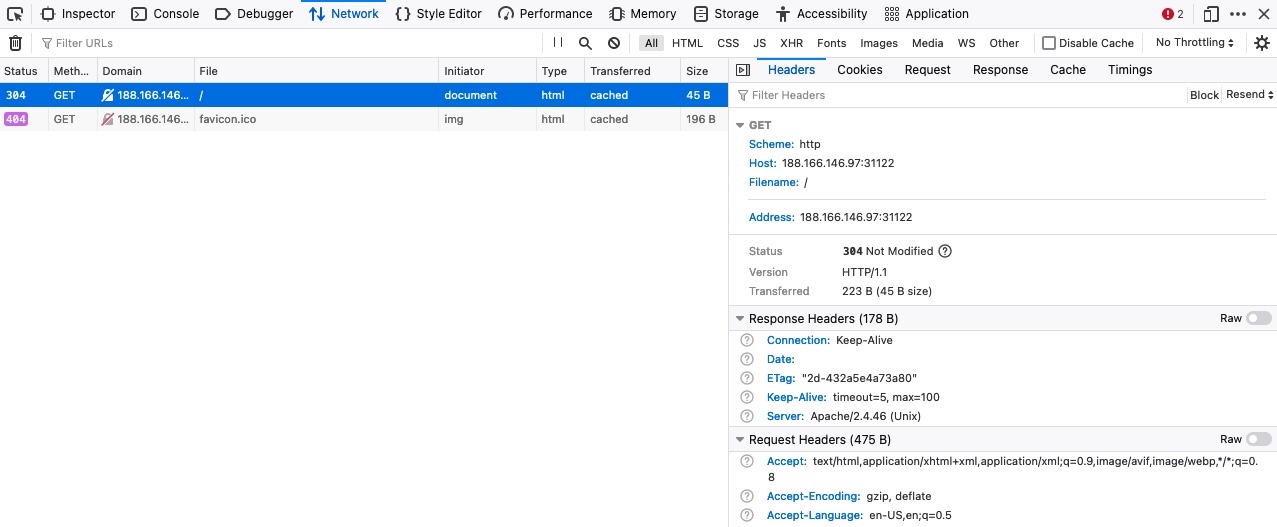
In the first Headers tab, we see both the HTTP request and HTTP response headers. The devtools automatically arrange the headers into sections, but we can click on the Raw button to view their details in their raw format. Furthermore, we can check the Cookies tab to see any cookies used by the request, as discussed in an upcoming section.#http #web #hacking
source
HTTP supports multiple methods for accessing a resource. In the HTTP protocol, several request methods allow the browser to send information, forms, or files to the server. These methods are used, among other things, to tell the server how to process the request we send and how to reply.
We saw different HTTP methods used in the HTTP requests we tested in the previous sections. With cURL, if we use -v to preview the full request, the first line contains the HTTP method (e.g. GET / HTTP/1.1), while with browser devtools, the HTTP method is shown in the Method column. Furthermore, the response headers also contain the HTTP response code, which states the status of processing our HTTP request.
Request Methods
The following are some of the commonly used methods:
| Method | Description |
|---|---|
GET |
Requests a specific resource. Additional data can be passed to the server via query strings in the URL (e.g. ?param=value). |
POST |
Sends data to the server. It can handle multiple types of input, such as text, PDFs, and other forms of binary data. This data is appended in the request body present after the headers. The POST method is commonly used when sending information (e.g. forms/logins) or uploading data to a website, such as images or documents. |
HEAD |
Requests the headers that would be returned if a GET request was made to the server. It doesn't return the request body and is usually made to check the response length before downloading resources. |
PUT |
Creates new resources on the server. Allowing this method without proper controls can lead to uploading malicious resources. |
DELETE |
Deletes an existing resource on the webserver. If not properly secured, can lead to Denial of Service (DoS) by deleting critical files on the web server. |
OPTIONS |
Returns information about the server, such as the methods accepted by it. |
PATCH |
Applies partial modifications to the resource at the specified location. |
The list only highlights a few of the most commonly used HTTP methods. The availability of a particular method depends on the server as well as the application configuration. For a full list of HTTP methods, you can visit this link.
Note: Most modern web applications mainly rely on the GET and POST methods. However, any web application that utilizes REST APIs also rely on PUT and DELETE, which are used to update and delete data on the API endpoint, respectively. Refer to the Introduction to Web Applications module for more details.
Response Codes
HTTP status codes are used to tell the client the status of their request. An HTTP server can return five types of response codes:
| Type | Description |
|---|---|
1xx |
Provides information and does not affect the processing of the request. |
2xx |
Returned when a request succeeds. |
3xx |
Returned when the server redirects the client. |
4xx |
Signifies improper requests from the client. For example, requesting a resource that doesn't exist or requesting a bad format. |
5xx |
Returned when there is some problem with the HTTP server itself. |
The following are some of the commonly seen examples from each of the above HTTP method types:
| Code | Description |
|---|---|
200 OK |
Returned on a successful request, and the response body usually contains the requested resource. |
302 Found |
Redirects the client to another URL. For example, redirecting the user to their dashboard after a successful login. |
400 Bad Request |
Returned on encountering malformed requests such as requests with missing line terminators. |
403 Forbidden |
Signifies that the client doesn't have appropriate access to the resource. It can also be returned when the server detects malicious input from the user. |
404 Not Found |
Returned when the client requests a resource that doesn't exist on the server. |
500 Internal Server Error |
Returned when the server cannot process the request. |
For a a full list of standard HTTP response codes, you can visit this link. Apart from the standard HTTP codes, various servers and providers such as Cloudflare or AWS implement their own codes.#http #web #get #hacking source
Whenever we visit any URL, our browsers default to a GET request to obtain the remote resources hosted at that URL. Once the browser receives the initial page it is requesting; it may send other requests using various HTTP methods. This can be observed through the Network tab in the browser devtools, as seen in the previous section.
Exercise: Pick any website of your choosing, and monitor the Network tab in the browser devtools as you visit it to understand what the page is performing. This technique can be used to thoroughly understand how a web application interacts with its backend, which can be an essential exercise for any web application assessment or bug bounty exercise.
HTTP Basic Auth
When we visit the exercise found at the end of this section, it prompts us to enter a username and a password. Unlike the usual login forms, which utilize HTTP parameters to validate the user credentials (e.g. POST request), this type of authentication utilizes a basic HTTP authentication, which is handled directly by the webserver to protect a specific page/directory, without directly interacting with the web application.
To access the page, we have to enter a valid pair of credentials, which are admin:admin in this case:
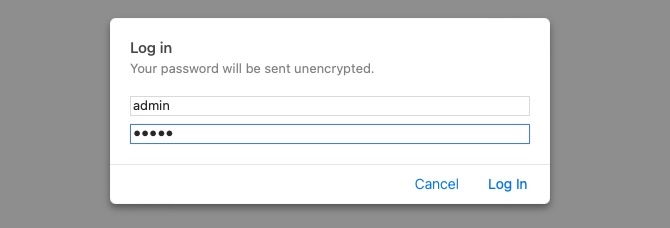
Once we enter the credentials, we would get access to the page:

Let's try to access the page with cURL, and we'll add -i to view the response headers:
tr01ax@htb[/htb]$ curl -i http://<SERVER_IP>:<PORT>/
HTTP/1.1 401 Authorization Required
Date: Mon, 21 Feb 2022 13:11:46 GMT
Server: Apache/2.4.41 (Ubuntu)
Cache-Control: no-cache, must-revalidate, max-age=0
WWW-Authenticate: Basic realm="Access denied"
Content-Length: 13
Content-Type: text/html; charset=UTF-8

Access denied
As we can see, we get Access denied in the response body, and we also get Basic realm="Access denied" in the WWW-Authenticate header, which confirms that this page indeed uses basic HTTP auth, as discussed in the Headers section. To provide the credentials through cURL, we can use the -u flag, as follows:
tr01ax@htb[/htb]$ curl -u admin:admin http://<SERVER_IP>:<PORT>/

<!DOCTYPE html>
<html lang="en">

<head>
...SNIP...
This time we do get the page in the response. There is another method we can provide the basic HTTP auth credentials, which is directly through the URL as (username:password@URL), as we discussed in the first section. If we try the same with cURL or our browser, we do get access to the page as well:
tr01ax@htb[/htb]$ curl http://admin:admin@<SERVER_IP>:<PORT>/

<!DOCTYPE html>
<html lang="en">

<head>
...SNIP...
We may also try visiting the same URL on a browser, and we should get authenticated as well.
Exercise: Try to view the response headers by adding -i to the above request, and see how an authenticated response differs from an unauthenticated one.
HTTP Authorization Header
If we add the -v flag to either of our earlier cURL commands:
tr01ax@htb[/htb]$ curl -v http://admin:admin@<SERVER_IP>:<PORT>/

*   Trying <SERVER_IP>:<PORT>...
* Connected to <SERVER_IP> (<SERVER_IP>) port PORT (#0)
* Server auth using Basic with user 'admin'
> GET / HTTP/1.1
> Host: <SERVER_IP>
> Authorization: Basic YWRtaW46YWRtaW4=
> User-Agent: curl/7.77.0
> Accept: */*
>
* Mark bundle as not supporting multiuse
< HTTP/1.1 200 OK
< Date: Mon, 21 Feb 2022 13:19:57 GMT
< Server: Apache/2.4.41 (Ubuntu)
< Cache-Control: no-store, no-cache, must-revalidate
< Expires: Thu, 19 Nov 1981 08:52:00 GMT
< Pragma: no-cache
< Vary: Accept-Encoding
< Content-Length: 1453
< Content-Type: text/html; charset=UTF-8
<

<!DOCTYPE html>
<html lang="en">

<head>
...SNIP...
As we are using basic HTTP auth, we see that our HTTP request sets the Authorization header to Basic YWRtaW46YWRtaW4=, which is the base64 encoded value of admin:admin. If we were using a modern method of authentication (e.g. JWT), the Authorization would be of type Bearer and would contain a longer encrypted token.
Let's try to manually set the Authorization, without supplying the credentials, to see if it does allow us access to the page. We can set the header with the -H flag, and will use the same value from the above HTTP request. We can add the -H flag multiple times to specify multiple headers:
tr01ax@htb[/htb]$ curl -H 'Authorization: Basic YWRtaW46YWRtaW4=' http://<SERVER_IP>:<PORT>/

<!DOCTYPE html
<html lang="en">

<head>
...SNIP...
As we see, this also gave us access to the page. These are a few methods we can use to authenticate to the page. Most modern web applications use login forms built with the back-end scripting language (e.g. PHP), which utilize HTTP POST requests to authenticate the users and then return a cookie to maintain their authentication.
GET Parameters
Once we are authenticated, we get access to a City Search function, in which we can enter a search term and get a list of matching cities:
As the page returns our results, it may be contacting a remote resource to obtain the information, and then display them on the page. To verify this, we can open the browser devtools and go to the Network tab, or use the shortcut [CTRL+SHIFT+E] to get to the same tab. Before we enter our search term and view the requests, we may need to click on the trash icon on the top left, to ensure we clear any previous requests and only monitor newer requests: 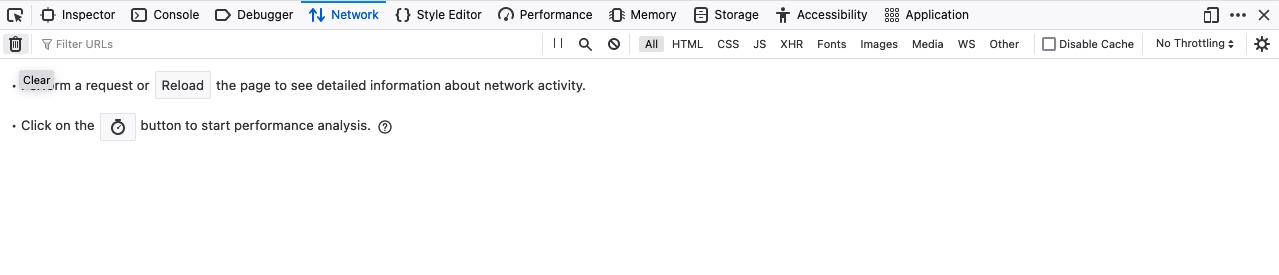
After that, we can enter any search term and hit enter, and we will immediately notice a new request being sent to the backend: 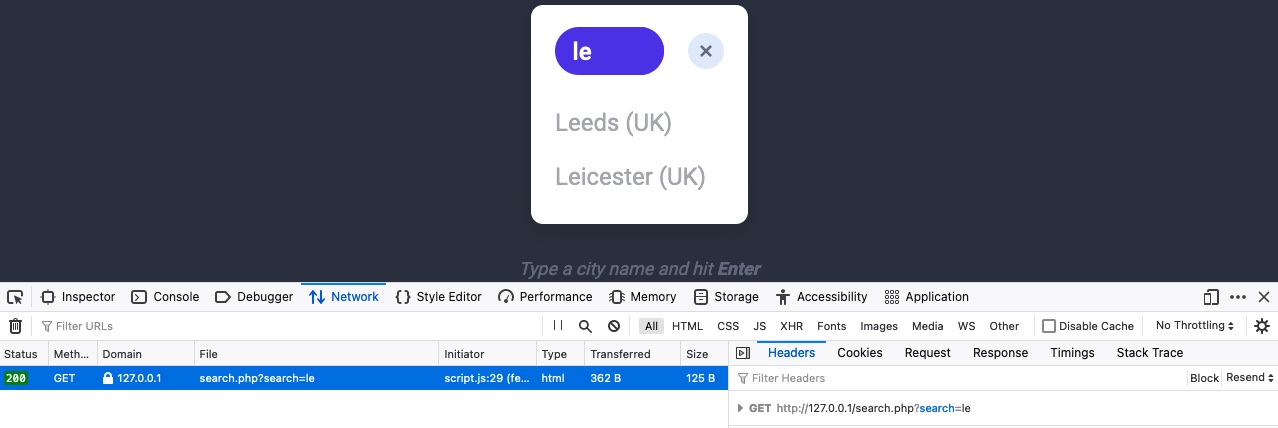
When we click on the request, it gets sent to search.php with the GET parameter search=le used in the URL. This helps us understand that the search function requests another page for the results.
Now, we can send the same request directly to search.php to get the full search results, though it will probably return them in a specific format (e.g. JSON) without having the HTML layout shown in the above screenshot.
To send a GET request with cURL, we can use the exact same URL seen in the above screenshots since GET requests place their parameters in the URL. However, browser devtools provide a more convenient method of obtaining the cURL command. We can right-click on the request and select Copy>Copy as cURL. Then, we can paste the copied command in our terminal and execute it, and we should get the exact same response:
tr01ax@htb[/htb]$ curl 'http://<SERVER_IP>:<PORT>/search.php?search=le' -H 'Authorization: Basic YWRtaW46YWRtaW4='

Leeds (UK)
Leicester (UK)
Note: The copied command will contain all headers used in the HTTP request. However, we can remove most of them and only keep necessary authentication headers, like the Authorization header.
We can also repeat the exact request right within the browser devtools, by selecting Copy>Copy as Fetch. This will copy the same HTTP request using the JavaScript Fetch library. Then, we can go to the JavaScript console tab by clicking [CTRL+SHIFT+K], paste our Fetch command and hit enter to send the request: 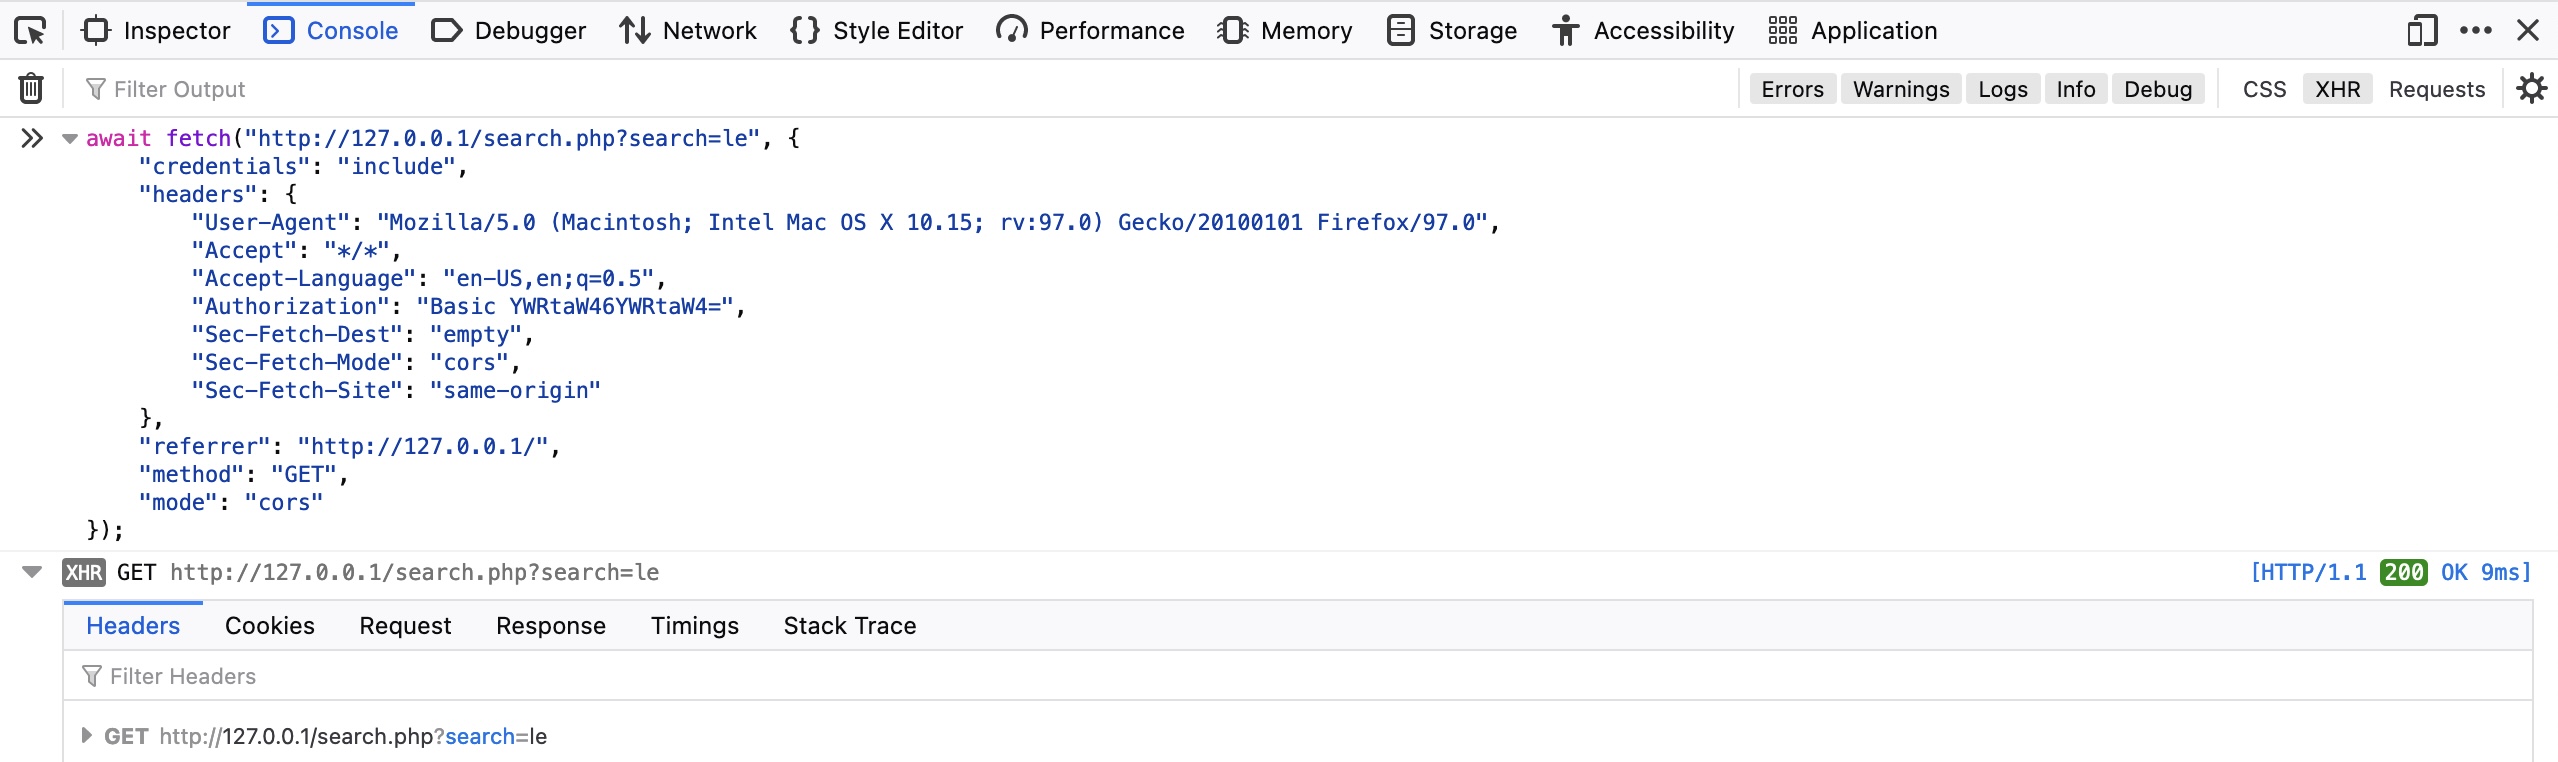
As we see, the browser sent our request, and we can see the response returned after it. We can click on the response to view its details, expand various details, and read them.
Start Instance#web #http #post #hacking source
In the previous section, we saw how GET requests may be used by web applications for functionalities like search and accessing pages. However, whenever web applications need to transfer files or move the user parameters from the URL, they utilize POST requests.
Unlike HTTP GET, which places user parameters within the URL, HTTP POST places user parameters within the HTTP Request body. This has three main benefits:
Lack of Logging: As POST requests may transfer large files (e.g. file upload), it would not be efficient for the server to log all uploaded files as part of the requested URL, as would be the case with a file uploaded through a GET request.Less Encoding Requirements: URLs are designed to be shared, which means they need to conform to characters that can be converted to letters. The POST request places data in the body which can accept binary data. The only characters that need to be encoded are those that are used to separate parameters.More data can be sent: The maximum URL Length varies between browsers (Chrome/Firefox/IE), web servers (IIS, Apache, nginx), Content Delivery Networks (Fastly, Cloudfront, Cloudflare), and even URL Shorteners (bit.ly, amzn.to). Generally speaking, a URL's lengths should be kept to below 2,000 characters, and so they cannot handle a lot of data.
So, let's see some examples of how POST requests work, and how we can utilize tools like cURL or browser devtools to read and send POST requests.
Login Forms
The exercise at the end of this section is similar to the example we saw in the GET section. However, once we visit the web application, we see that it utilizes a PHP login form instead of HTTP basic auth:

If we try to login with admin:admin, we get in and see a similar search function to the one we saw earlier in the GET section:

If we clear the Network tab in our browser devtools and try to log in again, we will see many requests being sent. We can filter the requests by our server IP, so it would only show requests going to the web application's web server (i.e. filter out external requests), and we will notice the following POST request being sent: 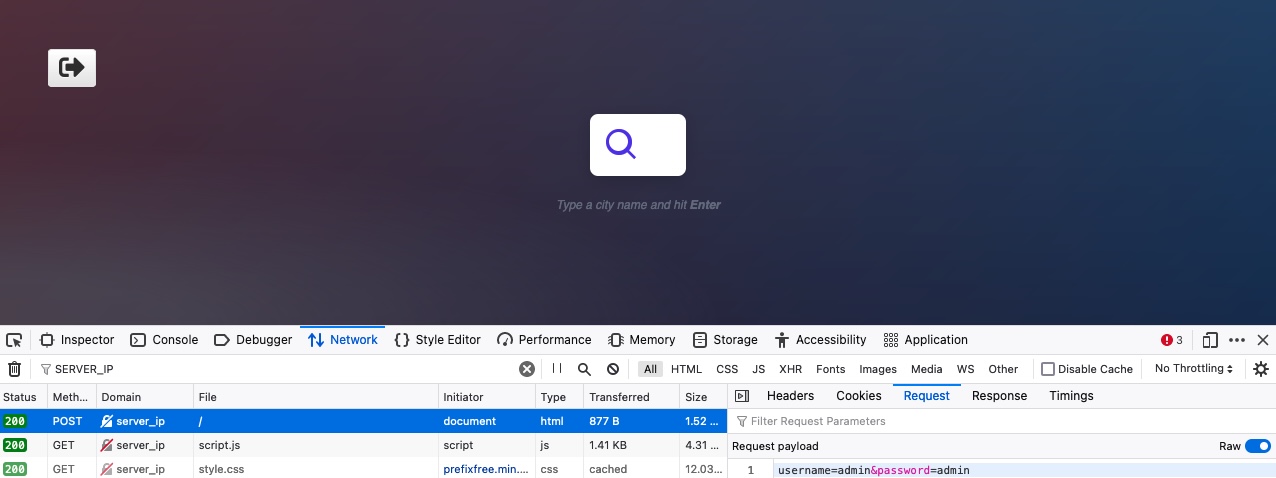
We can click on the request, click on the Request tab (which shows the request body), and then click on the Raw button to show the raw request data. We see the following data is being sent as the POST request data:
Code: bash
username=admin&password=admin
With the request data at hand, we can try to send a similar request with cURL, to see whether this would allow us to login as well. Furthermore, as we did in the previous section, we can simply right-click on the request and select Copy>Copy as cURL. However, it is important to be able to craft POST requests manually, so let's try to do so.
We will use the -X POST flag to send a POST request. Then, to add our POST data, we can use the -d flag and add the above data after it, as follows:
tr01ax@htb[/htb]$ curl -X POST -d 'username=admin&password=admin' http://<SERVER_IP>:<PORT>/

...SNIP...
        <em>Type a city name and hit <strong>Enter</strong></em>
...SNIP...
If we examine the HTML code, we will not see the login form code, but will see the search function code, which indicates that we did indeed get authenticated.
Tip: Many login forms would redirect us to a different page once authenticated (e.g. /dashboard.php). If we want to follow the redirection with cURL, we can use the -L flag.
Authenticated Cookies
If we were successfully authenticated, we should have received a cookie so our browsers can persist our authentication, and we don't need to login every time we visit the page. We can use the -v or -i flags to view the response, which should contain the Set-Cookie header with our authenticated cookie:
tr01ax@htb[/htb]$ curl -X POST -d 'username=admin&password=admin' http://<SERVER_IP>:<PORT>/ -i

HTTP/1.1 200 OK
Date:
Server: Apache/2.4.41 (Ubuntu)
Set-Cookie: PHPSESSID=c1nsa6op7vtk7kdis7bcnbadf1; path=/

...SNIP...
        <em>Type a city name and hit <strong>Enter</strong></em>
...SNIP...
With our authenticated cookie, we should now be able to interact with the web application without needing to provide our credentials every time. To test this, we can set the above cookie with the -b flag in cURL, as follows:
tr01ax@htb[/htb]$ curl -b 'PHPSESSID=c1nsa6op7vtk7kdis7bcnbadf1' http://<SERVER_IP>:<PORT>/

...SNIP...
        <em>Type a city name and hit <strong>Enter</strong></em>
...SNIP...
As we can see, we were indeed authenticated and got to the search function. It is also possible to specify the cookie as a header, as follows:
Code: bash
curl -H 'Cookie: PHPSESSID=c1nsa6op7vtk7kdis7bcnbadf1' http://<SERVER_IP>:<PORT>/
We may also try the same thing with our browsers. Let's first logout, and then we should get back to the login page. Then, we can go to the Storage tab in the devtools with [SHIFT+F9]. In the Storage tab, we can click on Cookies in the left pane and select our website to view our current cookies. We may or may not have existing cookies, but if we were logged out, then our PHP cookie should not be authenticated, which is why if we get the login form and not the search function: 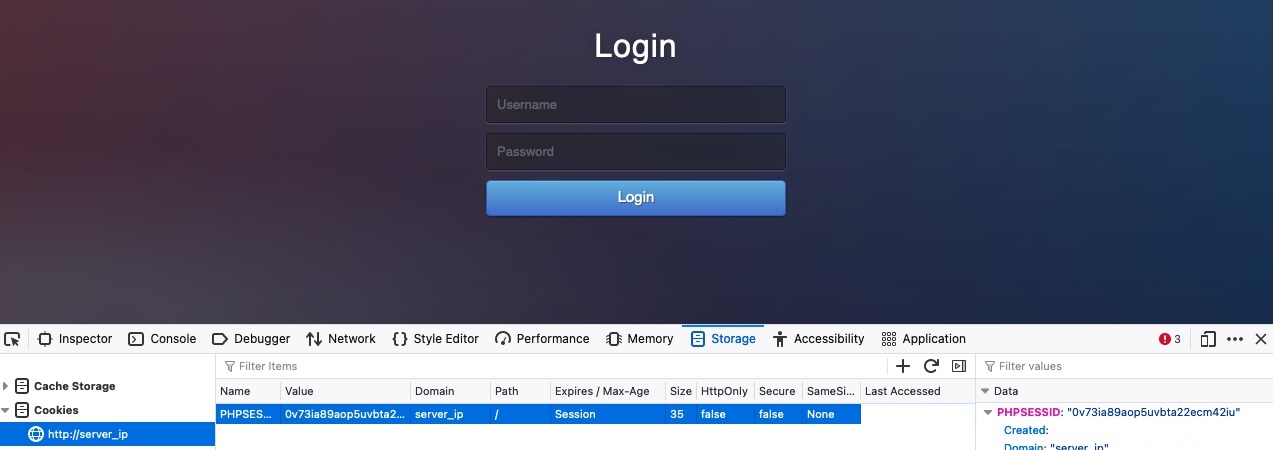
Now, let's try to use our earlier authenticated cookie, and see if we do get in without needing to provide our credentials. To do so, we can simply replace the cookie value with our own. Otherwise, we can right-click on the cookie and select Delete All, and the click on the + icon to add a new cookie. After that, we need to enter the cookie name, which is the part before the = (PHPSESSID), and then the cookie value, which is the part after the = (c1nsa6op7vtk7kdis7bcnbadf1). Then, once our cookie is set, we can refresh the page, and we will see that we do indeed get authenticated without needing to login, simply by using an authenticated cookie: 
As we can see, having a valid cookie may be enough to get authenticated into many web applications. This can be an essential part of some web attacks, like Cross-Site Scripting.
JSON Data
Finally, let's see what requests get sent when we interact with the City Search function. To do so, we will go to the Network tab in the browser devtools, and then click on the trash icon to clear all requests. Then, we can make any search query to see what requests get sent: 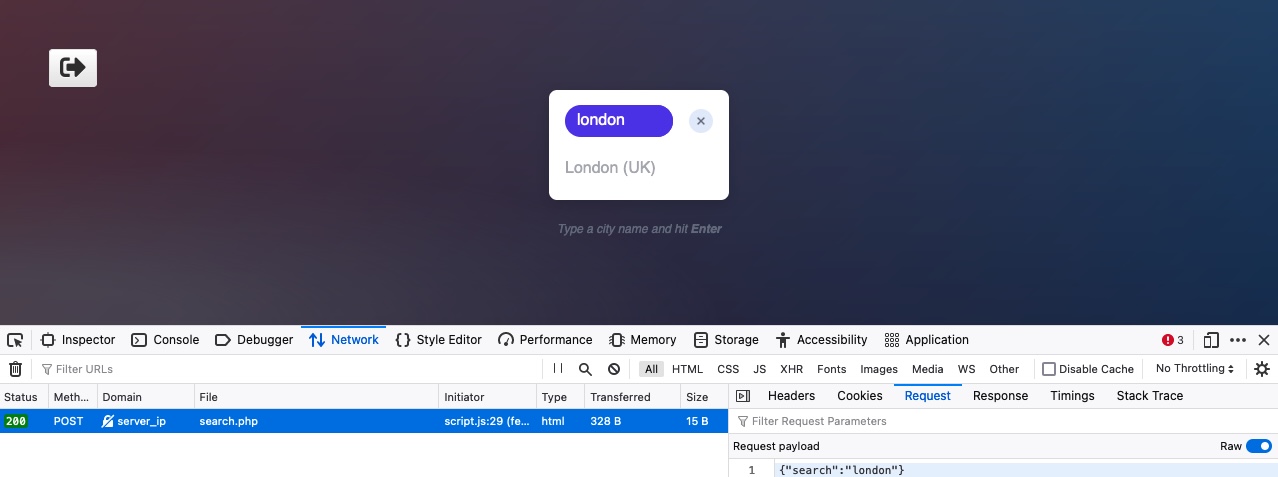
As we can see, the search form sends a POST request to search.php, with the following data:
Code: json
{"search":"london"}
The POST data appear to be in JSON format, so our request must have specified the Content-Type header to be application/json. We can confirm this by right-clicking on the request, and selecting Copy>Copy Request Headers:
Code: bash
POST /search.php HTTP/1.1
Host: server_ip
User-Agent: Mozilla/5.0 (Macintosh; Intel Mac OS X 10.15; rv:97.0) Gecko/20100101 Firefox/97.0
Accept: */*
Accept-Language: en-US,en;q=0.5
Accept-Encoding: gzip, deflate
Referer: http://server_ip/index.php
Content-Type: application/json
Origin: http://server_ip
Content-Length: 19
DNT: 1
Connection: keep-alive
Cookie: PHPSESSID=c1nsa6op7vtk7kdis7bcnbadf1
Indeed, we do have Content-Type: application/json. Let's try to replicate this request as we did earlier, but include both the cookie and content-type headers, and send our request to search.php:
tr01ax@htb[/htb]$ curl -X POST -d '{"search":"london"}' -b 'PHPSESSID=c1nsa6op7vtk7kdis7bcnbadf1' -H 'Content-Type: application/json' http://<SERVER_IP>:<PORT>/search.php
["London (UK)"]
As we can see, we were able to interact with the search function directly without needing to login or interact with the web application front-end. This can be an essential skill when performing web application assessments or bug bounty exercises, as it is much faster to test web applications this way.
Exercise: Try to repeat the above request without adding the cookie or content-type headers, and see how the web app would act differently.
Finally, let's try to repeat the same above request by using Fetch, as we did in the previous section. We can right-click on the request and select Copy>Copy as Fetch, and then go to the Console tab and execute our code there: 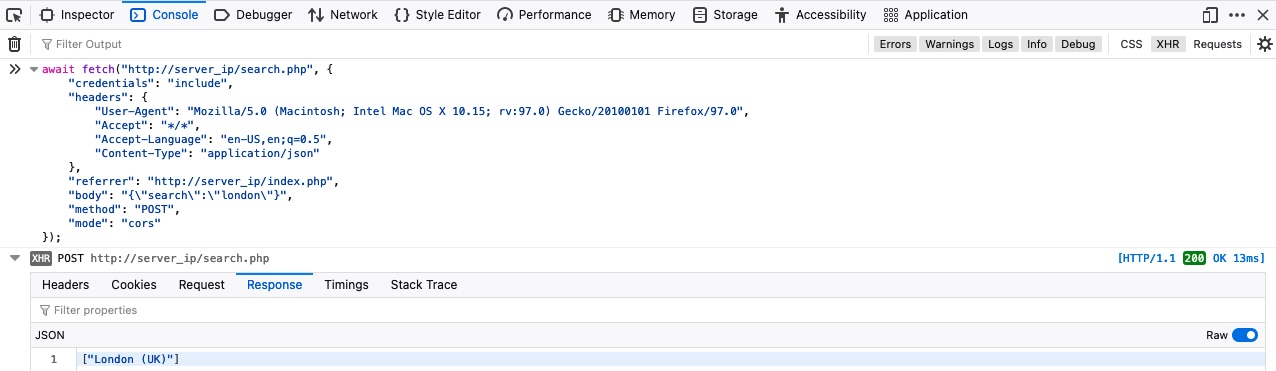
Our request successfully returns the same data we got with cURL. Try to search for different cities by directly interacting with the search.php through Fetch or cURL.#crud #web #http #hacking #api
source
We saw examples of a City Search web application that uses PHP parameters to search for a city name in the previous sections. This section will look at how such a web application may utilize APIs to perform the same thing, and we will directly interact with the API endpoint.
APIs
There are several types of APIs. Many APIs are used to interact with a database, such that we would be able to specify the requested table and the requested row within our API query, and then use an HTTP method to perform the operation needed. For example, for the api.php endpoint in our example, if we wanted to update the city table in the database, and the row we will be updating has a city name of london, then the URL would look something like this:
Code: bash
curl -X PUT http://<SERVER_IP>:<PORT>/api.php/city/london ...SNIP...
CRUD
As we can see, we can easily specify the table and the row we want to perform an operation on through such APIs. Then we may utilize different HTTP methods to perform different operations on that row. In general, APIs perform 4 main operations on the requested database entity:
| Operation | HTTP Method | Description |
|---|---|---|
Create |
POST |
Adds the specified data to the database table |
Read |
GET |
Reads the specified entity from the database table |
Update |
PUT |
Updates the data of the specified database table |
Delete |
DELETE |
Removes the specified row from the database table |
These four operations are mainly linked to the commonly known CRUD APIs, but the same principle is also used in REST APIs and several other types of APIs. Of course, not all APIs work in the same way, and the user access control will limit what actions we can perform and what results we can see. The Introduction to Web Applications module further explains these concepts, so you may refer to it for more details about APIs and their usage.
Read
The first thing we will do when interacting with an API is reading data. As mentioned earlier, we can simply specify the table name after the API (e.g. /city) and then specify our search term (e.g. /london), as follows:
tr01ax@htb[/htb]$ curl http://<SERVER_IP>:<PORT>/api.php/city/london

[{"city_name":"London","country_name":"(UK)"}]
We see that the result is sent as a JSON string. To have it properly formatted in JSON format, we can pipe the output to the jq utility, which will format it properly. We will also silent any unneeded cURL output with -s, as follows:
tr01ax@htb[/htb]$ curl -s http://<SERVER_IP>:<PORT>/api.php/city/london | jq

[
  {
    "city_name": "London",
    "country_name": "(UK)"
  }
]
As we can see, we got the output in a nicely formatted output. We can also provide a search term and get all matching results:
tr01ax@htb[/htb]$ curl -s http://<SERVER_IP>:<PORT>/api.php/city/le | jq

[
  {
    "city_name": "Leeds",
    "country_name": "(UK)"
  },
  {
    "city_name": "Dudley",
    "country_name": "(UK)"
  },
  {
    "city_name": "Leicester",
    "country_name": "(UK)"
  },
  ...SNIP...
]
Finally, we can pass an empty string to retrieve all entries in the table:
tr01ax@htb[/htb]$ curl -s http://<SERVER_IP>:<PORT>/api.php/city/ | jq

[
  {
    "city_name": "London",
    "country_name": "(UK)"
  },
  {
    "city_name": "Birmingham",
    "country_name": "(UK)"
  },
  {
    "city_name": "Leeds",
    "country_name": "(UK)"
  },
  ...SNIP...
]
Try visiting any of the above links using your browser, to see how the result is rendered.
Create
To add a new entry, we can use an HTTP POST request, which is quite similar to what we have performed in the previous section. We can simply POST our JSON data, and it will be added to the table. As this API is using JSON data, we will also set the Content-Type header to JSON, as follows:
tr01ax@htb[/htb]$ curl -X POST http://<SERVER_IP>:<PORT>/api.php/city/ -d '{"city_name":"HTB_City", "country_name":"HTB"}' -H 'Content-Type: application/json'
Now, we can read the content of the city we added (HTB_City), to see if it was successfully added:
tr01ax@htb[/htb]$ curl -s http://<SERVER_IP>:<PORT>/api.php/city/HTB_City | jq

[
  {
    "city_name": "HTB_City",
    "country_name": "HTB"
  }
]
As we can see, a new city was created, which did not exist before.
Exercise: Try adding a new city through the browser devtools, by using one of the Fetch POST requests you used in the previous section.
Update
Now that we know how to read and write entries through APIs, let's start discussing two other HTTP methods we have not used so far: PUT and DELETE. As mentioned at the beginning of the section, PUT is used to update API entries and modify their details, while DELETE is used to remove a specific entity.
Note: The HTTP PATCH method may also be used to update API entries instead of PUT. To be precise, PATCH is used to partially update an entry (only modify some of its data "e.g. only city_name"), while PUT is used to update the entire entry. We may also use the HTTP OPTIONS method to see which of the two is accepted by the server, and then use the appropriate method accordingly. In this section, we will be focusing on the PUT method, though their usage is quite similar.
Using PUT is quite similar to POST in this case, with the only difference being that we have to specify the name of the entity we want to edit in the URL, otherwise the API will not know which entity to edit. So, all we have to do is specify the city name in the URL, change the request method to PUT, and provide the JSON data like we did with POST, as follows:
tr01ax@htb[/htb]$ curl -X PUT http://<SERVER_IP>:<PORT>/api.php/city/london -d '{"city_name":"New_HTB_City", "country_name":"HTB"}' -H 'Content-Type: application/json'
We see in the example above that we first specified /city/london as our city, and passed a JSON string that contained "city_name":"New_HTB_City" in the request data. So, the london city should no longer exist, and a new city with the name New_HTB_City should exist. Let's try reading both to confirm:
tr01ax@htb[/htb]$ curl -s http://<SERVER_IP>:<PORT>/api.php/city/london | jq
tr01ax@htb[/htb]$ curl -s http://<SERVER_IP>:<PORT>/api.php/city/New_HTB_City | jq

[
  {
    "city_name": "New_HTB_City",
    "country_name": "HTB"
  }
]
Indeed, we successfully replaced the old city name with the new city.
Note: In some APIs, the Update operation may be used to create new entries as well. Basically, we would send our data, and if it does not exist, it would create it. For example, in the above example, even if an entry with a london city did not exist, it would create a new entry with the details we passed. In our example, however, this is not the case. Try to update a non-existing city and see what you would get.
DELETE
Finally, let's try to delete a city, which is as easy as reading a city. We simply specify the city name for the API and use the HTTP DELETE method, and it would delete the entry, as follows:
tr01ax@htb[/htb]$ curl -X DELETE http://<SERVER_IP>:<PORT>/api.php/city/New_HTB_City
tr01ax@htb[/htb]$ curl -s http://<SERVER_IP>:<PORT>/api.php/city/New_HTB_City | jq
[]
As we can see, after we deleted New_HTB_City, we get an empty array when we try reading it, meaning it no longer exists.
Exercise: Try to delete any of the cities you added earlier through POST requests, and then read all entries to confirm that they were successfully deleted.
With this, we are able to perform all 4 CRUD operations through cURL. In a real web application, such actions may not be allowed for all users, or it would be considered a vulnerability if anyone can modify or delete any entry. Each user would have certain privileges on what they can read or write, where write refers to adding, modifying, or deleting data. To authenticate our user to use the API, we would need to pass a cookie or an authorization header (e.g. JWT), as we did in an earlier section. Other than that, the operations are similar to what we practiced in this section.